
Installation guide

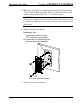
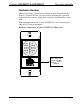

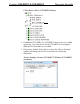
Table Of Contents

Decorator Keypads Crestron C2N-DBF12 & C2N-DBN12
12
•
Decorator Keypads: C2N-DBF/N12 Operations & Installation Guide – DOC. 6200C
Button Replacement
Replacing/changing the removable buttons in a keypad is a simple
process.
1. If the keypad is installed in an electrical box, remove the faceplate
and two 1 inch securing screws and carefully pull the keypad from
the electrical box.
2. Disconnect the Cresnet cable.
3. Remove the four screws that attach the divider, and remove the
divider. Refer to the illustration on page 9 for details.
CAUTION: The removable buttons fit snugly on the rubber
membrane and must be removed carefully to avoid pulling the
membrane from the unit. Once the membrane is detached, it may
not be possible to reattach it.
4. While holding adjacent buttons in place, carefully pull the
button(s) to be replaced from the rubber membrane.
5. Carefully press the replacement button(s) in place and make sure
LED window(s) orientation is correct. Refer to the illustration on
page 9 for correct orientation.
6. Attach the divider using the four screws removed in step 3.
7. Reinstall the keypad in the electrical box. For details refer to
“Assembly and Installation” which starts on page 8.