
Installation guide

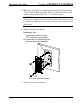
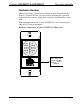

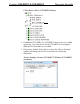
Table Of Contents

Decorator Keypads Crestron C2N-DBF12 & C2N-DBN12
8
•
Decorator Keypads: C2N-DBF/N12 Operations & Installation Guide – DOC. 6200C
Setup
Network Wiring
When wiring the network, consider the following:
• Use Crestron Certified Wire.
• Use Crestron power supplies for Crestron equipment.
• Provide sufficient power to the system.
CAUTION: Insufficient power can lead to unpredictable results
or damage to the equipment. Please use the Crestron Power
Calculator to help calculate how much power is needed for the
system (
www.crestron.com/calculators).
For networks with 20 or more devices, use a Cresnet
®
Hub/Repeater
(CNXHUB) to maintain signal quality.
For more details, refer to “Check Network Wiring” on page 22.
Identity Code
The Net ID of the C2NDBF/N12 has been factory set to 71. The Net IDs
of multiple C2NDBF/N12 devices in the same system must be unique.
Net IDs are changed from a personal computer (PC) via the Crestron
Toolbox
™ (refer to “Establishing Communication” on page 17).
When setting the Net ID, consider the following:
• The Net ID of each unit must match an ID code specified in the
SIMPL Windows program.
• Each network device must have a unique Net ID.
For more details, refer to the Crestron Toolbox help file.
Assembly and Installation
The following tools/hardware are required for installation.
• Cresnet network cable (sold separately)
• Phillips screwdriver (not supplied)
• Two 1 inch pan head Phillips screws (supplied)