Crestron C2N-DBF12 & C2N-DBN12 Decorator Keypads Operations & Installation Guide
This document was prepared and written by the Technical Documentation department at: Regulatory Compliance As of the date of manufacture, the C2N-DBF12 and C2N-DBN12 have been tested and found to comply with specifications for CE marking and standards per EMC and Radiocommunications Compliance Labelling. Federal Communications Commission (FCC) Compliance Statement This device complies with part 15 of the FCC Rules.
Crestron C2N-DBF12 & C2N-DBN12 Decorator Keypads Contents Decorator Keypads: C2N-DBF12 & C2N-DBN12 1 Introduction ............................................................................................................................... 1 Features and Functions ................................................................................................ 1 Specifications ..............................................................................................................
Crestron C2N-DBF12 & C2N-DBN12 Decorator Keypads Decorator Keypads: C2N-DBF12 & C2N-DBN12 Introduction Decorator Keypads provide a cost-effective room control solution for Adagio® and other Crestron® AV distribution systems. The C2N-DBF12 includes a set of 30 assorted button caps labeled for AV source selection and control functions. The C2N-DBN12 complements the C2N-DBF12, adding a set of numeric buttons for direct entry of channels, titles and tracks.
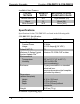
Decorator Keypads Crestron C2N-DBF12 & C2N-DBN12 Available Colors/Textures COLOR/ TEXTURE MODEL # SUFFIX MATCHING LUTRON® FACEPLATE COLOR Almond Smooth Black White Smooth A-S B W-S Light Almond (LA) Black (BL) White (WH) Specifications Specifications for the C2N-DBF/N12 are listed in the following table.
Crestron C2N-DBF12 & C2N-DBN12 Decorator Keypads C2N-DBF/N12 Specifications (Continued) SPECIFICATION Available Models C2N-DBF/N12-A-S C2N-DBF/N12-W-S C2N-DBF/N12B Included Accessories DB12-BTN-A-S3 DB12-BTN-W-S3 DB12-BTNB3 Available Accessories CCR-L-1 CRESNET-HP-NP-TL CRESNET-NP[TL,BK,OR,YL] CRESNET-P[TL,BK,OR,YL] DB12-BTN-A-S DB12-BTN-W-S DB12-BTNB DETAILS 12-Button Decorator Numeric/Function Keypad Almond Smooth White Smooth Black Engravable Button Caps with Default Engraving, Almond, Smooth Engrava
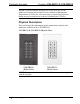
Decorator Keypads Crestron C2N-DBF12 & C2N-DBN12 NOTE: Crestron software and any files on the Web site are for authorized Crestron dealers and Crestron Authorized Independent Programmers (CAIP) only. New users may be required to register to obtain access to certain areas of the site (including the FTP site). Physical Description This section provides information on the connections, controls and indicators available on the C2N-DBF/N12.
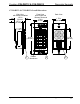
Crestron C2N-DBF12 & C2N-DBN12 Decorator Keypads C2N-DBF12 & C2N-DBN12 Overall Dimensions Side View with Buttons Installed 1.53 in (39 mm) 1.07 in (28 mm) Front View with Divider and Buttons Removed 1.79 in (46 mm) Back View 1.70 in (44 mm) 4.16 in (106 mm) 1 Rubber Membrane Operations & Installation Guide – DOC. 6200C 2.
Crestron C2N-DBF12 & C2N-DBN12 Decorator Keypads Connectors, Controls & Indicators * # CONNECTORS*, CONTROLS & INDICATORS DESCRIPTION 1 Buttons 2 LED Indicators 3 NET* (12) Replaceable pre-labeled buttons, programmable (1 per button) Red LED, programmable and dimmable (1) 4-pin 3.5 mm detachable terminal block; Cresnet slave port, connects to Cresnet control network; 24: Power (24 VDC) Y: Data Z: Data G: Ground Interface connector for NET is provided with the unit.
Crestron C2N-DBF12 & C2N-DBN12 Decorator Keypads The keypads come fully assembled and each has 12 buttons with LED windows (refer to illustration on page 4). The C2N-DBF12 has six source selector buttons, an ON-OFF button, a MUTE button, and device transport control and volume control buttons. A kit with additional source buttons for the C2N-DBF12 is also provided (refer to illustration on page 6). The C2N-DBN12 has a CLEAR button, an ENTER button, and numeric digit buttons 0 through 9.
Decorator Keypads Crestron C2N-DBF12 & C2N-DBN12 Setup Network Wiring When wiring the network, consider the following: • Use Crestron Certified Wire. • Use Crestron power supplies for Crestron equipment. • Provide sufficient power to the system. CAUTION: Insufficient power can lead to unpredictable results or damage to the equipment. Please use the Crestron Power Calculator to help calculate how much power is needed for the system (www.crestron.com/calculators).
Crestron C2N-DBF12 & C2N-DBN12 Decorator Keypads Assemble the keypad as described in the following steps. Refer to the accompanying illustration. 1. Place the removable buttons on the keypad assembly, making sure they are properly oriented with the LED windows facing up. 2. Carefully position the divider over the button caps on the keypad assembly. 3. Install and tighten the four supplied 2-28 x 3/16” screws. 4. Press each button and release to ensure that the button caps move freely.
Crestron C2N-DBF12 & C2N-DBN12 Decorator Keypads 3. Make sure the keypad is oriented properly (note the arrow labeled “TOP” on the keypad assembly), place it in the electrical box, and attach it using the included 6-32 x 1" pan head screws. CAUTION: Excess wire pinched between the keypad and electrical box could cause a short circuit. Make sure all excess wire is completely inside the electrical box and not between the box and the keypad. 4. Attach faceplate (not shown).
Crestron C2N-DBF12 & C2N-DBN12 Decorator Keypads Hardware Hookup Make the necessary connections as called out in the illustration below. Refer to “Network Wiring” on page 8 before attaching the 4-position terminal block connector. Apply power after all connections have been made. When making connections to the C2N-DBF/N12, use Crestron power supplies for Crestron equipment.
Decorator Keypads Crestron C2N-DBF12 & C2N-DBN12 Button Replacement Replacing/changing the removable buttons in a keypad is a simple process. 1. If the keypad is installed in an electrical box, remove the faceplate and two 1 inch securing screws and carefully pull the keypad from the electrical box. 2. Disconnect the Cresnet cable. 3. Remove the four screws that attach the divider, and remove the divider. Refer to the illustration on page 9 for details.
Crestron C2N-DBF12 & C2N-DBN12 Decorator Keypads Programming Software Have a question or comment about Crestron software? Answers to frequently asked questions (FAQs) can be viewed in the Online Help section of the Crestron Web site. To post a question or to view questions submitted to Crestron’s True Blue Support, log in at www.crestron.com/onlinehelp. First-time users must establish a user account to fully benefit from all available features.
Decorator Keypads Crestron C2N-DBF12 & C2N-DBN12 Programming with Crestron SystemBuilder SystemBuilder is a comprehensive programming environment. Appropriate for most systems, it can quickly and easily generate a complete working program including both control processor logic and touch screen graphics. Programming with SIMPL Windows NOTE: While SIMPL Windows can be used to program the C2N-DBF/N12, it is recommended to use SystemBuilder for configuring a system.
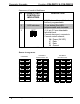
Crestron C2N-DBF12 & C2N-DBN12 Decorator Keypads C2Net-Device, Slot 1 (C2N-DBF12 shown) 2. If additional C2N-DBF12 or C2N-DBN12 devices are to be added, repeat step 1 for each device. Each C2N-DBF/N12 is assigned a different Net ID number as it is added. 3. If necessary, double click a device to open the “Device Settings” window and change the Net ID, as shown in the following illustration. “Device Settings: Crestron C2N-DBF12” Window (C2N-DBN12 not shown) Operations & Installation Guide – DOC.
Decorator Keypads Crestron C2N-DBF12 & C2N-DBN12 NOTE: The ID code specified in the SIMPL Windows program must match the Net ID of each unit. Refer to “Identity Code” on page 8. Program Manager Program Manager is the view where programmers “program” a Crestron control system by assigning signals to symbols. The symbol can be viewed by double clicking on the icon or dragging it into Detail View. Each signal in the symbol is described in the SIMPL Windows help file (F1).
Crestron C2N-DBF12 & C2N-DBN12 Decorator Keypads Uploading and Upgrading Crestron recommends using the latest programming software and that each device contains the latest firmware to take advantage of the most recently released features. However, before attempting to upload or upgrade it is necessary to establish communication. Once communication has been established, files (for example, programs or firmware) can be transferred to the control system (or device).
Decorator Keypads Crestron C2N-DBF12 & C2N-DBN12 3. Display the C2N-DBF/N12’s “System Info” window (click the icon); communications are confirmed when the device information is displayed. Programs and Firmware Program or firmware files may be distributed from programmers to installers or from Crestron to dealers. Firmware upgrades are available from the Crestron Web site as new features are developed after product releases.
Crestron C2N-DBF12 & C2N-DBN12 Decorator Keypads Operation The C2N-DBF12 serves as a source keypad, providing a cost-effective room control solution for Adagio and other Crestron AV distribution systems. It includes a set of 30 assorted button caps labeled for AV source selection and control functions. The C2N-DBN12 can be used to expand the capabilities of the source keypad and is ideal for audio device functions such as selecting a particular CD track number or a certain CD from a CD changer.
Crestron C2N-DBF12 & C2N-DBN12 Decorator Keypads Problem Solving Troubleshooting The table below provides corrective action for possible trouble situations. If further assistance is required, please contact a Crestron customer service representative. C2N-DBF/N12 Troubleshooting TROUBLE POSSIBLE CAUSE(S) CORRECTIVE ACTION Keypad does not function. Keypad is not communicating with the network. Use Crestron Toolbox to poll the network. Verify network connection to the device. Use Crestron power source.
Crestron C2N-DBF12 & C2N-DBN12 Decorator Keypads C2N-DBF/N12 Troubleshooting (Continued) TROUBLE POSSIBLE CAUSE(S) CORRECTIVE ACTION Keypad does not function (Continued). Keypad Net ID is the same as another device’s Net ID. Button LED does not illuminate. Feedback signal names incorrect in SIMPL Windows program. LED intensity set to 0 (zero). Firmware is loading. Assign a different Net ID in SIMPL Windows and reset unit using Toolbox. Verify SIMPL Windows program for feedback signal names.
Crestron C2N-DBF12 & C2N-DBN12 Decorator Keypads Check Network Wiring Use the Right Wire To ensure optimum performance over the full range of the installation topology, use Crestron Certified Wire only. Failure to do so may incur additional charges if support is required to identify performance deficiencies because of using improper wire. Calculate Power CAUTION: Use only Crestron power supplies for Crestron equipment. Failure to do so could cause equipment damage or void the Crestron warranty.
Crestron C2N-DBF12 & C2N-DBN12 Decorator Keypads NOTE: All Crestron certified Cresnet wiring must consist of two twisted pairs. One twisted pair is the +24V conductor and the GND conductor and the other twisted pair is the Y conductor and the Z conductor. Strip and Tin Wire When daisy chaining Cresnet units, strip the ends of the wires carefully to avoid nicking the conductors. Twist together the ends of the wires that share a pin on the network connector and tin the twisted connection.
Decorator Keypads Crestron C2N-DBF12 & C2N-DBN12 Future Updates As Crestron improves functions, adds new features, and extends the capabilities of the C2N-DBF/N12, additional information may be made available as manual updates. These updates are solely electronic and serve as intermediary supplements prior to the release of a complete technical documentation revision. Check the Crestron Web site periodically for manual update availability and its relevance.
Crestron C2N-DBF12 & C2N-DBN12 Decorator Keypads Return and Warranty Policies Merchandise Returns / Repair Service 1. No merchandise may be returned for credit, exchange or service without prior authorization from Crestron. To obtain warranty service for Crestron products, contact an authorized Crestron dealer. Only authorized Crestron dealers may contact the factory and request an RMA (Return Merchandise Authorization) number.
Crestron C2N-DBF12 & C2N-DBN12 Decorator Keypads This page is intentionally left blank. 26 • Decorator Keypads: C2N-DBF/N12 Operations & Installation Guide – DOC.
Crestron C2N-DBF12 & C2N-DBN12 Decorator Keypads This page is intentionally left blank. Operations & Installation Guide – DOC.
Crestron Electronics, Inc. 15 Volvo Drive Rockleigh, NJ 07647 Tel: 888.CRESTRON Fax: 201.767.7576 www.crestron.com Operations & Installation Guide – DOC. 6200C (2009208) 11.12 Specifications subject to change without notice.