
Installation guide
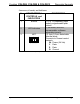


Crestron C2N-DB6, C2N-DB8 & C2N-DB12 Decorator Keypads
Button Replacement
Replacing or changing the removable buttons in a keypad is a simple
process. Refer to the illustration on the following page and the following
procedure.
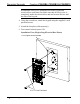
1. Turn control network power OFF.
2. If the keypad is installed in an electrical box, remove the two
1-inch screws and carefully pull the keypad from the electrical
box.
3. Disconnect the Cresnet cable from the NET port.
4. Remove the four 3/16-inch screws that attach the divider, and
remove the divider.
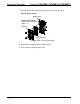
5. While holding adjacent buttons in place, carefully pull the
button(s) to be replaced from the rubber membrane.
CAUTION: The removable buttons fit snugly on the rubber
membrane and must be removed carefully to avoid pulling the
membrane from the unit. Once the membrane is detached,
reattachment may be difficult.
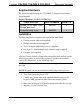
6. Carefully press the replacement button(s) in place, making sure
LED window’s orientation is correct. Button arrangements are
shown on the following image.
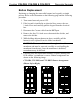
C2N-DB6, C2N-DB8, and C2N-DB12 Button Arrangement
(Shown Left to Right)
press 1
press 2
press 3
press 4
press 5
press 6
press 1
press 2
press 3
press 4
press 5
press 6
press 7
press 8
press 1
press 2
press 3
press 4
press 5
press 6
press 7
press 8
press 9
press 10
press 11
press 12
Operations & Installation Guide - DOC. 6154C Decorator Keypads: C2N-DB6/8/12 • 11