
Installation guide


Crestron C2N-DB6, C2N-DB8 & C2N-DB12 Decorator Keypads
Supplied Hardware
The hardware supplied with the C2N-DB6/8/12 keypad is listed in the
following table.
Supplied Hardware for the C2N-DB6/8/12
DESCRIPTION PART NUMBER QUANTITY
Screws, 06-32, steel, 1 inch
Phillips, pan head
2007251
2
Connector, plug, 4-pin 2003576 1
Installation
The following tools or hardware are required for installation:
• Cresnet network cable (not supplied)
• Phillips screwdriver (not supplied)
• Two 1-inch pan head Phillips screws (supplied)
• One 4-pin 3.5 mm terminal block connector plug (supplied)
• Faceplate (not supplied)
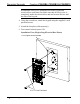
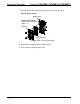
After the Cresnet network wiring has been installed and verified, use the
following procedure to install the keypad in a standard electrical box
(refer to the illustrations on the following page).
NOTE: Verify that sufficient Cresnet power to support the device(s) is
provided.
NOTE: Keypads can also be mounted in multi-gang electrical boxes.
1. Turn control network power OFF.
2. Connect the Cresnet cable with supplied connector plug to the
keypad’s NET port and the other end to the control system.
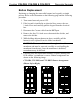
3. Make sure the keypad is oriented as marked with the arrow at top
and place it in the electrical box.
Operations & Installation Guide - DOC. 6154C Decorator Keypads: C2N-DB6/8/12 • 9