
Specifications


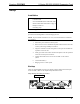


Crestron C2COM-3 2-Series RS-232/422/485 Expansion Card
Setup
Installation
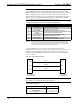
Tools/hardware required
C2COM-3 card
Non-standard DB9 (RS-232/422/485) cable
(Refer to DB9 cable information on page 4)
Phillips screwdriver
Grounding strap
The following provides C2COM-3 installation instructions.
CAUTION: The C2COM-3 contains electrostatic sensitive devices (ESD); observe
precautions for handling ESDs to avoid damaging the card.
NOTE: If you install the C2COM-3 in an AV2, it is assumed that the CAGE2 has
been installed.
1. Disconnect power from the control system.
2. Remove the two screws and blank faceplate from the desired slot in the
control system using a Phillips screwdriver.
3. Align the C2COM-3 with the card guides in the open slot and slide the
expansion card in the slot.
4. Firmly press both ends of the C2COM-3 faceplate to seat the expansion
card in the control system connector.
5. Tighten the thumbscrews to secure the C2COM-3 to the control
system.
6. Connect DB cable(s).
7. Reapply power to contol system.
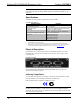
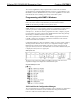
Hookup
Three non-standard DB9 connectors provide three distinct bidirectional serial ports
on the C2COM-3. Refer to the sample hookup illustration below.
Sample Hookup Connections for C2COM-3
Serial Device
Operations & Installation Guide - Doc. 8176 2-Series RS-232/422/485 Expansion Card: C2COM-3 • 3