
Specifications
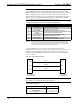

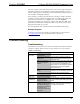


Crestron C2COM-3 2-Series RS-232/422/485 Expansion Card
In Configuration Manager, drag the C2COM-3 from the Plug-in Control Cards |
Cards (2-Series Y Bus) folder of the Device Library and drop it on the C2Y Card
Slot (01) in System Views. The PRO2 displays the C2COM-3 serial driver in slot 01.
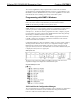
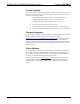
The PRO2 system tree displays the C2COM-3 in Slot 1. Click + to expand the tree
so you can view the C2COM-3 ports. Refer to following graphic.
Expanded Slot 1:C2COM-3
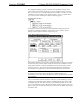
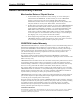
Each port has a built-in serial driver with communication settings that must be
specified in Configuration Manager: double-click Port A to open the “Device
Settings” window, and then click the Serial Settings tab.
Device Settings Window/Serial Settings tab
These settings define the protocol that a controlled serial device expects, and include
the baud rate, parity, and the number of data bits and stop bits. In addition, a device
might require hardware or software handshaking, which controls the flow of data
between two devices. The exact protocol will be described in the manufacturer's
documentation. The graphic above shows the default settings for the C2COM-3.
NOTE: If you connect a different serial device to Port A, these values may need to
be changed to the required settings for the device. SIMPL Windows can
automatically set the values for a controlled device that is selected from the Crestron
device database.
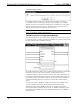
The Crestron database includes numerous serial devices, with default logic and pre-
configured communication settings that are compatible with the ports on the COM
card. Simply drag the serial device from the Crestron Database folder to one of the
ports on the COM card and click Yes when prompted (window is shown on the next
page) to replace the serial driver for that port. In most cases, the default logic should
be loaded as well.
Operations & Installation Guide - Doc. 8176 2-Series RS-232/422/485 Expansion Card: C2COM-3 • 7