Crestron B-G2-FP & B-G3-FP 2 and 3 Gang Faceplates Installation Guide
This document was prepared and written by the Technical Documentation department at: Crestron Electronics, Inc.
Crestron B-G2-FP & B-G3-FP 2 and 3 Gang Faceplates Contents 2 and 3 Gang Faceplates: B-G2-FP & B-G3-FP 1 Introduction......................................................................................1 Physical Description ..............................................................1 Industry Compliance..............................................................3 Setup.................................................................................................4 Network Wiring ................
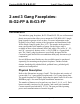
Crestron B-G2-FP & B-G3-FP 2 and 3 Gang Faceplates 2 and 3 Gang Faceplates: B-G2-FP & B-G3-FP Introduction Two and three gang faceplates, B-G2-FP and B-G3-FP, are wall-mounted plastic accessories that allow you to mount the CNX-B2/4/6/8/12 singlegang keypads in groups of two or three. For more information on the keypads, refer to latest version of the Operations and Installation Guide for the Single Gang Keypads, Doc. 8173. The number in the product’s name corresponds to the number of gangs.
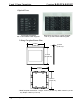
2 and 3 Gang Faceplates Crestron B-G2-FP & B-G3-FP Physical Views 2-Gang black faceplate with 12 and 8 black button keypads Metal finish mounted on 3-gang faceplate with 12 (2) and 8 black button keypads 2-Gang Faceplate/Detent Plate 4.724 in (11.999 cm)* 0.220 in (0.559 cm)* 4.762 in (12.096 cm)* 4.636 in (11.776 cm) 4.674 in (11.872 cm) * Metal faceplate dimensions – Height: 4.840 in (12.294 cm), Width: 4.800 in (12.192 cm), Depth: 0.283 in (0.
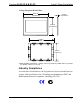
Crestron B-G2-FP & B-G3-FP 2 and 3 Gang Faceplates 3-Gang Faceplate/Detent Plate 6.537 in (16.604 cm)* 0.220 in (0.559 cm)* 4.762 in (12.096 cm)* 6.449 in (16.381 cm) 4.674 in (11.872 cm) * Metal faceplate dimensions – Height: 4.840 in (12.294 cm), Width: 6.614 in (16.800 cm), Depth: 0.283 in (0.
2 and 3 Gang Faceplates Crestron B-G2-FP & B-G3-FP Setup Network Wiring NOTE: When installing network wiring, refer to the latest revision of the wiring diagram(s) appropriate for your specific system configuration, available from the Downloads | Product Manuals | Software and Wiring Diagrams section of the Crestron website (www.crestron.com).
Crestron B-G2-FP & B-G3-FP 2 and 3 Gang Faceplates NOTE: All Cresnet wiring must consist of two twisted-pairs. One twisted pair is the +24V conductor and the GND conductor and the other twisted pair is the Y conductor and the Z conductor. NOTE: When daisy-chaining Cresnet units, strip the ends of the wires carefully to avoid nicking the conductors. Twist together the ends of the wires that share a pin on the network connector, and tin the twisted connection.
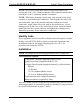
2 and 3 Gang Faceplates Crestron B-G2-FP & B-G3-FP 1. Turn Cresnet system power OFF. 2. Connect the Cresnet cable to the keypads’ Cresnet ports and the other ends to the control system. 3. Attach the two keypad button assemblies to the detent plate using the (4) 3/16 in. flathead screws (supplied with keypads). CAUTION: Excess wire that is pinched between the keypad and electrical box could short out.
Crestron B-G2-FP & B-G3-FP 2 and 3 Gang Faceplates Installation View 2-Gang Button assembly 2 gang detent 3/16 in. flathead Two gang electrical box (2.5 in. depth recommended) 1 in. panhead Two gang detent with button assemblies Installation Guide - DOC.
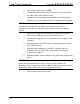
2 and 3 Gang Faceplates Crestron B-G2-FP & B-G3-FP Installation View 2-Gang (continued) Two gang detent Removable buttons Faceplate Button assemblies Divider Interlock Tabs Example Divider Interlock tabs 8 • 2 and 3 Gang Faceplates: B-G2-FP & B-G3-FP Installation Guide - DOC.
Crestron B-G2-FP & B-G3-FP 2 and 3 Gang Faceplates Troubleshooting Refer to latest version of the Operations and Installation Guide for the Single Gang Keypads, Doc. 8173, for troubleshooting information on the keypads.
2 and 3 Gang Faceplates Crestron B-G2-FP & B-G3-FP Return and Warranty Policies Merchandise Returns / Repair Service 1. No merchandise may be returned for credit, exchange, or service without prior authorization from CRESTRON. To obtain warranty service for CRESTRON products, contact the factory and request an RMA (Return Merchandise Authorization) number. Enclose a note specifying the nature of the problem, name and phone number of contact person, RMA number, and return address. 2.
Crestron B-G2-FP & B-G3-FP 2 and 3 Gang Faceplates This page intentionally left blank. Installation Guide - DOC.
Crestron Electronics, Inc. 15 Volvo Drive Rockleigh, NJ 07647 Tel: 888.CRESTRON Fax: 201.767.7576 www.crestron.com Installation Guide - DOC. 8182 07.02 Specifications subject to change without notice.