Crestron Adagio™ AADS Adagio Audio Distribution System Operations Guide
This document was prepared and written by the Technical Documentation department at: Crestron Electronics, Inc. 15 Volvo Drive Rockleigh, NJ 07647 1-888-CRESTRON Important Safety Instructions • Read these instructions. • Keep these instructions. • Heed all warnings. • Follow all instructions. • Do not use this apparatus near water. • Clean only with dry cloth. • Do not block any ventilation openings. Install in accordance with the manufacturer’s instructions.
Crestron Adagio™ AADS Audio Distribution System Contents Audio Distribution System: Adagio AADS 1 Introduction ............................................................................................................................... 1 Features and Functions ................................................................................................ 1 Multi-Room Audio........................................................................................2 High-End Performance...................
Audio Distribution System Crestron Adagio™ AADS Future Updates .......................................................................................................... 61 Appendix: RDS/RBDS Function Support............................................................................... 62 Return and Warranty Policies .................................................................................................. 63 Merchandise Returns / Repair Service ...................................................
Crestron Adagio™ AADS Audio Distribution System Audio Distribution System: Adagio AADS Introduction Features and Functions • • • • • • • • • • Operations Guide – DOC.
Audio Distribution System Crestron Adagio™ AADS Multi-Room Audio The AADS supports up to six sets of stereo room speakers, allowing listeners in each room to listen selectively to any of six different stereo sources. Its integrated multichannel power amplifier delivers a robust 45 watts per channel to all rooms. Without requiring any programming, the AADS can easily be expanded to support a total of 12 rooms by adding an AAE Audio Expander.
Crestron Adagio™ AADS Audio Distribution System 2-Series Ethernet Control System At the heart of the AADS is the powerful 2-Series control engine. With both Cresnet® and Ethernet connectivity, plus custom programmability using Crestron SystemBuilder™ software, the AADS allows nearly limitless expansion and customization using Crestron's entire line of touchpanels, wireless remotes, and hundreds of other devices.
Audio Distribution System Crestron Adagio™ AADS Available models are: • AADS: AADS with built-in dual AM/FM tuner • AADS-XM: AADS with built-in AM/FM/XM tuner • AADSI: AADS for International (230 VAC) use with built-in AM/FM tuner Out of the box, the AADS can support one AAS (Adagio Audio Server), one AAE (Adagio Audio Expander) for control of up to 12 zones, one CEN-IDOC (Interface for Apple® iPod), and a combination of up to 12 C2N-DBF12 (12-button keypads) or APAD controllers for local control of
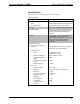
Crestron Adagio™ AADS Audio Distribution System Specifications Specifications for the AADS are listed in the following table. AADS Specifications SPECIFICATION DETAILS Processor CPU 32-bit Freescale ColdFire® Microprocessor Processing Speed 100 MIPS (Dhrystone 2.
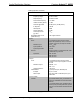
Audio Distribution System Crestron Adagio™ AADS AADS Specifications (Continued) SPECIFICATION DETAILS FM Tuner Frequency Range 87.50-108 MHz Step Frequency 50 kHz/ 100 kHz Intermediate Frequency 10.
Crestron Adagio™ AADS Audio Distribution System AADS Specifications (Continued) SPECIFICATION DETAILS Communication (continued) Serial (1) DB9, male, bidirectional RS-232 ports; Up to 115.2k baud, hardware and software handshaking support for communication with serial devices Console (1) RJ-11 female, bidirectional RS-232 computer console port for connection to PC Ethernet (1) RJ-45 port for Ethernet communications Power Power Consumption AADS/AADS-XM/ 7 Amps, 120 Volts AC @ 60Hz AADSI 3.
Audio Distribution System Crestron Adagio™ AADS Physical Description This section provides information on the connections, controls, and indicators available on your AADS. AADS Physical View (Front) AADS Physical View (Rear), AADS-XM Physical View (Rear), 8 • Audio Distribution System: Adagio AADS Operations Guide – DOC.
Crestron Adagio™ AADS Audio Distribution System AADS Overall Dimensions 17.09 in (43.41 cm) 17.16 in (43.58 cm) 5.64 in (14.33 cm) 5.03 in (12.77 cm) 17.56 in (44.61 cm) 17.71 in (44.97 cm) 17.96 in (45.63 cm) 18.11 in (45.99 cm) NOTE: Cable connections can extend the overall depth of the AADS by approximately two to three inches. Operations Guide – DOC.
Audio Distribution System Crestron Adagio™ AADS AADS Buttons and Ports (AADS-XM Shown) 1 2 3 4 6 5 8 9 7 11 12 22 10 13 23 14 16 15 18 17 24 19 26 28 29 30 20 21 25 27 Connectors, Controls, & Indicators # CONNECTORS, CONTROLS, & INDICATORS1 DESCRIPTION 1 SELECTION CONTROL Used to select rooms, sources, and radio stations (when using tuner). 2 SELECT BUTTON The SELECT button confirms changes made to AADS settings.
Crestron Adagio™ AADS Audio Distribution System Connectors, Controls, & Indicators (Continued) # CONNECTORS, CONTROLS, & INDICATORS1 3 HARDWARE RESET Recessed below the front panel. Press this button to initiate a system hardware reset. This has the same effect as disconnecting and reconnecting power. 4 SOFTWARE RESET Recessed below the front panel. Press this button while the system is running to restart the program without rebooting the processor.
Audio Distribution System Crestron Adagio™ AADS Connectors, Controls, & Indicators (Continued) # CONNECTORS, CONTROLS, & INDICATORS1 17 MORE 18 VOLUME CONTROL Push “up” to raise the volume of a room; push “down” to lower the volume of a room. Pressing and releasing the volume control will adjust the volume level in fine increments while pressing and holding the volume control will adjust the volume level in larger increments. Volume level is displayed on the LCD. Operates in Room mode only.
Crestron Adagio™ AADS Audio Distribution System Connectors, Controls, & Indicators (Continued) # CONNECTORS, CONTROLS, & INDICATORS1 DESCRIPTION 24 IR OUT (4) 3.5mm tip-ring-sleeve (TRS) miniphone ports enable serial communication in a variety of formats including infrared and one-way RS-232; Use Crestron Infrared Emitter Probe (part number STIRP, sold separately) for controlling infrared devices. For information on other serial control cables, contact Crestron.
Audio Distribution System Crestron Adagio™ AADS Connectors, Controls, & Indicators (Continued) # CONNECTORS, CONTROLS, & INDICATORS1 27 POWER INPUT DESCRIPTION Fuse terminal and power connector. The AADS requires a T8AH-type fuse rated at 250 Volts2. The AADS requires 120 VAC, 50-60 Hz, 7 Amps. The AADSI requires a T4AH-type fuse rated at 250 Volts2. The AADSI requires 230 VAC, 50-60 Hz, 3.5 Amps3. 28 COMPUTER One 6-pin RJ-11 female, computer console port. Use with included serial cable.
Crestron Adagio™ AADS Audio Distribution System Industry Compliance This product is Listed to applicable UL Standards and requirements by Underwriters Laboratories Inc. (E302724) As of the date of manufacture, the AADS has been tested and found to comply with specifications for CE marking and standards per EMC and Radiocommunications Compliance Labelling. NOTE: This device complies with part 15 of the FCC rules.
Audio Distribution System Crestron Adagio™ AADS Setup Network Wiring When wiring the AAE Adagio Audio Expander, APAD controller, or C2N-DBF12 keypad to the AADS, consider the following: • Use Crestron Certified Wire. • Use Crestron power supplies for Crestron equipment. • Provide sufficient power to the system. CAUTION: Insufficient power can lead to unpredictable results or damage to the equipment.
Crestron Adagio™ AADS Audio Distribution System ⇒ AAS-2: Audio output A of the AAS-2 must be connected to source input port 1 and audio output B must be connected to source input port 2. ⇒ AAS-4: Audio output A of the AAS-4 must be connected to source input port 1. Audio output B must be connected to source input port 2. Audio output C must be connected to source input port 3. Audio output D must be connected to source input port 4.
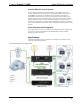
Audio Distribution System Crestron Adagio™ AADS Hardware Connections for Out-of-the-Box Functionality APAD APAD C2N-DBF12 C2N-DBF12 C2N-DBF12 C2N-DBF12 INPUT FROM CEN-IDOC (OPTIONAL) INPUT(S) FROM AAS (OPTIONAL): AAS-1: SOURCE 1 AAS-2: SOURCES 1 & 2 AAS-4: SOURCES 1-3* NET: TO AAE (OPTIONAL) OUTPUT TO CORRESPONDING SOURCE INPUTS ON AAE (IF INSTALLED) LAN: CONNECT TO DHCP ROUTER; REQUIRED FOR USE WITH CEN-IDOC AND AAS TO ROOM SPEAKERS: EACH PAIR OF SPEAKER OUTPUTS CORRESPONDS TO A ROOM NUMBER *
Crestron Adagio™ AADS Audio Distribution System Custom Program Connections for the AADS SOURCES: FROM AUDIO SOURCES; WITH LOOP-THRU OUTPUT TO AAE(s) TUNER OUT: TO AAE(s) NET: POWERED PASSTHROUGH TO APAD AND C2N-DB12 DEVICES IR OUT: TO STIRP IR EMITTER PROBE OR ONE-WAY SERIAL CONTROLLED DEVICES COM A: BI-DIRECTIONAL RS-232 WITH HARDWARE & SOFTWARE HANDSHAKING AND MODEM CONTROL COMPUTER: TO PC LAN: 10/100 BASE-T ETHERNET TO LAN NET: TO AAE(s) ROOMS: 45 WATTS/CHANNEL TO 8 OHM SPEAKERS Antennas GROU
Audio Distribution System Crestron Adagio™ AADS The recommended FM antenna is an outdoor type, commonly available in electronics stores. Use of the supplied indoor FM antenna is recommended only if you cannot use an outdoor antenna. Outdoor antennas are particularly needed in rural areas, some distance from FM radio signal sources. The FM antenna supplied with the AADS is a T-type, and it should be stretched horizontally in space that is as clear as possible.
Crestron Adagio™ AADS Audio Distribution System To replace the fuse: 1. Press STANDBY to place the unit in Standby and remove the power cable. 2. Use a flat-head screwdriver to push in the fuse holder. While pushing in the fuse holder, turn screwdriver counterclockwise until the fuse holder pops out. 3. Remove the fuse from the fuse holder and insert a new fuse. CAUTION: Only use the specified type of fuse when replacing a blown fuse. Failure to do so may cause damage to the AADS.
Audio Distribution System Crestron Adagio™ AADS 3. Continue sliding the screwdriver behind the label strip until the top of the label strip slides out as shown in the following picture. 4. Continue sliding the screwdriver until the entire top of the label strip is visible. Remove the label strip by pulling the top of the label strip up from the Adagio component as shown below.
Crestron Adagio™ AADS Audio Distribution System Configuration After making all hardware connections to the AADS, the system must be configured for operation. Configuring the system is broken down into four processes: • Configure the AADS for Operation • Configure Sources • Configure Rooms • Configure Preset Groups Configure the AADS for Operation The AADS must be configured for operation prior to configuring sources, rooms, or groups. Use the Installer Tools to configure the AADS for operation.
Audio Distribution System Crestron Adagio™ AADS ⇒ Configure Keypads – Configures the source assignments of the top six buttons of every C2N-DBF12 keypad that is connected to the system. ⇒ Restore Defaults – Restores default settings ⇒ System Information – Provides information about the AADS such as IP data, firmware version, and program information. To configure the displayed option, press the SELECT button. To exit Installer Tools and save changes to the AADS’ configuration, press the MENU button.
Crestron Adagio™ AADS • Audio Distribution System The AADS will then prompt you to install an AAS. To install an AAS, press the SELECT button and follow the instructions onscreen. The source names will be renamed as follows: ⇒ Source 1 becomes “Server 1” ⇒ Source 2 becomes “Server 2”1,2 ⇒ Source 3 becomes “Server 3”2 1: If an AAS-2 model is detected 2: If an AAS-4 model is detected If a CEN-IDOC is not configured and an AAS-4 is installed, Source 4 becomes “Server 4”.
Audio Distribution System Name Rooms Crestron Adagio™ AADS This screen allows you to customize the name of each room displayed on the LCD. • Open Installer Tools as described on page 23, select Name Rooms, and press the SELECT button. Select Room To Name SOURCE ROOM PRESET BKLT Select Room To Name 1: Room 1 MENU • SCHED DISPLAY MORE To select a room to name, press the selection control up or down until the room to be named is displayed and press the SELECT button.
Crestron Adagio™ AADS Name Sources Audio Distribution System This screen allows you to customize the name of each source displayed on the LCD. • Open Installer Tools as described on page 23, select Name Sources, and press the SELECT button. Name Sources SOURCE ROOM PRESET BKLT Select Src. To Name 1: Source 1 MENU • SCHED DISPLAY MORE To select a source to be named, press the selection control up or down until the source to be named is displayed and press the SELECT button.
Audio Distribution System Hide Sources Crestron Adagio™ AADS Sources that are not used can be hidden from the list of available sources while in Source mode. This allows quicker scrolling through the connected sources while in the Source mode. • Open Installer Tools as described on page 23, select Hide Sources, and press the SELECT button. The AADS will list Source 1 with its visibility status. NOTE: Hidden sources are indicated with an asterisk (*).
Crestron Adagio™ AADS Configure Keypads Audio Distribution System This screen allows you to assign sources to the top six keys of a C2N-DBF12 keypad. The source assignment is applied to every C2N-DBF12 keypad that is connected to the system. The functions of the bottom six keys cannot be changed when using the out-of-the-box program. • Open Installer Tools as described on page 23, select Configure Keypads, and press the SELECT button. Select Button To Map SOURCE ROOM PRESET BKLT Select Btn.
Audio Distribution System Restore Defaults Crestron Adagio™ AADS This screen allows you to restore the AADS to its factory default settings. The AADS can restore all of the factory settings or just the audio settings. • Open Installer Tools as described on page 23, select Restore Defaults, and press the SELECT button.
Crestron Adagio™ AADS Audio Distribution System Gain Control SOURCE BKLT iPod Gain 0dB ROOM PRESET MENU SCHED DISPLAY MORE • Adjust the gain level with the selection control. Press up to raise the gain level or press down to lower the gain level. • Press SELECT to store the new setting and exit. Configure Rooms The sound quality, minimum volume, maximum volume and startup volume settings, of each room can be customized from the AADS control panel.
Audio Distribution System Crestron Adagio™ AADS Minimum Volume Control SOURCE ROOM PRESET BKLT Room 6 Min Volume 9% MENU Adjust the Maximum Volume SCHED DISPLAY MORE • Adjust the minimum volume with the selection control. Press up to raise the minimum volume or press down to lower the minimum volume. The highest minimum volume setting is 30%. • Press SELECT to store the minimum volume setting and to return to the Room Setup menu.
Crestron Adagio™ AADS Audio Distribution System Startup Volume Control SOURCE ROOM PRESET BKLT Room 6 Start Volume 50% MENU Set Mono or Stereo Mode SCHED DISPLAY MORE • Adjust the maximum volume with the selection control. Press up to raise the maximum volume or press down to lower the maximum volume. The maximum startup volume setting is 50%. • Press SELECT to store the startup volume setting and to return to the Room Setup menu.
Audio Distribution System Crestron Adagio™ AADS Edit Presets Control SOURCE BKLT Edit Presets 1: Party ROOM PRESET SCHED DISPLAY MENU MORE • To configure a preset, press up or down on the selection control to display the preset to be configured and press SELECT. • To add rooms to the preset, press the corresponding room buttons on the AADS or AAE (if connected). The room button’s LED will turn on. Press again to remove the room from the preset group. The room button’s LED will turn off.
Crestron Adagio™ AADS Audio Distribution System Edit Preset Name SOURCE ROOM PRESET BKLT Enter Preset 1 Name Partya MENU SCHED DISPLAY MORE ⇒ Move the cursor position by pressing the selection control up or down. Select letters (upper and lower-case), numbers, or other characters by pressing the volume control up or down until the desired letter, number, or other character is displayed on the LCD. NOTE: The maximum length for any preset name is 16 characters. ⇒ Press SELECT to store the name.
Audio Distribution System Crestron Adagio™ AADS Operation Prior to using this section, refer to the QuickStart Guide (Doc. 6459) that is included with the AADS. For instructions on using the APAD and the C2N-DBF12 with the AADS refer to the latest version of the Out-Of-The-Box Functionality Guide (Doc. 6493).
Crestron Adagio™ AADS Audio Distribution System FM Radio Source SOURCE BKLT AM-FM 92.70 FM/Stereo ROOM PRESET MENU SCHED DISPLAY MORE XM Radio Source SOURCE ROOM PRESET BKLT XM Van Halen/Dreams MENU • Control the AM/FM Tuner SCHED DISPLAY MORE Press the SELECT button to open the tuner controls. The AM/FM tuner controls allow access to the AM/FM tuner functions.
Audio Distribution System Crestron Adagio™ AADS ⇒ To store a preset: Select the AM/FM tuner controls as described on page 36. Tune the desired station using the Manual tuning mode (as described on page 38). Press the MENU button to return to the tuner controls. Press the selection control up or down to display Preset and press SELECT. Preset Controls SOURCE BKLT FM Presets 1. 107.
Crestron Adagio™ AADS Audio Distribution System • Scan Stations: ⇒ Select the AM/FM tuner controls as described on page 36. ⇒ Press the selection control up or down to display Scan Stations and press SELECT. Scan Stations SOURCE BKLT Scan Stations 107.10 FM Scanning ROOM PRESET MENU SCHED DISPLAY MORE ⇒ Press the selection control “up” to start a scan that increases in frequency; or press the selection control “down” to start a scan that decreases in frequency to the next clear frequency.
Audio Distribution System Crestron Adagio™ AADS Select the tuning mode by pressing up or down on the selection control to display the desired mode. Press MENU to return to the tuner controls. Stereo/Mono Mode SOURCE BKLT Stereo/Mono Stereo ROOM PRESET MENU Control the XM Tuner (AADS-XM Only) SCHED DISPLAY MORE The XM tuner controls allow access to the XM tuner functions. The tuner controls can recall and store presets, tune stations by categories or channel, or view XM technical information.
Crestron Adagio™ AADS Audio Distribution System Press the selection control up or down to display Preset and press SELECT. Preset Controls SOURCE BKLT Presets 1. Big Tracks ROOM PRESET SCHED DISPLAY MENU MORE Select a preset location by pressing the selection control up or down to display the desired preset location and press the MORE button.
Audio Distribution System Crestron Adagio™ AADS Category Channels SOURCE ROOM PRESET BKLT Rock Channels 41. Boneyard MENU SCHED DISPLAY MORE ⇒ Press the selection control up or down to browse through the channels within the selected category. When the desired channel is displayed, press SELECT to select the channel. The display will indicate that the channel has been selected. • Channel Tuning: Tune stations by channel to listen to a specific channel or to set up a preset.
Crestron Adagio™ AADS Audio Distribution System ⇒ To view the Radio ID of the XM tuner: Select the XM tuner controls as described on page 36. Press the selection control up or down to display Radio ID and press SELECT. Press MENU to return to the tuner controls. Radio ID SOURCE ROOM PRESET BKLT Radio ID NBBKK4MF SCHED DISPLAY MENU MORE Controlling an iPod An Apple iPod can be controlled from the AADS front panel with an optional CEN-IDOC Interface for Apple iPod.
Audio Distribution System Crestron Adagio™ AADS • Press the selection control up or down until Play is displayed and press SELECT. The display will briefly show instructions for using the AADS front panel to skip songs, pause playback, and resume playback. The display will then show the artist and track information as well as the playback status. Press DISPLAY to switch the display between artist and album information.
Crestron Adagio™ AADS Audio Distribution System Shuffle Mode SOURCE BKLT Shuffle Mode ROOM All PRESET DISPLAY MENU • SCHED MORE Press the selection control up or down to display the shuffle modes: ⇒ Album: Plays an album in order then shuffles to the next album in the playlist. ⇒ All: Shuffles all of the tracks within a playlist. ⇒ Off: Turns off the shuffle function. • Select Tracks with the AADS Press SELECT to activate the displayed mode and return to the iPod controls.
Audio Distribution System Crestron Adagio™ AADS • Press the selection control up or down to display an AAS source (Server 1 for an AAS-1, Servers 1 and 2 for an AAS-2, or Servers 1, 2, 3 and 4 for an AAS-4 if using out-of-the-box functionality). The track and artist information will be displayed. NOTE: Server 4 will only be displayed if a CEN-IDOC is not installed.
Crestron Adagio™ AADS Audio Distribution System AAS Playing SOURCE ROOM PRESET BKLT Eric Clapton Layla H MENU Browse the AAS Library with the AADS SCHED DISPLAY MORE • To resume or pause playback, press the SELECT button. • To skip to the next track, press the selection control up. • To return to the beginning of a track or skip to the previous track, press the selection control down. The AADS front panel can be used to select a category (playlist, artist, album, era, etc.
Audio Distribution System Crestron Adagio™ AADS ⇒ To add the selection to the play queue, press the selection control up or down to display Add and press SELECT. ⇒ To cancel, press the selection control up or down to display Cancel and press SELECT. The AADS front panel can be used to jump alphabetically within a category. • To jump within a category while browsing through the AAS library, start browsing through a category as described on page 47 and press the MORE button to open the search tool.
Crestron Adagio™ AADS Audio Distribution System Shuffle Mode SOURCE ROOM PRESET BKLT Shuffle Mode Tracks MENU • SCHED DISPLAY MORE Press the selection control up or down to display the different shuffle modes: ⇒ Selections: Randomly plays all items in the play queue. Group items such as Playlists will be played in order. However, the order of group items will be shuffled. ⇒ Tracks: Randomly plays all of the tracks in the play queue. ⇒ Off: Turns off the shuffle function.
Audio Distribution System Crestron Adagio™ AADS NOTE: Volume adjustment is not available when the AADS is in Source mode. When a source is routed to a room that is not already on, the room will be turned on at the startup volume specified on page 32. Room Mode Room mode is used to select and control a room that is connected to the AADS. Select a Room To select a room: • Press ROOM to put the AADS in the Room mode.
Crestron Adagio™ AADS Audio Distribution System Global Volume SOURCE BKLT Global Volume 50% ROOM PRESET aaaaaa MENU • Adjust the Bass SCHED DISPLAY MORE Press the SELECT button to set the global volume level. If left untouched, the new level will be set and the display will return to the room mode. The bass level of each room can be adjusted independently. • While in Room mode, press the MORE button twice. • Press the SELECT button to open the bass control.
Audio Distribution System Adjust the Balance Crestron Adagio™ AADS The balance of each room can be adjusted independently. • While in Room mode, press the MORE button twice. • Press the selection control down until Balance is displayed on the LCD. • Press the SELECT button to open the balance control. Balance Control SOURCE BKLT Room1 Balance 0 ROOM PRESET SCHED DISPLAY MENU Set Loudness MORE • Adjust the balance with the selection control.
Crestron Adagio™ AADS Audio Distribution System • Scroll through the preset groups by pressing up or down on the selection control. Active preset groups are indicated with a À. • To activate a preset group, use the selection control to find an inactive preset group and press the SELECT button. A À will appear next to the preset group name. NOTE: If a room is shared by two or more preset groups, the source from the most recently activated preset group will be routed to all of the activated groups.
Audio Distribution System Crestron Adagio™ AADS Programming Software Refer to this section only if a custom program for the AADS is to be created. A built-in program containing the out-of-the-box functionality resides in a protected area of the AADS’ flash memory. The program cannot be erased and can be recalled at any time by holding the software reset button during a hardware reset. The built-in-program cannot be modified using the tools described in this section.
Crestron Adagio™ AADS Audio Distribution System download Adagio Composer from the Crestron website and examine the extensive help file. To create more advanced systems that include non-audio distribution devices such as lighting and HVAC, use Crestron SystemBuilder or SIMPL Windows. Programming with Crestron SystemBuilder Crestron SystemBuilder is the easiest method of programming, but does not offer as much flexibility as SIMPL Windows.
Audio Distribution System Crestron Adagio™ AADS Signals that are part of the AADS’ out-of-the-box functionality are locked and cannot be modified or deleted. Locked signals are grayed out in the AADS’ SIMPL Windows symbols. To prevent corruption of the out-of-the-box functionality, locked signal names should not be copied or driven to other destinations in the SIMPL Windows program. The symbol can be viewed by double clicking on the icon or dragging it into Detail View.
Crestron Adagio™ AADS Audio Distribution System Uploading and Upgrading Crestron recommends using the latest programming software and that each device contains the latest firmware to take advantage of the most recently released features. However, before attempting to upload or upgrade, it is necessary to establish communication. Establishing Communication Use Crestron Toolbox for communicating with the AADS; refer to the Crestron Toolbox help file for details. There are two methods of communication.
Audio Distribution System Crestron Adagio™ AADS • Confirm Ethernet connections between the AADS and PC. If connecting through a hub, use CAT5 straight through cables with 8-pin RJ-45 connectors. Alternatively, Use a CAT5 crossover cable to connect the two LAN ports directly, without using a hub. • Use the Address Book in Crestron Toolbox to create an entry for the AADS with the AADS’ TCP/IP communication parameters. • icon) and select the Display the “System Info” window (click the AADS entry.
Crestron Adagio™ AADS Audio Distribution System Problem Solving Troubleshooting The following table provides corrective action for possible trouble situations. If further assistance is required, please contact a Crestron customer service representative. AADS Troubleshooting TROUBLE POSSIBLE CAUSE(S) CORRECTIVE ACTION AADS does not function. AADS is not receiving power. Use the provided power cord. Verify connection. C2N-DBF12 or APAD does not function.
Audio Distribution System Crestron Adagio™ AADS AADS Troubleshooting (continued) TROUBLE POSSIBLE CAUSE(S) Sound is not heard. CORRECTIVE ACTION Room is muted or turned off. Turn off mute function or route a source to the room. Volume is turned down. Raise volume to an audible level. Speakers are not properly connected. Verify speaker connections. Source is not selected/properly connected. Verify that source is selected and properly connected.
Crestron Adagio™ AADS Audio Distribution System the tinned connection into the Cresnet connector and tighten the retaining screw. Repeat the procedure for the other three conductors. Add Hubs For larger networks (i.e., greater than 28 network devices), it may become necessary to add a Cresnet Hub/Repeater (CNXHUB) to maintain signal quality throughout the network. Also, for networks with lengthy cable runs, it may be necessary to add a Hub/Repeater after only 20 devices.
Audio Distribution System Crestron Adagio™ AADS Appendix: RDS/RBDS Function Support Many radio stations transmit additional information, such as traffic information, radio text, real time clock etc., with their regular FM programming. The FM tuner contains circuitry that retrieves this information. The US format for such information is called the Radio Broadcast Data System (RBDS), and in Europe this format is called the Radio Data System (RDS).
Crestron Adagio™ AADS Audio Distribution System Return and Warranty Policies Merchandise Returns / Repair Service 1. No merchandise may be returned for credit, exchange, or service without prior authorization from CRESTRON. To obtain warranty service for CRESTRON products, contact an authorized CRESTRON dealer. Only authorized CRESTRON dealers may contact the factory and request an RMA (Return Merchandise Authorization) number.
Crestron Electronics, Inc. 15 Volvo Drive Rockleigh, NJ 07647 Tel: 888.CRESTRON Fax: 201.767.7576 www.crestron.com Operations Guide – DOC. 6458 (2014560) 10.06 Specifications subject to change without notice.