
User Manual
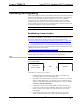


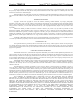
Table Of Contents
- Isys i/O® 2.8” Handheld WiFi Touchpanel: TPMC-3X
- Introduction
- Setup
- Identity Code
- Battery Installation
- Power
- Battery Calibration
- Configuring the Touchpanel
- General Use and Safety
- Recommended Cleaning
- Programming Software
- Uploading and Upgrading
- Problem Solving
- Appendix: TBD
- Software License Agreement
- Return and Warranty Policies

Isys i/O
®
2.8” Handheld WiFi Touchpanel Crestron TPMC-3X
5. Display the “System Info” window (click the
icon) and select the
TPMC-3X entry.
USB
USB Communication
USB
PC Running
Crestron Toolbox
TPMC-3X
The USB port on the TPMC-3X connects to the USB port on the PC:
1. Use the included USB cable to connect the TPMC-3X to a PC running the
Crestron Toolbox.
2. Open the “System Info” window; click the “Enter an address …” icon
(pencil) to display the “Edit Address” window.
3. Select USB as the connection type, and select “TPMC-3X” from the Device
Type drop down list (click OK when the “Warning” notice appears).
Programs, Projects and Firmware
Program, project or firmware files may be distributed from programmers to installers
or from Crestron to dealers. Firmware upgrades are available from the Crestron
website as new features are developed after product releases. One has the option to
upload programs and projects via the programming software or to upload and
upgrade via the Crestron Toolbox. For details on uploading and upgrading, refer to
the SIMPL Windows help file, VT Pro-e help file or the Crestron Toolbox help file.
SIMPL Windows
If a SIMPL Windows program is provided, it can be uploaded to the control system
using SIMPL Windows or Crestron Toolbox.
VisionTools Pro-e
Upload the VT Pro-e file to the touchpanel using VT Pro-e or Crestron Toolbox.
Firmware
Check the Crestron website to find the latest firmware. (New users may be required
to register to obtain access to certain areas of the site, including the FTP site.)
Upgrade TPMC-3X firmware via Crestron Toolbox.
1. Establish communication with the TPMC-3X and display the “System Info”
window.
2. Select Functions | Firmware… to upgrade the TPMC-3X firmware.
Program Checks
For Ethernet connections, using Crestron Toolbox, display the “System Info window
(click the
icon) and select the Functions menu to display actions that can be
performed on the TPMC-3X.
Be sure to use Crestron Toolbox to create the TPMC-3X IP table.
1. Select Functions | IP Table Setup.
2. Add, modify or delete entries in the IP table. The TPMC-3X can have only
one IP table entry.
3. A defined IP table can be saved to a file or sent to the device.
38 • Isys i/O
®
2.8” Handheld WiFi Touchpanel: TPMC-3X Operations Guide – DOC. 6789C