Crestron CLS-C6 Series iLux™ Integrated Lighting Systems User Guide .
Contents iLux™ Integrated Lighting Systems: CLS-C6 Series 1 Introduction................................................................................................................................1 Operating Modes........................................................................................................................5 Standard Mode.............................................................................................................5 Lights Mode....................................
iLux™ Integrated Lighting Systems Crestron CLS-C6 Series iLux™ Integrated Lighting Systems: CLS-C6 Series Introduction The CLS-C6 series of iLux™ units are complete, integrated wall-mounted lighting systems that can function as standalone devices and/or be part of a Crestron® solution total control system network. The units are intended for installation in boardrooms, auditoriums, home theaters, or anywhere versatile and cost-effective control of lighting and shades is required.
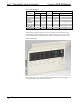
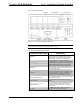
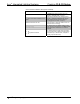
iLux™ Integrated Lighting Systems Crestron CLS-C6 Series CLS-C6 Model Definition Model Designation Power Requirements 120 VAC CLS-C6 X CLS-C6M X 230 VAC X CLSI-C6M X X CLS-C6MRF X Control System Integration Detector 2 Cresnet® 1 Cresnet®; 1 infiNET™ X CLSI-C6 CLS-C6RF Motion X X X X X X CLSI-C6RF X CLSI-C6MRF X X X X X X All controls and indicators for the CLS-C6 are located on the front of the unit.
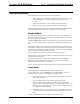
Crestron CLS-C6 Series iLux™ Integrated Lighting Systems CLS -C6 Controls & Indicators The table on the following page describes the function of the iLux unit’s controls and indicators, which are listed in alphabetical order. NOTE: Standard mode, Lights mode, and Shades mode mentioned in the following discussions are described in “Operating Modes” on page 5.
iLux™ Integrated Lighting Systems Crestron CLS-C6 Series CLS-C6 Controls & Indicators Descriptions (Continued) CONTROLS & INDICATORS DESCRIPTION ON Button The ON button always recalls the On scene. (Refer to “Standard Mode” on page 5.) ^, v, Save, and Cancel Pushbuttons and LEDs Use these pushbuttons when changing scene presets. The Save and Cancel LEDs indicate when these functions are active. (Refer to “Changing Scene Presets” on page 7.
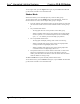
iLux™ Integrated Lighting Systems Crestron CLS-C6 Series Operating Modes After installation, the CLS-C6 operates in one of three modes: • Standard mode: this is the default mode; buttons are typically used to recall scenes, although they can be reprogrammed by the dealer for other functions. • Lights mode: this mode is used to manually adjust lighting loads. • Shades mode: this mode is used to manually control shade groups.
iLux™ Integrated Lighting Systems Crestron CLS-C6 Series To exit Lights mode, press the Lights button again, or press Cancel. The LED will go off, and the unit will revert to Standard mode. Shades Mode Shades mode allows you to manually adjust any of the six shade groups. To enter Shades mode, press the Shades button. The LED will light, and the six function buttons can now be used to adjust shade groups 1 through 6.
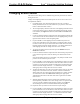
iLux™ Integrated Lighting Systems Crestron CLS-C6 Series Changing Scene Presets The CLS-C6 scene settings can be modified using the front panel controls, without having to use a PC. Changes to the lighting load levels and shade presets for one or more scenes can be accomplished as follows: 1. In Standard mode, press the function button of the scene you wish to modify and hold it for five seconds. (Make sure you press the center of the button so both sides make contact.) 2.
iLux™ Integrated Lighting Systems Crestron CLS-C6 Series 12. To adjust the fade time, press the ^ and v buttons. When going up, the value will go from 0 seconds to 59 seconds, and then 1 minute to 99 minutes. When going down, the value will go from 99 minutes to 1 minute, and then 59 seconds to 0 seconds. The Min and Sec LEDs light as appropriate. Adjustment to fade time can be made when either Lights mode or Shades mode is active. 13.
iLux™ Integrated Lighting Systems Crestron CLS-C6 Series Problem Solving Troubleshooting The table below provides corrective action for possible trouble situations. If further assistance is required, please contact your dealer. CLS-C6 Troubleshooting TROUBLE The unit does not respond as expected after changing preset. POSSIBLE CAUSE(S) Incorrect procedures were used to change the preset. CORRECTIVE ACTION Refer to “Changing Scene Presets” on page 7 to revise the preset correctly.
Crestron Electronics, Inc. 15 Volvo Drive Rockleigh, NJ 07647 Tel: 888.CRESTRON Fax: 201.767.7576 www.crestron.com User Guide - DOC. 6395B (2014521) 06.08 Specifications subject to change without notice.