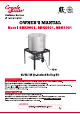
G ) Customer Service © 1-800-618-6798 OWNER’S MANUAL Model: SBK0601, SBK0801, SBK1001 60/80/100 Qt. Seafood Boiling Kit Use outdoors only! Do not use it inside a building, garage, or any other enclosed space. Read the instructions before assembling and using the appliance. DO NOT use the appliance unless it is completely assembled, and all the parts are securely fastened. This appliance will become very hot, do not move it during use. Keep away from children and pets.
For Your Safety Ck, When using this appliance, please always observe basic safety precautions. Read and understand the meaning of these symbols before assembling and using this appliance. THE APPLIANCE IS ONLY INTENDED FOR HEATING WATER (NOT OIL OR GREASE). THIS APPLIANCE IS FOR OUTDOOR USE ONLY. A WARNING: 1. Be alert. There is risk of serious personal injury if the instructions are not followed. 2. Indicates a hazardous situation, which if not avoided, may result in death or serious injury. 3.
For Your Safety Ck, Danger If you smell gas: If possible, immediately tum off gas supply to the appliance by muting the Propane tank valve clockwise {right}. If this cannot be accomplished safely, immediately get away from the appliance and contact the fire department (e.g. 911). Extinguish any open flame, use an approved fire extinguisher. Always have an approved extinguisher on hand when using this product. A Class "B" dry chemical or "CO2" extinguisher or preferably a Class "K" extinguisher.
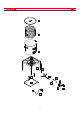
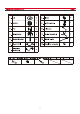
Parts and Hardware List wool. Ref Description Frustration QTY | | Ref Description Frustration | QTY 1. |Lid 1 8. | ignition Basket 1 9. | Ignition panel { 1 3. |Pot 1 10. | Electrode Ia 1 4. |Boiler stand 1 11. | Buber assembly Buber bracket Match holder _— 1 6.
Preparation Creole, Before beginning assembly, make sure all parts are present. Compare parts with packaged contents list and diagram above. If any parts are missing or damaged, do not attempt to assemble the products. Contact customer service for replacement parts via telephone or email. Dey Bey Phillips screwdriver Wrench * Estimated assembly time: 15 minutes * Tools required for assembly: Phillips screwdriver (not included) and Wrench (not included) CALIFORNIA PROPOSITION 65 WARNING 1.
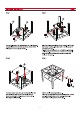
Assembly Instructions Step 1 Put the boiler stand (4) upside down on a flat surface. Assemble 2 boomer brackets (5) to the stand with 4 bolts (A) and 4 nuts (B) as shown. Step 3 Step 2 Align the holes on both the boomer assembly (11) and the boomer brackets. Fix them with 4 bolts (A) and 4 nuts (B) as shown. Please note: At this point, do not tighten all the bolts until step 3. The venture tube of the boomer assembly must be oriented in the same direction as 2 front holes on the stand.
Assembly Instructions Step 5 (not included) Unscrew ignition cap and washer from the ignition (8), Plug the electrode (10) wire into the corresponding then insert and align the ignition with the hole on bottom port on the ignition. of the ignition panel. Insert a battery and replace the washer and ignition cap. Screw the regulator connector (13) to the venture tube on the ignition panel then insert and tighten the regulator assembly (7) to it.
LP Tank Creole DANGER Read and follow the LP TANK instructions before/while using this appliance. Failure to follow these warnings could result in fire or explosion causing damages to property, injury, or death. +» The safety release valve on the LP tank could lead to gas leakage and cause a severe fire and increase the risk of serious injury or death. If the steps below are not followed exactly, a fire causing personal injury or death can occur.
LP Tank Close, CONNECTING REGULATOR TO LP TANK: « Place the LP tank on a secures, level, and stable surface. « Tum control knob to the “OFF” position. » Turn LP tank OFF by muting the hand wheel clockwise to a full stop. » Remove the protective cap from the LP tank valve. HINT: Always use the cap and strap supplied with the valve. DO NOT use a POL transport plug. It will defeat the safety feature of the valve. « Hold the regulator, insert the nipple into the LP tank valve.
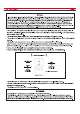
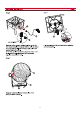
LP Tank Close, Leak Testing Valves, Hoses, and Regulator 1. Tum all control knob(s) to OFF. 2. Be sure the regulator is tightly connected to the LP tank. 3. Completely open the LP tank valve by muting the hand wheel counterclockwise. If you hear a rushing sound, tum the gas off immediately. This means there is a major leak at the connection. Correct before proceeding. 4. Brush the soapy solution onto indicated connections is shown below in Figure A and B. 5. If "growing" bubbles appear, there is a leak.
Operating Instructions Creole, Lighting Instructions 1. Read all instructions before lighting. 2. Turn regulator control valve and tank valve to OFF position. 3. Fully open LP tank valve by muting counterclockwise. 4. DO NOT stand with your head or arms over the bummer. Slowly turn on regulator valve one tum clockwise. Press ignition button and hold for 3 seconds to light the boomers. 5. If the burner does not ignite in 5 seconds, turn the regulator and the LP tank valve to OFF position.
Operating Instructions Create Operating Instructions 1. Check that your gas cylinder is not over filled and has the proper QCC type 1 connection. The maximum weight of a properly filled cylinder is approximately 38 Ib. (17 kg). 2. Check that your hose assembly is set to restrict gas flow. With the adjustable regulator provided, tum the regulator control counterclockwise until it stops. This is the OFF position. 3. Attach the regulator to the cylinder valve; refer to page 10 for detailed instructions.
Cleaning and Maintenance Took CAUTION : Allow the appliance to fully cool down (115 before performing any cleaning. Correct care and maintenance will keep your appliance operating smoothly. Clean regularly as determined by the amount of use. NOTE: Clean the entire appliance each year and frighten all hardware on a regular basis (1-2 times a year or more depending on usage). Cleaning should be done using detergents that won't harm the patio, lawn, or the environment. STEPS FOR CLEANING THE BURNER 1.
Cleaning and Maintenance Tek Suggested Cleaning Materials Mild dish washing liquid detergent Nylon cleaning brush pad Hot water Paper clip Polish Aluminum Pots 1. It is recommended to season the pot before use. Pour a small amount of vegetable oil inside and spread it with a paper towel until the entire bottom and sides are coated. Let it stand for 10 minutes. Wash out the interior of the pot, it will be ready to use. DO NOT apply to flame during any of this process. 2.
Troubleshooting Guide Create Q: My burner's flame appears very weak. A: If the hose assembly has a Type Connection (black/green knob}, it is equipped with a flow limiting device. This device is intended to limit the flow of gas should there be a leak between the regulator and the appliance. To achieve a positive gas seal, which will allow for maximum gas flow, the regulator control must be turned to a completely OFF position before the cylinder valve is opened.
Warranty and Customer Service Co gel. Thanks for purchasing this Creole feast ®Boiling Kit. We are here to help you enjoy your new boiling kit. We provide a warranty for your product within the warranty conditions under normal use of one year from the date of purchase for all components, covering defects and manufacturing errors.