FatPipe_CES_2_samples.fm Page 1 Friday, November 23, 2007 2:11 PM Welcome We are pleased to present the latest Video Conferencing experience from Creative. Read on to get the most out of your new inPerson™.
FatPipe_CES_2_samples.fm Page 2 Friday, November 23, 2007 2:11 PM 2 Table of Contents A Tour of Your inPerson and Remote Control ........................ 3 Power Options ......................................................................... 8 Getting Started ........................................................................ 9 During a Call ............................................................................ 13 Connecting Your inPerson to a TV ..........................................
FatPipe_CES_2_samples.
FatPipe_CES_2_samples.
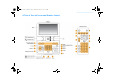
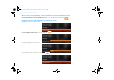
FatPipe_CES_2_samples.fm Page 5 Friday, November 23, 2007 2:11 PM A Tour of Your inPerson and Remote Control 5 The color selectors Press the red, green, blue or yellow selector on inPerson corresponding to the same color button you want to select on your inPerson’s LCD. Entering characters To enter a number, press and hold the numeric button. To enter an alphabet letter, press the letter's button continuously until the desired letter appears. To enter symbols, press the * button.
FatPipe_CES_2_samples.fm Page 6 Friday, November 23, 2007 2:11 PM 6 A Tour of Your inPerson and Remote Control We use the term “Highlight“ in this manual to mean the following action: To move up and down a menu to highlight an item, press the up and down arrows button Using the Arrows and OK buttons to edit menu items Highlight the menu item that you want. To edit a highlighted menu item, press the OK button . Using the keypad, edit the menu item.
FatPipe_CES_2_samples.fm Page 7 Friday, November 23, 2007 2:11 PM A Tour of Your inPerson and Remote Control 7 Using the Options button Pressing the Options button displays additional options in the following menu screens. To exit from the Options menu, press the Back button or press the Options button again.
FatPipe_CES_2_samples.fm Page 8 Friday, November 23, 2007 2:11 PM 8 Power Options Power Options There are two power options available for your inPerson: • Direct power source via the power outlet: if you are near a power outlet, we recommend you to use the power adapter. The Direct Power icon appears on the LCD. • Portable removable battery: if you want the convenience of portability, use the rechargeable Lithium-ion battery.
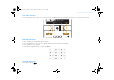
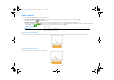
FatPipe_CES_2_samples.fm Page 9 Friday, November 23, 2007 2:11 PM Getting Started 9 Getting Started Step 1: Set up your inPerson NOTE You do not need to connect the ethernet cable if you are using a Wi-Fi connection. 1 Connect the ethernet cable as shown below. 2 Connect your inPerson to a power outlet using the power adapter. Your inPerson turns on and the LCD lights up after the power adapter is plugged in.
FatPipe_CES_2_samples.fm Page 10 Friday, November 23, 2007 2:11 PM 10 Getting Started Step 2: Set Date & Time After your inPerson turns on for the first time, you need to set the date and time. Using the Arrows button select Next. After setting the date and time, the Network Settings screen appears. , set the date and time and then Step 3: Connect to the network NOTE • If your inPerson is connected to the network using both Ethernet and Wi-Fi, the Ethernet connection will be used.
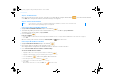
FatPipe_CES_2_samples.fm Page 11 Friday, November 23, 2007 2:11 PM Getting Started 11 To configure Manual Settings i. Highlight Network Name or Security (if the network is security enabled). ii. Press the OK button to edit the menu item. iii. After editing the menu item, press the OK button iv. Select Ok. When network connection is successful, the Wi-Fi icon again. appears on the LCD. Step 4: Sign-in to your account 1 Please wait as your inPerson automatically signs in to your account.
FatPipe_CES_2_samples.fm Page 12 Friday, November 23, 2007 2:11 PM 12 Getting Started Step 5: Making a call TIP To automatically send and receive video for all future calls, select Main Menu→ System→ User Settings→ Default Conferencing Mode→ Audio/ Video On. 1 If you already have a contact list in your SightSpeed account, your existing contacts will appear. If you want to add contacts, see “Add a contact” on page 16. 2 Highlight the contact you want. 3 Press the Call/End Call button .
FatPipe_CES_2_samples.fm Page 13 Friday, November 23, 2007 2:11 PM During a Call 13 During a Call Adjust volume Press the Volume +/- buttons . Activate Privacy options NOTE By default, the outgoing video is turned off when video conferencing starts. 1 To turn the outgoing audio on or off, press the Audio On/Off button . 2 To turn the outgoing video on or off, press the Video On/Off button . Switch display views TIP • To switch views during a call, you can also press the Arrows button .
FatPipe_CES_2_samples.fm Page 14 Friday, November 23, 2007 2:11 PM 14 Connecting Your inPerson to a TV Connecting Your inPerson to a TV NOTE If you were video conferencing, your inPerson will continue to stream video and audio even if the lid is closed. 1 Connect your inPerson to a TV as shown. 2 Press the TV/LCD button The LCD will be turned off. .
FatPipe_CES_2_samples.fm Page 15 Friday, November 23, 2007 2:11 PM Managing Photos 15 Managing Photos View photos 1 From the User Account or Video Conferencing screen, select Main Menu. 2 Highlight Photos and press the OK button . Thumbnails of your photos are displayed. To switch display view, press the Options button, highlight Switch View and press the OK button 3 Highlight the photo that you want and press the OK button 4 To return to the thumbnails view, press the Back button . .
FatPipe_CES_2_samples.fm Page 16 Friday, November 23, 2007 2:11 PM 16 Managing Your Contact List Managing Your Contact List Add a contact 1 Make sure you are logged in to your SightSpeed account. 2 From the Main Menu or Video Conferencing screen, select Contacts. 3 Select Add. 4 Press the OK button to enter your contact’s User ID. 5 Using the keypad, enter your contact’s SightSpeed ID (not your contact’s email address). 6 After editing, press the OK button again.
FatPipe_CES_2_samples.fm Page 17 Friday, November 23, 2007 2:11 PM Managing Your Contact List 17 Attach a photo to your contact 1 Make sure you are logged in to your SightSpeed account. 2 From the Main Menu or Video Conferencing screen, select Contacts. 3 Highlight the contact you want. 4 Select Edit. 5 Highlight Photo. 6 Press the OK button . 7 Highlight the photo you want. 8 Select Next. 9 Select Save. To delete the attached photo, repeat steps 1 to 4 above and select Reset Photo.
FatPipe_CES_2_samples.fm Page 18 Friday, November 23, 2007 2:11 PM 18 Managing Your Calls Managing Your Calls Add speed dial 1 From the User Account or Video Conferencing screen, select Speed Dial. 2 Highlight the keypad number you want to assign the speed dial. 3 Press the OK button Your contact list appears. or select Assign. 4 Highlight the contact you want assigned to the speed dial. 5 Press the OK button . 6 Select Yes. Make a call 1 There are several ways to make a call.
FatPipe_CES_2_samples.fm Page 19 Friday, November 23, 2007 2:11 PM Managing Your Calls 19 Manage incoming calls If the incoming call party is on your contacts list, the display name and photo (for contacts with attached photos) will be displayed. For contacts with no display name, the User ID will be displayed. To accept a call, select Yes. To ignore a call, select No. Enable Auto Answer This would be useful for remotely monitoring your home or office as your inPerson will automatically answer all calls.
FatPipe_CES_2_samples.fm Page 20 Friday, November 23, 2007 2:11 PM 20 Personalizing Your inPerson Personalizing Your inPerson Change Screen Saver settings NOTE Your inPerson will go into Screen Saver mode after a period of time of non-activity. This time can be changed. You can still receive calls in Screen Saver mode. 1 Make sure you are logged in to your SightSpeed account. 2 From the User Account or Video Conferencing screen, select Main Menu. 3 Highlight System and press the OK button .
FatPipe_CES_2_samples.fm Page 21 Friday, November 23, 2007 2:11 PM Managing Video Conferencing Settings 21 Managing Video Conferencing Settings NOTE If your contact informs you that the audio/video is not as smooth as before, try selecting a lower upload bandwidth and/or lower video resolution.
FatPipe_CES_2_samples.fm Page 22 Friday, November 23, 2007 2:11 PM 22 Managing Network Settings Managing Network Settings NOTE • If your inPerson is connected to the network using both Ethernet and Wi-Fi, the Ethernet connection will be used. • Wi-Fi networks requiring a webpage login are not supported. Set up a Wi-Fi connection 1 From the User Account or Video Conferencing screen, select Main Menu. 2 Highlight System and press the OK button .
FatPipe_CES_2_samples.fm Page 23 Friday, November 23, 2007 2:11 PM Upgrading Firmware 23 2 Highlight System and press the OK button . 3 Highlight Network Settings and press the OK button . . 4 Highlight Wi-Fi (Wireless Network) and press the OK button 5 Highlight the Wi-Fi network you want. To disable a Wi-Fi connection 6 Press the Options button 7 Press the OK button and highlight Disable Wi-Fi. . To delete a Wi-Fi profile 6 Press the Options button 7 Press the OK button and highlight Delete. .
FatPipe_CES_2_samples.fm Page 24 Friday, November 23, 2007 2:11 PM 24 FAQs/Troubleshooting FAQs/Troubleshooting My inPerson is not responding. What do I do? Try resetting your device. • Press and hold the Power button to turn off your inPerson, and then turn it on again. • If your inPerson is connected to the power outlet, remove and re-connect the power adapter from your inPerson. • If your inPerson is running on battery power, remove and re-attach the battery before turning on your inPerson again.
FatPipe_CES_2_samples.fm Page 25 Friday, November 23, 2007 2:11 PM Information Diagrams 25 Make sure your inPerson is connected to the network, and then set the date and time again. From the User Account or Video Conferencing screen, select Main Menu→ Date & Time. My time display is blinking. What does it mean? When your time display is blinking, your inPerson is trying to connect to the Internet to retrieve the current time.
FatPipe_CES_2_samples.fm Page 26 Friday, November 23, 2007 2:11 PM 26 Recovery Menu To exit the recovery menu From the Recovery Menu screen, select Restart.
FatPipe_CES_2_samples.fm Page 27 Friday, November 23, 2007 2:11 PM Specifications 27 Specifications Dimensions (W x D x H) 7.6’’ x 5.9’’ x 1.9’’ (194.3 mm x 150.5 mm x 48 mm) Image Sensor Color VGA CMOS (5.04 µm active square pixels) Lens Precision glass lens, F/2.0 Field of View 76° ultra wide angle LCD (Color Display) 7’’diagonal (16.
FatPipe_CES_2_samples.fm Page 28 Friday, November 23, 2007 2:11 PM 28 Safety Safety Refer to the following information to use your product safely, and to reduce the chance of electric shock, short-circuiting, damage, fire, hearing impairment or other hazards. Improper handling may void the warranty for your product. For more information, read the warranty available with your product. • Do not dismantle or attempt to repair your product. Refer all servicing to authorized repair agents.
FatPipe_CES_2_samples.fm Page 29 Friday, November 23, 2007 2:11 PM Regulatory 29 Regulatory The following sections contain notices for various countries: CAUTION: This product is intended for use with FCC/CE certified computer equipment. Please check the equipment operating/installation manual and/or with the equipment manufacturer to verify/confirm if your equipment is suitable prior to the installation or use of the product.
FatPipe_CES_2_samples.fm Page 30 Friday, November 23, 2007 2:11 PM 30 Regulatory CANADIAN CLASS B STATEMENT: This digital device does not exceed the Class B limits for radio noise emissions from digital apparatus as set out in the interference-causing equipment standard entitled "Digital Apparatus," ICES-003 of the Department of Communications.