Introduction Congratulations on your purchase of Sound Blaster® R5/E5! This portable audio recording hub and DAC (Digital-to-Analog Converter) features powerful noise reduction microphones that record clean, high quality audio directly to smart devices or PCs and Macs. The built-in powerful SoundCore3D TM sound and voice processor with SBX® Pro Studio™ technology was designed to perfectly deliver our legendary microphone reverb engine and produce an amazing cinematic audio playback experience.
Registering Your Product Registering your product ensures you receive the most appropriate service and product support available. You can register your product during installation or at www.creative.com/register. Please note that your warranty rights are not dependent on registration. More Help For the latest news and products for the Sound Blaster, please visit www.soundblaster.com. The site also includes information on making purchases, technical help and the latest software updates.
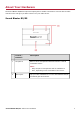
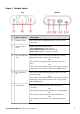
About Your Hardware The Sound Blaster R5/E5 has input and output jacks to enable connection to various devices while controls on the side give you basic control over your audio device. Sound Blaster R5/E5 1 Control / Indicator Description Microphones Built-in stereo microphones with horizontal or vertical orientation sensor. Note: Only one pair of microphones will be enabled at a time, depending on the orientation of the device.
Controls & Indicators 3 Control / Indicator Description Power / Bluetooth button and indicator Power / Bluetoothbutton l Power On – Press and hold 1 sec l Bluetooth pairing – Press and hold 2 sec l Power Off – Press and hold 4 sec Indicator l White: Power ON l Blue (blinking): Bluetooth discovery/pairing mode l Blue: Bluetooth connected l Off: Power OFF 4 SBX / Call button and indicator SBX button l Toggles SBX Pro Studio audio enhancements ON/OFF.
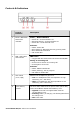
Input / Output Jacks Top Bottom Jack / Control Description 7 Headphone jacks Connects to stereo headphones with a 3.50 mm (1/8inch) plug. 8 Volume control knob Adjusts the audio output volume. Turn clockwise: Increase volume Turn anti-clockwise: Decrease volume Press once: Mute or unmute the volume 9 Line / Mic / Optical In jack Connects to line-level sources (smartphones, tablets, MP3 players) with a 3.50 mm (1/8-inch plug. OR Connects to microphones with a 3.50 mm (1/8- inch) plug.
12 Jack / Control Description USB port Connects to USB ports of PC/Mac for audio playback or recording. OR Connects to an Android phone/tablet via an OTG cable for audio recording. OR Alternatively, you may connect it to the power socket via a USB power adapter to charge it.
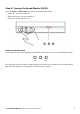
Setting Up Your Audio Device Step 1: Charging your Sound Blaster R5/E5 Connect your Sound Blaster R5/E5 directly to a USB port on your computer. You can also connect to a wall outlet using USB power adapter* (not included). * DC 5V, 1 A Charge your Sound Blaster R5/E5 for approximately 3 to 4 hours. It is recommended that you charge it for at least 8 hours before it is used for the first time. Note: Lithium-ion battery life may suffer when it is constantly fully depleted or overexerted at low voltage.
Step 2: Turning On Sound Blaster R5/E5 Press the Power / Bluetooth button to turn on Sound Blaster R5/E5. l Power On – Press and hold 1 sec l Bluetooth pairing – Press and hold 2 sec l Power Off – Press and hold 4 sec Battery level indication In On mode, the three white LEDs light up according to the battery level of your Sound Blaster R5/E5. Low Full When charging during Off mode, the LEDs will light up according to the battery level, and the flashing LED shows the charge level.
Step 3: Connecting to an Audio Source One-touch pairing with NFC You may pair your NFC-enabled devices with the Sound Blaster R5/E5 with a single tap using NFC technology. Simply follow these steps to connect them. Action 1 Turn ON the NFC feature on your device. And touch your device on the NFC logo on Sound Blaster R5/E5. LED Status Device Status Bluetooth indicator lights up in blue. Device paired automatically. Ready to stream music.
Manual Bluetooth pairing To enjoy your favorite music from your Bluetooth devices, simply follow these steps to connect them. Action LED Status Device Status 1 Press and hold Power / Bluetooth button for 2 seconds. Bluetooth indicator blinks in blue. Pairing mode. Ready to be paired with new device. 2 Turn ON the Bluetooth feature on your device. Search and select "Sound Blaster R5/E5". If password is required, enter 0000 and connect to it. Bluetooth indicator lights up in blue.
Connecting to a computer via USB (a) Micro-USB cable (b) Desktop (c) Laptop Note: Connecting the Sound Blaster R5/E5 to a USB hub is not recommended. Setting the Sound Blaster R5/E5 as the default audio device For Windows 1. Go to Control Panel and click Sound. 2. Click the Playback tab, select Sound Blaster R5/E5, then click the Set Default button. 3. Click the Recording tab, select the required Sound Blaster R5/E5 recording device, then click the Set Default button. For Mac 1.
Connecting to an Android device via USB To connect an Android device via USB, use an On-The-Go cable*. (a) On-The-Go cable* (b) USB cable (c) Android phone (d) Android tablet Note: * The On-The-Go cable is available separately. On-The-Go cable lets you connect your device to the Sound Blaster R5/E5 using the USB cable that came with your device.
Connecting to a mobile device via USB Host (a) USB cable (b) Smartphone (c) Tablet Sound Blaster R5/E5 – Setting Up Your Audio Device 13
Connecting to line-in sources (e.g. MP3 player, CD player) (a) 3.5 mm (1/8") stereo analog cable (b) PC/Mac (c) Tablet/Smartphone (d) Portable media player (e) External recording devices (DAT players, CD players, etc.
Connecting to Optical-In Sources (e.g.
Step 4: Connecting to Headphones / Speakers / Microphone Connecting to headphones CAUTION: Set the appropriate gain level (L or H) before connecting your headphones to the Headphone jack to prevent damaging your headphones.
Connecting to speakers (a) 3.5 mm 2-channel audio cable (available separately) (b) Analog speakers (c) Mini-TOSLINK cable (not included) (d) Digital speakers Note: The Line/Optical Out jack is disabled if a device is connected to the Headphone jacks.
Connecting to microphones (a) Microphone (b) Headset (c) Sound Blaster R1 (available separately) To use an external microphone For Windows 1. Go to Control Panel and click Sound. 2. Click the Recording tab, select Sound Blaster R5/E5 (External Mic) or Sound Blaster R1, then click the Set Default button. For Mac 1. Go to System Preferences and click Sound. 2. Click the Input tab, then select Sound Blaster R5/E5 (External Mic) or Sound Blaster R1. Note: You can only use one microphone at a time.
Installing and Uninstalling Software To take full advantage of your Sound Blaster R5/E5 audio device, you need to install device drivers and applications. At times, you may also need to uninstall some or all of the device drivers and applications to correct problems, change configurations, or upgrade outdated drivers or applications.
Uninstalling Drivers and Applications In the event that an uninstallation is required (such as for upgrades), please follow the following procedure. Before you begin, close all running audio applications. Applications that are still running during uninstallation will not be removed. For Windows OS 1. From the Control Panel, click Uninstall a program. 2. Select Sound Blaster R5/E5. 3. Click the Uninstall button or option. If the User Account Control dialog box appears, click the Continue button. 4.
Installing the Mobile App Sound Blaster Central (for iOS and Android) Sound Blaster R5/E5 comes with the Sound Blaster Central mobile application, that supports both iOS and Android OS, for you to customize your audio – you now have total control right from the palm of your hand. Download Sound Blaster Central from the Apple App Store or Google Play Store.
Using Your Audio Device Step 1: Adjusting the volume WARNING: l l Set the volume control at minimum level before connecting headphones or speakers. Do not listen to audio at high volumes for prolonged periods of time to avoid impairing your hearing. Adjust the volume to a comfortable level using the volume control.
Step 2: Using your Sound Blaster R5/E5 Your Sound Blaster R5/E5 works seamlessly with many external devices to perform different tasks: l Playing audio l Answering and ending calls l Recording audio Note: The Line/Optical Out jack is disabled if a device is connected to the Headphone jacks. Playing audio from a Bluetooth device OR OR Note: Customize and enhance your audio playback via Bluetooth with the Sound Blaster Central mobile application or Sound Blaster R5/E5 Control Panel software.
Playing audio from a computer/mobile device via USB OR Note: Enhance audio playback with SBX Pro Studio enhancements such as immersion control, dynamic range restoration, low-frequency boost, dialog boost, and automatic volume levelling. See Using the Creative Software Suite – SBX Pro Studio Settings.
Playing audio from a mobile device via USB host OR Sound Blaster R5/E5 – Using Your Audio Device 25
Playing audio from a line-in/optical-in device OR Sound Blaster R5/E5 – Using Your Audio Device 26
Answering and ending calls Mobile communication When there's an incoming call, the call takes precedence over audio playback – playback stops and the ringtone will be heard. Press the SBX button once to answer the call. Press again to end the call. The music will resume after the call has ended. OR Desktop communication Use the Sound Blaster R5/E5 to enjoy outstanding acoustic performance in popular VoIP applications like Ventrilo®and TeamSpeak®.
Recording audio to a mobile device You can record audio to your mobile device using the built-in microphones of the Sound Blaster R5/E5, or an external microphone connected to the Sound Blaster R5/E5. Use a voice recording application on your mobile device to record audio. For Android, a third party app such as "USB Audio Recorder PRO" must be installed on your device to use this feature.
Recording audio to a computer Easily record audio on your computer with the built-in microphones of the Sound Blaster R5/E5, or an external microphone connected to the Sound Blaster R5/E5. Use a voice recording application on your computer to record audio. Note: The built-in microphones will be disabled automatically when an external microphone is connected.
Recording line-level audio to a mobile device or computer You can record audio from a line-in source (game console, DVD player, TV set) and store them in your mobile or computer via the Sound Blaster R5/E5. OR Note: Signal levels can be adjusted using the Sound Blaster R5/E5 Control Panel or the Sound Blaster Central application. See Using the Creative Software Suite.
Recording "What U Hear" (For Windows OS) The Sound Blaster R5/E5 is equipped with What U Hear feature that allows you to record what is being played as it is. You can also record voice conversations held over instant messaging tools such as Google Talk, Skype etc. 1. Go to Control Panel and click Sound. 2. Click the Recording tab, select Sound Blaster R5/E5 (What U Hear), then click the Set Default button. 3. Play music on your connected device or activate your voice conversation. 4.
Using the Creative Software Suite A software suite for the Sound Blaster R5/E5 is developed to provide additional enhancements to the audio and voice inputs and outputs of the product.
Sound Blaster R5/E5 Control Panel The rest of this chapter explains how to use the Sound Blaster R5/E5 Control Panel to view and adjust the various features of your Sound Blaster R5/E5. The examples and screenshots below uses Windows as an example. The UI for other operating systems may differ slightly. Managing Your Profiles FPO Click the button to display the Profiles pane. Activate a profile by clicking the list.
Configuring Your General Settings Click list: from the top right corner of the interface and select the option from the FPO l Select whether the Sound Blaster R5/E5 Control Panel is activated when Windows starts. (For Windows only) l Restore default settings. l Select the audio playback device. (For Windows only) l Select the supported software languages available for your system. l General information regarding your Sound Blaster R5/E5 Control Panel software.
SBX Pro Studio Settings FPO 1. SBX Pro Studio enhancements Select to turn on or turn off each enhancement. You can hover your mouse cursor over each enhancement to display a brief explanation. 2. Enhancement Level sliders Adjust the amount of enhancement to apply. 3. Audio test controls Play/Pause or Stop the demo video. Enhancing Your Listening Experience You can adjust the amount to apply for each enhancement by dragging its slider left to decrease or right to increase.
CrystalVoice Settings FPO 1. Volume sliders Adjust the recording and monitoring volumes, or to mute/unmute them. 2. Microphone EQ Select an equalizer preset suitable for your microphone. 3. Crystal Voice enhancements Select to turn on or off each of the available enhancements. 4. Enhancement Level sliders Adjust the amount of enhancement to apply. 5. Audio test button Click and speak into your microphone to hear how your voice sounds with CrystalVoice applied.
l l CrystalVoice Acoustic Echo Cancellation eliminates echoes and enables the speaker to listen to the other party clearly. Echoes are a common problem present in voice communication systems that disrupts conversations by making it difficult to hear the other party. CrystalVoice Focus creates a zone and suppresses noise outside it to enable the speaker within to be heard with amazing clarity. Multiple microphones are used to focus, enhance the speaker's voice, and eliminate sounds outside the zone.
Speakers/Headphones Settings FPO 1. Speakers / Headphones Configuration Shows your current physical speakers or headphones configuration. 2. Testing your audio playback Click to hear a sample audio clip being played back through your setup.
Mixer Settings FPO 1. Volume sliders Under Playback, adjust your playback and monitoring volumes, or to mute/unmute them. Under Recording, adjust your recording volumes or to mute/unmute them. 2. You can click the icon to adjust more settings for your input/output.
Equalizer Settings FPO 1. EQ presets Select an equalizer preset to apply to your audio. 2. EQ sliders Adjust the equalizer settings. Customizing Your EQ Settings Select the EQ checkbox to enable this feature, then click the EQ drop-down arrow and select a preset from the list. Selecting a preset will move the EQ sliders to the appropriate values. You can then adjust the equalizer setting by dragging the sliders up or down to the desired level. Click configuration as a new preset.
General Specifications Inputs l One 3.5 mm (1/8") line-in/mic-in/optical-in jack l Built-in stereo microphones Outputs l Two 3.5 mm (1/8") headphones jack l One 3.
l Headphone amplifier: o Normal: 33 ~ 300 ohms (1.5 ~ 3.3 V) o High: 300 ~ 600 ohms (3.
Troubleshooting and Support This section provides solutions to problems you may encounter during installation or normal use. This includes: l Problems with Sound l Problems with Simultaneous Playback/Recording l Tips to Improve Your Recording Quality l Restore Default Settings Problems with Sound No sound from the headphones. Check the following: l The headphones are connected to the Headphone jack. l Ensure the Sound Blaster R5/E5 is turned on.
Problems with Simultaneous Playback/Recording An error message appears when recording and playing back simultaneously. This may occur due to data transfer limitations if your computer is using a USB 1.1 connection. It may not be possible to play back, or simultaneously record and play back, content at the highest bit rate and/or frequency supported. Select lower bit depth and sampling rates for reduced CPU consumption and lower USB bandwidth requirements.
Safety Information Refer to the following information to use your product safely, and to reduce the chance of electric shock, short-circuiting, damage, fire, hearing impairment or other hazards. Improper handling may void the warranty for your product. For more information, read the warranty available with your product. l Do not dismantle or attempt to repair your product. Refer all servicing to authorized repair agents.
Wireless Product l l l The short wave radio frequency signals of a wireless device may impair the operation of other electronic and medical devices. Switch off the device where it is prohibited. Do not use the device in medical facilities, aircraft, refueling points, close to automatic doors, automatic fire alarms or other automatically controlled devices. Keep this device at least 20 cm from pacemakers and other medical devices.
IMPORTANT — A LIRE AVEC ATTENTION Ecouter de manière prolongée, à un très haut volume sonore de la musique (au dessus de 80 decibels), aumoyen d'un casque ou d'écouteurs, peut entraîner une détérioration irreversible et définitive de vos facultés auditives. L’usage répété et habituel d’un casque ou d’écouteurs à un niveau de volume sonoretrop élevé peut donner l'impression à l'utilisateur que le volume sonore émis par l’appareil n'est pas suffisant.
Regulatory Information Notice for the USA Federal Communication Commission (FCC) Interference Statement FCC Part 15: This equipment has been tested and found to comply with the limits for a Class B digital device, pursuant to Part 15 of the FCC Rules. These limits are designed to provide reasonable protection against harmful interference in a residential installation.
Notice for Canada This Class B digital apparatus complies with Canadian ICES-003 and RSS-210. Cet appareil numérique de classe B est conforme aux normes canadiennes NMB-003 et CNR-210. This device complies with Industry Canada licence-exempt RSS standard. Operation is subject to the following two conditions: 1. This device may not cause harmful interference, and 2. this device must accept any interference received, including interference that may cause undesirable operation.
DECLARATION OF CONFORMITY According to the FCC96 208 and ET95-19 Manufacturer/Importer’s Name: Creative Labs, Inc. Manufacturer/Importer’s Address: 1901 McCarthy Boulevard Milpitas, CA. 95035 Tel: (408) 428-6600 declares under its sole responsibility that the product Trade Name: Creative Model Number: SB1590 has been tested according to the FCC / CISPR22 requirement for Class B devices and found compliant with the following standards: EMI/EMC: ANSI C63.
European Compliance This product conforms to the following: EMC Directive 2004/108/EC. RoHS Directive 2011/65/EU. Mains operated products for the European market comply with Low Voltage Directive 2006/95/EC and Commission Regulation(s) Implementing Directive 2009/125/EC. Communication/RF wireless products for the European market comply with R&TTE Directive 1999/5/EC.
Conformità alle normative europee Questo prodotto è conforme alla seguente normativa: Direttiva EMC 2004/108/CE. Direttiva RoHS 2011/65/UE. I prodotti che funzionano con corrente di rete per il mercato europeo sono conformi alla direttiva bassa tensione 2006/95/CE e alla direttiva di implementazione nelle normative europee 2009/125/CE. I prodotti di comunicazione/wireless RF per il mercato europeo sono conformi alla Direttiva R&TTE 1999/5/CE.
Homologación para Europa Este producto cumple: la Directiva de compatibilidad electromagnética 2004/108/CE. Directiva RoHS 2011/65/UE. Los productos funcionando con corriente electrica cumplen con la Directiva 2006/95/CE de baja tensión y con la implementación de los requisitos de la Comisión para la directiva 2009/125/CE. Los productos inalámbricos de comunicación o frecuencias de radio para el mercado europeo cumplen la Directiva 1999/5/CE de equipos de radio y terminales de telecomunicaciones.
Conformidade Europeia Este produto está em conformidade com a seguinte regulamentação: Directiva EMC 2004/108/EC. Directiva RoHS 2011/65/UE. Os produtos com ligação à rede destinados ao mercado europeu estão em conformidade com a directiva de baixa voltagem 2006/95/CE. Directiva de Implementação do(s) Regulamento(s) da Comissão 2009/125/CE. Os produtos de comunicação/radiofrequência sem fios destinados ao mercado europeu estão em conformidade com a directiva R&TTE 1999/5/CE.
Europeisk samsvar Dette produktet er i samsvar med følgende: EMC-direktivet 2004/108/EC. RoHS-Direktivet 2011/65/EU. Elektriske produkter til det europeiske markedet er i samsvar med Lavspenningsdirektivet 2006/95/EC og Økodesigndirektivet 2009/125/EC. Kommunikasjon/RF trådløse produkter til det europeiske markedet er i samsvar med R&TTE-direktivet 1999/5/EC. ADVARSEL: For å overholde det europeiske CE-kravet må denne enheten installeres med CE-sertifisert datautstyr som tilfredsstiller klasse B-grensene.
Eurooppalainen yhdenmukaisuus Tämä tuote täyttää seuraavat tuotemääritykset: TEMC-direktiivin 2004/108/EC. RoHS-direktiivin 2011/65/EU. Euroopan markkinoiden verkkovirtaa käyttävät tuotteet ovat matalajännitedirektiivin 2006/95/EY mukaisia. Euroopan parlamentin ja neuvoston ohjaava direktiivi 2009/125/EY. Euroopan markkinoiden tietoliikenne- ja langattomat radiotaajuustuotteet noudattavat R&TTEdirektiiviä 1999/5/EY.
Zgodność z przepisami europejskimi Urządzenie jest zgodne z dyrektywą EMC 2004/108/EC. Dyrektywa RoHS 2011/65/UE. Urządzenia zasilane z sieci elektrycznej przeznaczone na rynek europejski muszą być zgodne z dyrektywą dotyczącą urządzeń niskonapięciowych 2006/95/EC oraz z dyrektywą wdrażającą komisji regulacyjnej 2009/125/WE. Urządzenia komunikacyjne / bezprzewodowe wykorzystujące transmisję radiową przeznaczone na rynek europejski spełniają warunki dyrektywy RTTE 1999/5/EC.
Európai megfelelőség Ez a termék megfelel a következőknek: 2004/108/EGK sz., az elektromágneses összeférhetőségre. 2011/65/EU, RoHS. Az Európa területére szánt hálózati termékek megfelelnek az alacsony feszültségre vonatkozó 2006/95/EC irányelvnek. Az irányelvet 2009/125/EK végrehajtó bizottsági rendeletek. Az Európa területére szánt, távközlési, illetve rádiófrekvenciás vezeték nélküli termékek megfelelnek a rádióés távközlő végberendezésekre vonatkozó 1999/5/EK irányelvnek.
Europos Sąjungos atitiktis Šis gaminys atitinka šiuos reikalavimus: „Elektromagnetinės atitikties“ („EMC“) direktyva 2004/108/EC. RoHS direktyva 2011/65/ES. Produktai, kurie veikia maitinami iš elektros tinklo, skirti Europos rinkai, atitinka Žemos įtampos direktyvą 2006/95/EB. Komisijos reglamentas(-ai) dėl Direktyvos 2009/125/EB įgyvendinimo.
Avrupa Uyumu Bu ürün aşağıdakilere uygundur: 2004/108/EC EMC (Elektromanyetik Uyumluluk) Yönetmeliği. 2011/65/EC RoHS (Tehlikeli Maddelerin Kısıtlanması) Yönetmeliği Avrupa piyasasına yönelik, elektrik şebekesi tarafından çalıştırılan ürünler 2006/95/EC Alçak Gerilim Yönetmeliği (LVD) ve 2009/125/EC Enerji ile İlgili Ürünlerin Çevreye Duyarlı Tasarımına İlişkin Yönetmeliğe uygundur. Avrupa piyasasına yönelik İletişim / RF kablosuz ürünleri R ve TTE Yönetmeliği 1999/5/EC ile uyumludur.
Ukraine RoHS Statement Обладнання відповідає вимогам Технічного регламенту щодо обмеження використання деяких небезпечних речовин в електричному та електронному обладнанні, затвердженого постановою Кабінету Міністрів України від 3 грудня 2008 № 1057 Notice for Japan 充電式電池のリサイクル 充電式リチウム電池はリサイクル可能な資源です。 l Creative製品に埋め込まれている充電式リチウム電池をリサイクルするために、本体から電池を取り外さないで ください。リサイクルに関する情報および指示については、 Creative Media K Kカスタマーサポート http://jp.creative.
Notice for China Vietnam RoHS Statement This product is in compliance with Circular 30/2011/TTBCT of the Ministry of Trade of the Socialist Republic of Vietnam (“Circular”), it does not contain the following substances in concentration greater than the Maximum Limit value as specified in the Circular.
License and Copyright Information in this document is subject to change without notice and does not represent a commitment on the part of Creative Technology Ltd. No part of this manual may be reproduced or transmitted in any form or by any means, electronic or mechanical, including photocopying and recording, for any purpose without the written permission of Creative Technology Ltd. © 2014 Creative Technology Ltd. All rights reserved.