
User's Manual
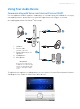

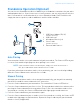
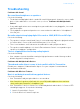
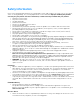
Table Of Contents
- Congratulations!
- System Requirements
- About Your Devices
- Setting Up Your Wireless System
- Using Creative Music Server
- Using the Controller
- Playing and Managing Music
- Managing Broadcast and Zone modes
- Using Your Audio Device
- Software Suite
- Standalone Operation (Optional)
- Troubleshooting
- General Specifications
- Safety Information
- Regulatory Information

Standalone Operation (Optional) 20
Standalone Operation (Optional)
You can also use Sound Blaster Wireless MultiPlay as a standalone transmitter for your other
audio playback devices. If you choose to use it in this manner, you can enjoy only one wireless
music stream which is transmitted to all receivers (Broadcast mode). Your Controller will
simply function as speakers, and no additional controls will be available.
Auto Pairing
Your transmitter and receivers pair automatically when turned on. The Connect LEDs on your
receivers flash and then light up green when pairing is successful.
If you have paired your transmitter and receivers previously, you can reset them by holding
down the Connect button on the units for five seconds.
Manual Pairing
Although your transmitter and receivers may pair automatically, you may wish to manually
pair them to establish a more robust wireless connection.
1 Press the Connect button on your transmitter. The transmitter’s Connect LED flashes.
2 Press the Connect button on your first receiver. This must be done within three minutes after
pressing the Connect button on the transmitter (Step 1). Once the transmitter and receiver
are paired successfully, the Connect LED on both units light up green and remain on.
3 Press the Connect button on your transmitter again.
4 Press the Connect button on your second receiver. Once paired successfully, the Connect LED
on both units light up green and remain on. Repeat the steps 3 and 4 to pair your third and
fourth receivers (if applicable).
NOTE
If your transmitter and receiver do not pair, simply reset them. On one unit at a
time, press and hold the Connect button for five seconds.
CONNECT
2
3
1
5
4
1 USB Power Adapter (5V, 1A)
(available separately)
2 USB Connector
3 Microphone/Line In jack
4 Stereo cable
(available separately)
5 External audio sources