CONNECT Sound Blaster Wireless MultiPlay System User’s Guide
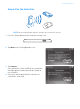
English Congratulations! The Sound Blaster® Wireless MultiPlay System, combined with the Creative Music Server software, lets you playback and control different music simultaneously wherever you are in your home, wirelessly. You can expand your wireless system by adding on other Sound Blaster Wireless devices.
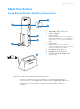
About Your Devices 2 About Your Devices Sound Blaster Wireless MultiPlay (Transmitter) 3 2 CONNECT 4 5 1 2 3 Lights up green when wireless streaming is enabled and ready. Flashes to indicate pairing with a wireless receiver or other supported device. 6 4 1 Adjustable USB connector Connect button Connect LED Power LED Lights up blue when connected to the computer’s USB port and computer is turned on. Flashes when volume is muted.
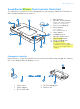
About Your Devices 3 Sound Blaster Wireless Touch Controller (Controller) The Controller is a wireless receiver designed to let you remotely control the Transmitter’s music playback and wireless features. 2 1 2 3 1 Mini speakers Speaker volume buttons May be used to adjust transmitter volume for certain functions. 4 3 4 Touch screen display Power button Press to turn on. Press and hold to turn off.
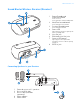
About Your Devices 4 Sound Blaster Wireless Receiver (Receiver) 1 2 1 Power/Standby and Play/Pause button Press to turn on. Press and hold to enable Standby mode. 2 3 Next/Fast forward button Press and hold to Fast forward. 3 Previous/Rewind button Press and hold to Rewind. 4 Power LED Lights up when turned on. Lights up red when on standby mode. 5 6 7 4 Line Out jack RCA Audio Line Out jacks Connect LED button Lights up green when paired with transmitter.
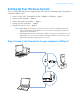
Setting Up Your Wireless System 5 Setting Up Your Wireless System This section shows you how to set up your wireless system consisting of your Transmitter, Controller and Receiver. • • • • • Step 1: Connect the Transmitter to your computer’s USB port ... page 5 Step 2: Install Software ... page 6 Step 3: Set up the Transmitter ... page 6 Step 4: Pair the Controller. ... page 8 Step 5: Pair the Receiver ...
Install Software 6 Step 2: Install Software To control your wireless music streaming and manage separate playlists for each zone, you must install the drivers and applications provided on the installation CD. If you are using a notebook that does not have a CD-ROM drive, you can download the installation software from www.soundblaster.com/SBWirelessMultiPlay. For all supported Windows OS 1 If prompted for the audio drivers, click the Cancel button. 2 Insert the Installation CD into your CD or DVD drive.
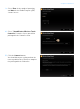
Set up the Transmitter 7 3 Select Zone for the mode of operation, and Auto for the Radio Frequency (RF) channel to use. 4 Select “Sound Blaster Wireless Touch Controller” from the list as you will be pairing with the Controller next. 5 Click the Connect button. You should then proceed to perform the next step within three(3) min to complete the pairing with the Controller.
Pair the Controller. 8 Step 4: Pair the Controller. CONNECT NOTE You are allowed to pair only one controller for each wireless system. 1 Press the Power button on the Controller to turn it on. 2 Tap Next on the Pairing Wizard screen. 3 Tap Connect. Once paired, the Connect LED on the transmitter will light up green and a Zone will be shown on the Controller. 4 A test tone will be played to the Controller to confirm the connection.
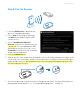
Pair the Receiver 9 Step 5: Pair the Receiver CONNECT 1 Click the Add Receiver... button on the Wireless Setup Wizard window. 2 Select Zone for the mode of operation, and Auto for the Radio Frequency (RF) channel to use. 3 Select “Sound Blaster Wireless Receiver” from the list. Alternatively, you can enter or select an appropriate label and image for the Receiver (e.g., select “Bedroom” if the Receiver will eventually be placed in the bedroom). 4 Click the Connect button.
Pair the Receiver 10 Pairing Additional Receivers If you wish to reset your transmitter or add more receivers later, follow the steps below: 1 Click the Wireless Control Setup 2 Click the Wizard icon in Creative Music Server. button. 3 Select the Add a wireless receiver option, then follow the instructions on the screen as described in the previous section, “Step 5: Pair the Receiver”. 4 Press the Connect button on the receiver to complete the pairing with the transmitter.
Using Creative Music Server 11 Using Creative Music Server Creative Music Server gives you full wireless control over your music streaming and integrates seamlessly with your iTunes® or Windows Media library. You can playback any music tracks in your computer and other sources, such as the audio track of movies and Internet radio from other applications. Use your existing playlists, or create new ones from your music library.
Playing and Managing Music 12 Playing and Managing Music Playing Music Using Creative Music Server 1 Click the zone you wish to stream music to. This step is not required if you are in Broadcast mode. 2 Click the Play From... button to display the Music Server - Sources window. You can browse through your computer for songs or playlists, then click and drag them into the play queue window. You can press and hold the Shift key to click and select multiple tracks. 3 Select a song, then click .
Playing and Managing Music 13 Adjusting Audio Settings You can enhance your music listening experience with these settings: Crossfading is used to create smooth transitions between songs by fading out the volume at the end of one song and fading in the volume of the next song gradually. Crystalizer restores the natural dynamic range that is lost when iTunes and MP3 music gets compressed.
Managing Broadcast and Zone modes 14 Managing Broadcast and Zone modes Use the Broadcast feature to playback the same song to all your receivers simultaneously. This quick and easy method is perfect for occasions such as parties when you want everyone to listen to the same song throughout your home. Use the Zone Control feature to allow people in your home to listen to the songs they want, and each zone can have their own playlist.
Managing Broadcast and Zone modes 15 Zone Control Your transmitter and receivers may automatically pair with each other the first time they are switched on. However, to use zone control, you must manually pair your transmitter and receivers so that the zones are correctly assigned. To do this, follow the steps in “Setting Up Your Wireless System” on page 5. Using Creative Music Server 1 Click the Wireless Control Setup icon. 2 Under Zone, click the On option, then close the Wireless Settings window.
Managing Broadcast and Zone modes 16 Grouping Zones Zones that are grouped together share the same play queue. Each zone can only belong to one group, but you can create multiple groups. Each group can have their own play queue. This lets you play songs to only some of your receivers simultaneously. For example, you can group the kitchen and dining room together for classical music, and group the living room and the bedroom for rock music.
Using Your Audio Device 17 Using Your Audio Device Communicating with Voice over Internet Protocol (VoIP) Use a headphones and microphone combination, or a headset with your audio device to enjoy outstanding acoustic performance for your VoIP applications like Skype®, or instant messaging applications like Yahoo!® Messenger. CONNECT L 1 2 5 1 Headset Stereo cable 4 (available separately) 3 4 5 Powered stereo or 2.
Using Your Audio Device 18 Playing / Recording Music You can play music from, and/or record music to external devices (for example, MP3 players, Digital Audio Tape players/recorders and MiniDisc players/recorders) by connecting them to your audio device.
Software Suite 19 Playing Games Your audio device is equipped with Creative's cutting edge audio technologies and software to enhance the audio in your games. EAX ADVANCED HD Make your games come alive with EAX® ADVANCED HD™! Hear multiple audio effects being played simultaneously, and precise environment settings applied to them to create a life-like environment and heighten the sense of realism.
Standalone Operation (Optional) 20 Standalone Operation (Optional) You can also use Sound Blaster Wireless MultiPlay as a standalone transmitter for your other audio playback devices. If you choose to use it in this manner, you can enjoy only one wireless music stream which is transmitted to all receivers (Broadcast mode). Your Controller will simply function as speakers, and no additional controls will be available.
Troubleshooting 21 Troubleshooting Problems with Sound No sound from headphones or speakers. Check the following: • The default sound playback device under Microsoft Volume panel shows the correct audio device. If the audio device selected is correct, refer to “Problems with Multiple Audio Devices” • If any audio applications were running when your audio device was plugged in, close and open them again. • The headphones or powered speakers are connected to the audio device’s Headphone/ Line Out jack.
Troubleshooting 22 3 Select the Enable Wireless Music Control check box. 1 2 3 The receivers seem to be picking up extra noise, or there are intermitten pauses. The position of your Sound Blaster Wireless devices as well as signals from other wireless routers or Bluetooth equipment may affect the quality of the transmissions. Try the following: • In the Wireless Music Control section of Creative Music Server, change the RF Channel from Auto to either Ch 1, 2 or 3.
General Specifications 23 General Specifications Connectivity Sound Blaster Wireless MultiPlay • One 3.5 mm (1/8”) stereo jack for Analog Line In or Microphone • One 3.5 mm (1/8”) stereo jack for Analog Line Out or Headphones Sound Blaster Wireless Touch Controller • One 3.5 mm (1/8”) stereo jack for Headphones Sound Blaster Wireless Receiver • One 3.
Safety Information 24 Safety Information Refer to the following information to use your product safely, and to reduce the chance of electric shock, short-circuiting, damage, fire, hearing impairment or other hazards. Improper handling may void the warranty for your product. For more information, read the warranty available with your product. • Read these instructions. • Keep these instructions. • Heed all warnings. • Follow all instructions. • Do not use this apparatus near water.
Regulatory Information 25 Regulatory Information Notice for the USA 1 2 FCC Part 15: This equipment has been tested and found to comply with the limits for a Class B digital device, pursuant to Part 15 of the FCC Rules. These limits are designed to provide reasonable protection against harmful interference in a residential installation.
Regulatory Information 26 niveau d'exposition peut être inférieur au niveau critique établi par la Proposition 65 ou même être nul. Néanmoins, par souci extrême de prudence, Creative a choisi de placer l'avertissement de la Proposition 65 sur ses produits. European Compliance This product conforms to the following: EMC Directive 2004/108/EC. Mains operated products for the European market comply with Low Voltage Directive 2006/95/EC.