
Installation Guide

2-1/8''
2-1/8''
3-3/8''
17-1/2''
11-3/4''
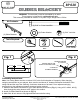
GLIDER BRACKET
Blue Sky Play PT 2008 2-23-2017
2700 Riverside Drive For Customer Service, Call: 844-801-5828
Chattanooga, TN 37406
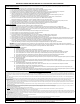
WARNING: This accessory must be assembled by an adult.
This accessory is intended for residential use only.
This accessory intended for children 3-10 years of age. Weight Limit: 150 lbs.
Specications subject to change without notice.
Manufactured for Blue Sky Play
Made in China
Assembly Instructions:
Note: Your Swing Beam must be a nominal 3-3/8’’ wide for this bracket to t properly. When hanging
swinging accessories on your playset, there must be a minimum 8’’ clearance between the bottom of the
swing seat and the top of the surfacing. A minimum clearance of at least 8’’ from adjacent swinging
accessories or play equipment support structures is also required.
1. Measure and mark the locations for your Glider Bracket as shown in (Fig. 1). Using a 3/8’’ drill bit, drill (2)
holes through the swing beam at a 90° angle to the surface.
2. Install (2) Glider Brackets as shown in (Fig. 2).
3. Make sure all lock nuts are fully tightened and secure before using.
Fig. 1
BP 020
Tools Required:
TAPE MEASURE
3/8’’ DRILL BIT
ELECTRIC
DRILL
Kit Contents:
GLIDER BRACKET
(2) 5/16’’ x 4’’ Hex Head Bolt
(4) Fender Washer (2) 5/16’’ Lock Nut
(1 PAIR) GLIDER BRACKET
BP 020
(2) Glider Brackets
SOCKET WRENCH
& 5/16’’ SOCKET
2-1/8''
2-1/8''
3-3/8''
17-1/2''
11-3/4''
4" HEXBOLT
&FENDERWASHER
FENDE RWASHER
&LOCK NUT
TIGHTENQUICK LINK
A
FTERATTACHING CHAIN
Fig. 2