
Frequently Asked Questions
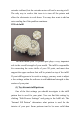
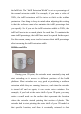
Table Of Contents

Each layer of your 3D printed part is created using a
combination of outline perimeters and infill. The perimeters trace
the outline of your part creating a strong and accurate exterior. The
infill is printed inside of these perimeters to make up the
remainder of the layer. The infill typically uses a fast back-and-
forth pattern to allow for quick printing speeds. Because the infill
uses a different pattern than the outline of your part, it is important
that these two sections merge together to form a solid bond. If you
notice small gaps between the edges of your infill, then there are
several settings you may want to check.
(1) Not enough outline overlap
Simplify3D includes a setting that allows you to adjust the
strength of the bond between the perimeter outlines and the infill.
This setting is called the “Outline overlap” and determines how
much of the infill will overlap with the outline to join the two
sections together. This setting can be found by going to “Edit
Process Settings” and selecting the Infill tab. The setting is based
on a percentage of your extrusion width, so that it easily scales and
adjusts for different nozzle sizes. For example, if you are using a
20% outline overlap, it means that the software will instruct the
printer so that the infill overlaps with 20% of the inner-most
perimeter. This overlap helps to ensure a strong bond between the
two sections. As an example, if you were previously using an
outline overlap of 20%, try increasing that value to 30% to see if
the gaps between your perimeters and infill disappear.
(2) Printing too fast
The infill for your part is generally printed much faster than