
Frequently Asked Questions
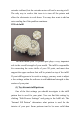
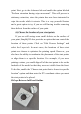
Table Of Contents

others. For example, Grid, Triangular, and Solid Honeycomb are
all strong infill patterns. Other patterns like Rectilinear and Fast
Honeycomb may sacrifice some strength for faster printing speeds.
If you are having trouble producing strong reliable infill, try a
different pattern to see if it makes a difference.
(2) Lower the print speed
The infill is typically printed faster than any other portion of
your 3D print. If you try to print the infill too fast, the extruder
won’t be able to keep up and you will start to notice under-
extrusion on the inside of your part. This under-extrusion will tend
to create weak, stringy infill since the nozzle is not able to extrude
as much plastic as the software would like. If you have tried
several infill patterns, but continue to have problems with weak
infill, try reducing the print speed. To do this, click “Edit Process
Settings” and select the Speeds tab. Adjust the “Default Printing
Speed”, which directly controls the speed that is used for the infill.
For example, if you were previously printing at 3600 mm/min (60
mm/s), try decreasing that value by 50% to see if the infill starts to
become stronger and more solid.
(3) increase the infill extrusion width
Another very powerful feature within Simplify3D is the
ability to modify the extrusion width that is used for the infill of
your part. For example, you could print the outline perimeters with
a very fine 0.4mm extrusion width, but transition to a 0.8mm
extrusion width for the infill. This will create thicker, stronger
infill walls that greatly improve the strength of your 3D printed
part. To adjust this setting, click “Edit Process Settings” and select