
Frequently Asked Questions
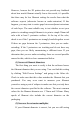

Table Of Contents
hollow, we want the exterior to remain solid. To do this,
Simplify3D allows you to specify how many solid layers you want
on the top and bottom of your part. For example, if you were
printing a simple cube with 5 top and bottom solid layers, the
software would print 5 completely solid layers at the top and
bottom of the print, but everything else in the middle would be
printed as a partially hollow layer. This technique can save a
tremendous amount of plastic and time, while still creating very
strong parts thanks to Simplify3D’s great infill options. However,
depending on what settings you are using, you may notice that the
top solid layers of your print are not completely solid. You may
see gaps or holes between the extrusions that make up these solid
layers. If you have encountered this issue, here are several simple
settings that you can adjust to fix it.
(1) Not enough top solid layers
The first setting to adjust is the number of top solid layers
that are used. When you try to print a 100% solid layer on top of
your partially hollow infill, the solid layer has to span across the
hollow air pockets of your infill. When this happens, the
extrusions for the solid layer have a tendency to droop or sag
down into the air pocket. Because of this, you generally want to
print several solid layers at the top of your print to ensure a nice
flat, completely solid surface. As a good rule of thumb, you want
the solid section at the top of your print to be at least 0.5mm thick.
So if you are using a 0.25mm layer height, you would need at least
2 top solid layers. If you are printing at a lower layer height such
as 0.1mm, you may need 5 solid layers at the top of your print to