
User Manual


19
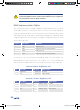
Setup
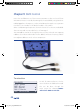
1. Set correct framerate and format on Lockit box [1] (see instruction manual for
device). This should match the frame rate and format you intend to shoot at
2. Plug a BNC T adapter [2] into the VIDEO/WORD output of the Lockit box
3. Connect camera GENLOCK input [3] to Lockit box [2] with coaxial cable. Follow
camera instructions to enable external genlock input, and make sure camera
is receiving genlock signal (if shooting on RED camera, see instructions on
next page)
4. Plug Flashbandit adapter [4] into the Creamsource Accesory adaptor [5]
5. Plug the Creamsource Accesory adaptor [5] into Accessories input on
Creamsource Micro [5]
6. Connect Flashbandit to Lockit Box using coaxial cable – blue light on
Flashbandit should flash indicating valid signal
7. Check correct framerate is shown on Creamsource display
8. Calibrate with Flashbandit (see 8.2 for details)
Synchronising to framerates greater than 60fps to can difficult.
For best results shoot at under this speed.
8.2 Calibrate with Flashbandit
This is a special mode used for calibrating the light to an external sync source,
such as the FlashBandit sync box. It is used to make sure the camera shutter
and Creamsource are synchronised, to prevent the flash-banding effects
when shooting on a CMOS sensor camera. Access this mode by going to
MENU->EFFECTS->Calibrate Sync. See next page for full details.
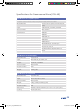
SETTING RANGE DESCRIPTION
PHASE 0-350 Deg Phase offset of camera pulse
BRIGHTNESS 0-100% Maximum flash brightness
COLOUR TEMP 2700k - 6500k Approximate colour temperature
CS_micro_UG_6PRINT.indd 19 23/01/2018 2:35 PM