
Instruction manual

Crathco Powdered Beverage Dispensers
Page 10
Purging machine of all water for shipment in cold areas
Warning: This procedure should be performed by a qualified service technician.
The unit can be purged of water as follows:
1. Turn the power switch to the "OFF" position.
2. Drain the water tank (refer to instructions above). Do not replace the drain hose plug and clamp until further
instructed.
3. Turn the power switch to the "ON" position. The ready light should turn itself "ON" within 12 seconds. The 12
second delay signals that the heating element has been disabled due to the lack of water in the tank after it is
drained. Important: If the ready light does not turn itself "ON" within 12 seconds, turn the power "OFF" to
avoid burning out the heating element.
4.
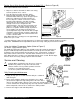
Listen for the inlet valve to energize. To purge the inlet valve and water inlet tube, apply 10-20 psi compressed air
to the inlet valve connection for 10 to 20 seconds while the inlet valve is energized. Note: Do not energize the
inlet valve for more than 5 minutes at a time. Otherwise, the watchdog timer will disable the inlet valve. If this
occurs, reset the machine by flipping the power switch ”OFF” then ”ON”.
5.
After the inlet valve and water inlet tube are purged, purge the dump valves and dispense lines. While applying
10-20 psi compressed air to the inlet valve connection, press and hold each dispense button for 1-2 seconds.
6.
Turn the power switch to the ”OFF” position. Replace the drain hose plug and clamp. Reposition the drain hose
inside the hose clip on the left side wall.
7. Reassemble the front access panel and drain tray.
Cleaning the steam recovery tray (Recommended once every 3 months)
Warning: Risk of electric shock; Disconnect from power before servicing!
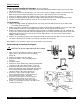
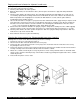
1. Remove the side access panel (Refer to figure J)
2. Disconnect the flexible vent tube attached to the recovery tray.
3. Remove the two screws which fasten the recovery tray to the sheetmetal enclosure and remove the recovery
tray through the side access hole.
4.
Remove the back access plate (refer to figure K). Disconnect and remove the flexible vent tube from the blower
housing. Carefully remove the flexible vent tube from the machine's cabinet.
5.
Wash, rinse, sanitize, and air dry the recovery tray and hose. Note: A long soft bristle brush or small cloth towel
may be used to clean the internal passage of the flexible vent tube by pushing it through the tube. Rinse, sanitize
and air dry the tube.
6. Reassemble the parts in reverse order.
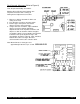
Figure J
Figure I
Figure K