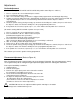
Crathco Powdered Beverage Dispensers Operation and Instruction Manual for PIC (1, 2, & 3) DC, PSD (1, 2, & 3) DC & PIC-33A Series TABLE OF CONTENTS Warning Labels......................................2 Installation.........................................3 Start up Procedures................................3-4 Hot Chocolate How To Dispense Cappuccino.............4 Adjustments.......................................5-7 Service and Cleaning.........................7-11 Troubleshooting.......................
Warning Labels The following warning labels were on your dispenser when it was shipped from the factory. They should remain on your dispenser in good, readable condition at all times. If one of your labels is missing or damaged, order a replacement label immediately. Part #62337, Located on the upper splash panel on the front of the dispenser WARNING Contents can cause severe burns if handled improperly. Cup must rest flat on tray with 1/4” (6mm) clearance between cup and spout.
Installation Water Inlet Connection: The National Sanitation Foundation requires the following for an NSF approved water hook-up: 1. A quick disconnect water connection or enough coiled tubing so that the machine can be moved for cleaning underneath. 2. An approved backflow prevention device, such as a double check valve to be installed between the machine and water supply.
Start-Up Procedures for Pump Units (PIC 2-DC & PIC 3-DC only): (Refer to serial tag to verify model number of your machine) Note: Pump units are not designed to be plumbed to pressurized water source. 1. Place a full 5 gallon water container within 3 feet vertically and 2 feet horizontally of the machine. 2. Drop the hose at the rear of the machine into the water container (The hose should extend to approximately 1 inch from the bottom of the water container).
Adjustments Portion Adjustment (On models starting with PIC-2A-DC and PIC-3A-DC with portion control dispense switches) 1. 2. 3. 4. Place a cup under the selected drink dispense nozzle. Press and hold the dispense switch. After a 10 second time delay, the machine is triggered into program mode and will begin dispensing. Continue pressing the button until cup is approximately 2/3 full, then release the switch to prevent overfill.
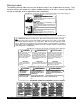
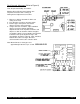
Drink Strength Adjustment (Refer to Figure A) Tools Required: #2 Phillips Screwdriver Warning: Risk of Electric Shock! Always turn off power to machine while servicing or making internal adjustments to machine. 1. Dispense a drink to determine if drink is too strong or too weak. 2. Turn off power to machine at power switch. 3. Remove upper front splash cover below dispense heads in front of machine. 4. Using a flat head screwdriver, adjust individual dispense heads by rotating appropriate adjustment knob.
Portion Size & Drink Strength Adjustment for Model PIC-J (Refer to Figure B) Tool required: #2 Flat Head screwdriver. 1. Dispense a drink to determine if drink is too strong, weak or if portion size is correct. 2. Turn off power to machine at power switch. 3. Drink strength and portion size controls will be found behind the drain tray. (Refer to Figure B) For portion size adjustment, turn dial clockwise to increase dispense volume. To decrease volume turn dial counterclockwise.
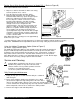
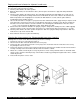
Weekly Cleaning Removing and Cleaning the Chambers (Refer to Figure D) 1. Open the door and remove the mixing funnel shroud by pulling forward while turning 1/4 turn to the right. Lift off and remove. 2. Remove the mixing funnel by lifting the neck of the funnel out of the whipper chamber, then tilt to the left. With one hand on the water inlet fitting on the back panel, pull the funnel out of the white ring. 3. Remove the whipper chamber by rotating it 1/8 of a turn to the right, then pull to remove. 4.
Service and Cleaning (con't.) Cleaning the Steam Plenum Tray: (Refer to Figure K) 1. Remove hoppers from machine. 2. Remove cover plate. 3. Using a damp towel, wipe powder build-up from inside steam plenum tray. ! Caution: Do not pour liquid into tray. Failure to comply will damage the dispenser and void the warranty. 4. Replace cover plate. 5. Replace hoppers. Reassembling the Hoppers IMPORTANT: All components must be completely dry prior to reassembly 1.
Purging machine of all water for shipment in cold areas Warning: This procedure should be performed by a qualified service technician. The unit can be purged of water as follows: 1. Turn the power switch to the "OFF" position. 2. Drain the water tank (refer to instructions above). Do not replace the drain hose plug and clamp until further instructed. 3. Turn the power switch to the "ON" position. The ready light should turn itself "ON" within 12 seconds.
Changing the Lightbulb on Models With a Backlit Merchandiser (Refer to Figure L) (Refer to serial tag to verify model number of your machine) Warning: Disconnect machine from branch electrical supply before changing the lightbulb. Note: The machine uses a F8T5 12" 8 watt replacement bulb. 1. Remove the front merchandiser photo and cover by grasping the edges of the merchandiser. 2. Remove the old lightbulb by gently turning the lightbulb 1/4 turn to the left and pulling the bulb from the socket. 3.
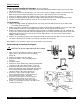
TROUBLESHOOTING GUIDE Only a qualified service technician should perform Electrical and mechanical adjustments or repairs. Always disconnect power before attempting any maintenance procedures. FRONT VIEW OF CONTROL BOARD (BEHIND FRONT ACCESS PLATE) If WTR FAIL light is flashing: Ensure water supply to machine is turned “on”. Reset machine power “off” then “on”. If THERM FAIL light is flashing: Reset machine power “Off” then “On”.
TROUBLESHOOTING GUIDE (CONT.) Only a qualified service technician should perform Electrical and mechanical adjustments or repairs.
Exploded Views PIC-2-DC, PIC-3-DC, PSD-2, and PSD-3 Crathco Powdered Beverage Dispensers Page 14
Exploded Views PIC-1-DC and PSD-1 Crathco Powdered Beverage Dispensers Page 15
Water Tank Assembly PIC-2-DC, PIC-3-DC, PSD-2, and PSD-3 Crathco Powdered Beverage Dispensers Page 16
Water Tank Assembly PIC-1-DC and PSD-1 Crathco Powdered Beverage Dispensers Page 17
Hopper Assembly PIC-2-DC, PIC-3-DC, PSD-2, and PSD-3 Crathco Powdered Beverage Dispensers Page 18
Hopper Assembly PIC-1-DC and PSD-1 Crathco Powdered Beverage Dispensers Page 19
Door Assembly PIC-2-DC, PIC-3-DC, PSD-2 and PSD-3 Crathco Powdered Beverage Dispensers Page 20
Door Assembly PIC-1-DC and PSD-1 Crathco Powdered Beverage Dispensers Page 21
PIC-1-DC and PSD-1Wiring Diagram 120V and 120/240V (Q Models) Crathco Powdered Beverage Dispensers Page 22
PIC-2 and PIC-3 Wiring Diagram 120V and 120/240V (Q Models) Crathco Powdered Beverage Dispensers Page 23
PIC-2J and PIC-3J Wiring Diagram 100 and 200 V Crathco Powdered Beverage Dispensers Page 24
PIC-2-DC and PIC-3-DC Wiring Diagram 120V and 120/240V (Q Models) ( 3 Portions per head ) Crathco Powdered Beverage Dispensers Page 25
PIC-2-DCJ and PIC-3-DCJ Wiring Diagram 100V & 200V ( 3 Portions per head ) Crathco Powdered Beverage Dispensers Page 26