
Instruction manual


VFX 5112/5212 Guitar Amplifier
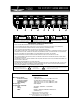
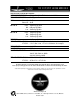
1918 20 21 22 23
18. AC Line Cord (not shown):
The grounded power cord should
only be plugged into a grounded
power outlet that meets all applica-
ble electrical codes and is compati-
ble with the voltage, power, and fre-
quency requirements stated on the
rear panel. Do not attempt to
defeat the safety ground connec-
tion.
19. FOOTSWITCH JACK: Use
this jack to connect the cable of the
footswitch (supplied) for remote
control of channel switching and the
DSP effect. (Tip = channel select,
ring = DSP select.) Refer to the sec-
tion below for additional information
about how the footswitch can be
used to save DSP settings for each
channel.
20. LINE OUT JACK: Use this jack
to send a line level signal from the
amplifier to an external amplifier, a
mixing console, or the input of an
external effect.
21. LINE IN JACK: Use this jack to
return the signal from an external
effect to the amplifier.
22. EXT. SPEAKER JACK: Use
this jack to connect the amplifier to
a 16 ohm extension speaker. The
internal speaker is not disconnect-
ed when this jack is in use. The
impedance switch (#23) must be
set to the 8 ohm position when a 16
ohm extension speaker is used.
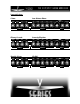
23. IMPEDANCE SWITCH: Use
this switch to set the amplifier’s out-
put impedance to match the imped-
ance of the speaker(s). The imped-
ance of the speaker(s) inside the
amplifier is 16 ohms. The switch is
set at the factory to the 16 ohm
position. When a 16 ohm extension
speaker cabinet is used (see (#22),
this switch must be set to the 8 ohm
position. Use the tip of a small flat-
blade screwdriver to slide the switch
to the proper position.
The Rear Panel:
The VFS-2 two-button footswitch (supplied) may be used to save two DSP settings for each channel.
(1) Connect the cable of the footswitch to the Footswitch jack (#19)
on the back of the VFX amplifier.
(2) Click the footswitch buttons until both LEDs are not illuminated.
Channel A is now active.
(3) Select one of the DSP settings - for example, Large Reverb. Click
the “2” footswitch button (the green LED will illuminate). Select
another DSP setting - for example, Vibrato Slow. Click the “2”
footswitch button again (the green LED will go out) and the Large
reverb DSP setting is recalled.
You have now programmed the footswitch to recal two DSP settings for Channel A: Large Reverb (green LED not
illuminated) and Vibrato Slow (green LED illuminated). You may repeat this procedure for Channel B. Click the “1”
footswitch button, then repeat step 3 for Channel B using different effects.
Using the Footswitch to Save DSP
Settings:
8 OHM
POSITION
16 OHM
POSITIO
N
Impedance switch as seen from below