
Specifications


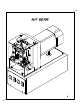
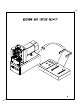
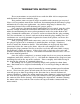
Table Of Contents
- SPA-100 Manual Cover Sheet
- Machine Introduction
- Specifications
- Manual Page
- Diagrams
- Basic Machine Diagram
- Machine and Tester Set-Up
- Machine and Guard Assembly
- Machine Base and Panels Assembly
- Motor and Tool Slide Assembly
- Tool Slide and Punch Holders
- Ram Slide Assembly
- Nest Assembly
- Nest Block Including Nests
- Micro Switch and Nest Stop Assembly
- Punch Holder Assembly (8 Position)
- Cam and Adjustment Assembly
- Test Assembly
- Test Block Assembly - Micro Switch Asseembly
- Controller and Circuits
- Termination Instructions
- Receiving Inspection
- Recommended Spare Tooling and Troubleshooting Tips
- Maintenance for SPA-100
- SPA-100 Parts List
MANUAL FOR SPA-100 PRESS
I. Set-up
A) Refer to page 6 for a pictorial view while following instructions.
B) Plug press into the wall outlet 110 volts.
C) Plug cable tester into 110 volts outlet.
D) Attach cables (supplied) to press and cable tester as labeled.
E) Select proper combination of switches on press.
1) “Auto/Hand” (on press)
2) “Double/Single” (on press)
3) With a “known good cable” set-up a signature (on tester).
II. Ready to run
With the signature cable, insert into the nest(s). When the plug reaches
proper depth, a micro switch in rear of nest actuates a single rotation of the
press. When a single plug is required, only the left nest can be utilized.
CAUTION: When using both nests, make sure the selector switch is on
double!
After ram on press has returned to top position, maintain the position of the
plugs in the nest to insure an accurate reading on the tester. The plugs in
the nests will actuate a micro switch to cycle machine, (if plug is removed
and reinserted it will cycle again). When the ram is at it top position the test
wires are making contact with the gold pins in the plugs, this will allow the
tester to check continuity, shorts and correct polarity of plugs to wire. This
test will remain active as long as plugs remain in the nests. Once the plug
moves away from the micro switch in rear of nest, the machine resets itself
to begin a new termination.
III. Adjustments
A) Nests
Both nests are in a fixed position and cannot be adjusted. However,
They can be removed and replaced with other nests allowing termination
of various Sentinel Connector Systems connectors.
1) The nests are equipped with two ball vilers that seat the connector
into the nest securely. At times it may be necessary to remove these
and replace them with new, when doing this please be sure not to
over tighten as to damage the connector.
3