
Instruction manual


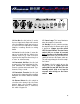

5
BOTH CHANNELS
9 10 11 12 13 14 15
16 17 18 19
12. Line Out: Use this jack to: (1) send a
line-level signal to the input of an external
effect for additional signal processing, or
(2) send a line-level signal to an external
amplifier, recording console or mixing
board.
13. Line In: Use this jack to: (1) return the
processed signal from the output of an
external effect, or (2) send a line-level
signal into the amplifier when using it as
a “slave” or extension amp.
14. Footswitch, Ch./Rev.: Use this jack
to connect the stereo plug from the sup-
plied footswitch for remote control of
channel selection and reverb on/off. Tip =
channels, Ring = reverb.
15. Footswitch, Tremolo: Use this jack
to connect the mono plug of the supplied
footswitch for remote control of tremolo
on/off.
16. Channel Select: Use this switch to
select the active channel: Up = the Clean
channel, down = the Overdrive channel.
When a footswitch (#14) is connected,
this switch is bypassed.
17. Power Lamp: This lamp illuminates
when the amplifier is turned on.
18. Standby: Use this switch to activate
the amplifier after the Power switch (#19)
is turned on. Always turn this switch
OFF first and ON last! Turn the Power
switch (#19) on at least 30 seconds
before turning on the Standby switch.
During short breaks you should turn this
switch off and leave the Power switch on.
This will help prolong the life of the ampli-
fier’s tubes.
19. Power: Use this switch to turn the
amplifier on and off. Always turn this
switch ON first and OFF last! Turn the
Standby switch (#18) on at least 30
seconds after
turning on the Power
switch.