
Assembly Instruction


Customer Service 800-967-6696 | http://www.crateandbarrel.com
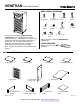
VENETIAN BATH TOP CABINET
Page 3 of 3
Made in China - r04
C
B
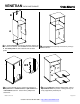
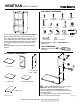
6 A. Place door into position, aligning holes in hinges
with holes on side panel edges. Secure with 2 small wood
screws per hinge, but do not over tighten.
B. Attach pull to door front, securing with 1 pull screw.
C. Complete assembly by concealing all exposed cams
with cam covers.
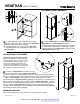
7 A. Secure back panel with 4 large machine screws, 4
split washers and 4 flat washers per cabinet.
B. With the assistance of another adult, place top cabinet
on base cabinet, aligning holes on back edges. Fasten
cabinets together with 2 metal straps and secure with 2
small wood screws per strap.
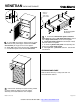
8 A. Attach 1 metal bracket to the back of the top
cabinet as shown. Secure with 1 medium wood screw.
B. With the assistance of another adult, place unit in desired location against the wall.
Mark the location of the hole in the bracket on the wall. Move unit out of the workspace.
C. Attach 1 metal bracket to the wall, lining up mark on wall with hole in bracket.
Secure to wall with 1 large wood screw, preferably into a wall stud. If not attaching to a
stud, pre-drill a hole slightly smaller in diameter than the plastic wall anchor. Insert the
wall anchor into the hole and gently tap with a hammer unit it is flush with the surface of
the wall. Insert the long wood screw through the metal bracket and into the anchor.
D. Place cabinet assembly back into position against the wall and thread the wall strap
through both brackets and pull until tight.
x 2
A
CLEANING AND CARE
OPTIONAL WALL ATTACHMENT
These instructions are for drywall mounting
only. For safe installation it is essential to use
hardware appropriate for your wall type. Mount
to wood wall studs whenever possible. If you
are unsure of what type of fasteners to use,
consult your local hardware store or a qualified
professional. This product is only deterrent, it is
not a substitute for proper adult supervision.
Clean surfaces with a dry or damp soft cloth. Do not use abrasive cleaners.
x 4
B
A
x 2
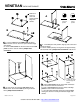
TOP & BASE CABINET ASSEMBLY