
Assembly Instruction


PATERSON TWO DOOR CUPBOARD
Made in China - r04 Page 4 of 4
Customer Service 800.967.6696 | Latest instructions available at www.crateandbarrel.com
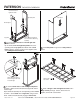
For added safety and stability, it is recommended that the wall mounting
hardware be installed. For safe mounting, it is essential to use wall
anchors appropriate to your wall type (i.e. plaster, drywall, concrete, etc.).
Mount to wood studs whenever possible.
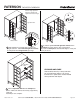
A) Attach anti-tip bracket to top of unit using 2 small screws as shown.
B) Determine the final location of unit. Mark position on the wall,
approximately 2" below the anti-tip bracket mounted to the back of the
unit.
C) Drill a pilot hole in the wall stud. If the wall stud is not available, drill a
hole in the wall that is slightly smaller in diameter than the anchor. Gently
tap the plastic anchor until the flange of the anchor is flush with the wall.
D) Attach wall bracket to the wall by inserting 1 large screw, and into
the plastic anchor in the wall.
E) Place the unit so the anti-tip bracket on the back edge is aligned with
the wall bracket on the wall.
F) Lace one end of the wall strap through both brackets, and into the
other end of the strap.
G) Pull the strap tightly until secure.
Wall mounting assembly is now complete.
NOTE: If you are unsure about your wall type or what mounting
method you should use, consult a qualified professional or your
local hardware store.
OPTIONAL WALL MOUNTING INSTRUCTIONS
WALL
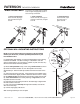
2) Depth adjustment:
Loosen screw A, push hinge arm
forwards or backwards, re-tighten
screw A.
3) Height adjustment:
Loosen screw C, adjust
door height and re-
tighten screw C.
HINGE ADJUSTMENT
If the doors do not appear square or aligned,
loosen or tighten the appropriate screws on
each case hinge as illustrated.
1) Side to side adjustment:
Loosen screw A, adjust gap
with screw B and re-tighten
screw A.
2
A
C
C
3
A
B
1
A
C
D
F
anti-tip
bracket
small
screw
wall
bracket
plastic
anchor
large
screw
wall
strap