
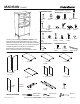
Assembly Instruction

NOTE: Please refer
to diagram for
hinge adjustment.
NOTE: Please refer
to diagram for
hinge adjustment.
NOTE: Make sure
corners of assembled
unit are 90º square
NOTE: Hardware pack includes
20 nails. Securing back panel
with more than 9 nails is optional.
MADISON CABINET
Made in Denmark - r06 Page 4 of 6
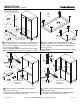
12 A) Attach hinges of 2 door frames to hinge plates of
assembled unit as shown.
B) Attach pull to each door frame with 2 small screws per
pull as shown. Secure screws with a screwdriver.
11 A) Attach hinges of 2 door fronts to hinge plates of
assembled unit as shown.
B) Attach pull to each door front with 2 small screws per pull
as shown. Secure screws with a screwdriver.
A
B
B
A
A
B
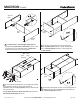
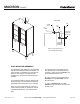
10 A) Attach 2 hinges to each door frame with 2 small
screws per hinge as shown. Secure screws with a screwdriver.
B) Attach 2 hinges to each door front with 2 small screws
per hinge as shown.
C) Adhere 8 bumpers to corners of 2 door frames and 2 door
fronts as shown.
B
A
door
frame
door
front
C
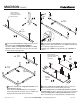
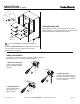
9 A) With the assistance of another adult, carefully position unit
upright. Make sure corners of assembled unit are 90º square
before inserting 9 nails along groove of back panel as shown.
Secure nails with a hammer.
B) Attach 8 support wedges to assembled unit with 1 small
screw per wedge as shown. Secure screws with a screwdriver.
A
B
B
A
90º
Customer Service 800.967.6696 | www.crateandbarrel.com
B
A