
Assembly Instruction

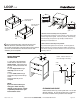

3 A) For legal hanging files, insert file rails into outer
notches as shown, and fit file hooks over file rails.
B) For letter hanging files, insert file rails into inner notches
as shown, and fit hooks over file hooks over file rails.
Assembly is now complete.
A
B
Legal
Hanging
Files
Letter
Hanging
Files
Insert file rails into
outer notches
Insert file rails into
inner notches
A
B
B
A
B
A
LOOP FILE
Made in China - r08 Page 2 of 2
CLEANING AND CARE
Clean surfaces with a dry or damp soft cloth. Do not use
abrasive cleaners. Do not use furniture wax or polish as
the wood is finished with a protective clear lacquer.
Customer Service 800.967.6696 | www.crateandbarrel.com
small
screw
wall
strap
large
screw
plastic
anchor
WALL
SAFETY MOUTNING
INSTRUCTIONS
A. Drill a hole in the wall slightly
smaller than the diameter of the
plastic anchor. Lightly tap with a
hammer until the face is flush with
the wall.
B. Insert large screw through
wall strap and into the wall
anchor.
C. Insert small screw through
wall anchor strap and into the top
of unit.
Mounting assembly is now
complete.
NOTE: Insert screws 3/4"-1"
from the edge of the strap
NOTE:
If you are unsure about your
wall type or what mounting
method you should use, consult
a qualified professional or your
local hardware store.
A) Remove drawer assembly from file pedestal:
Fully extend drawer assembly from file cabinet. Locate plastic tabs
on left and right drawer glides. With even pressure, simutaneously
lift the left tab (A) and press the right tab (B) to release drawer
assembly from assembled unit.
B) Attach drawer assembly to file pedestal:
Fully extend drawer glides from file cabinet. Fit drawer glides of
drawer assembly into corresponding drawer glides of file cabinet.
Push drawer assembly forward and listen for a click to ensure that
assembly is secure.
B
left drawer
glide
right drawer
glide