
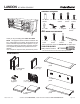
Assembly Instruction
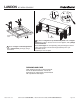

OPTIONALSAFETYMOUNTINGINSTRUCTIONS
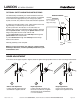
Foraddedsafetyandstability,itisrecommendedthatthewall
mountinghardwarebeinstalled.Forsafemounting,itisessential
tousewallanchorsappropriatetoyourwalltype(i.e.plaster,
drywall,concrete,etc.).Mounttowoodstudswheneverpossible.
A)Determinethefinallocationofunit.Markpositiononthewall,
approximately2"belowthetopofunitasshown.
B)Drillapilotholeinthewallstud.Ifthewallstudisnot
available,drillaholeinthewallthatisslightlysmallerindiameter
thantheplasticanchor.Gentlytaptheplasticanchoruntilthe
flangeoftheplasticanchorisflushwiththewall.
C)Insertlargescrewthroughendofwallstrapandthroughthe
plasticanchorinthewallasshown.
D)Insertsmallscrewthroughendwallstrapandintothetop
backofunitasshown.
Mountingassemblyisnowcomplete.
NOTE:Ifyouareunsureaboutyourwalltypeorwhatmounting
methodyoushoulduse,consultaqualifiedprofessionaloryour
localhardwarestore.
small
screw
wallstrap
(NOTE:Insertscrews
3/4"-1"fromthe
edgeofthestrap)
large
screw
WALL
SIDEVIEWDETAIL
plastic
anchor
LANDON 65” MEDIACONSOLE
MadeinChina -r06 Page5 of 5
CustomerService800.967.6696 | Latestinstructionsavailableatwww.crateandbarrel.com
Depth adjustment:
Loosen screw A, push hinge arm
forwards or backwards, re-tighten
screw A and secure screw B with
a 1/4 turn clockwise
Height adjustment:
Loosen screw C, adjust door
height and re-tighten screw C
A
1
2
3
Side to side adjustment:
Loosen screw A, adjust gap with
screw B and re-tighten screw A
B
HINGE ADJUSTMENT
If the doors do not appear square or aligned, loosen or tighten the appropriate screws on each case hinge as illustrated.
A
C
C