
Assembly Instruction

Customer Service 800-967-6696 | http://www.crateandbarrel.com
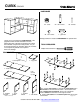
6 Secure assembly by turning all 8 cams 90º clockwise
with a phillips head screwdriver.
CUBIX STACKER
Page 3 of 4
Made in China - r04
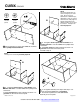
9 A. Fit together assembly from Step 6 and Step 7 or 8.
Secure all remaining cams with a screwdriver.
B. Conceal all exposed cams with cam covers.
Assembly is now complete.
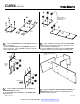
7 A. Fit together bottom panel, 1 short divider and 2
dividers with slots. Lock all 6 cams with a phillips head
screwdriver.
B. Slide back panel into slots of dividers as shown. Fit
grommet into the hole of the back panel.
Proceed to step 9.
x 8
Cam in
unlocked
position
Cam in
locked
position
A
B
NOTE:
This step is for constructing Assembly Option B.
8 A. Fit together bottom panel, 1 short divider and 2
dividers with slots. Lock all 6 cams with a phillips head
screwdriver.
B. Slide back panel into slots of dividers as shown. Fit
grommet into the hole of the back panel.
A
B
NOTE:
At this point decide how you
want to configure your Cubix
units. Each unit can be
assembled in 2 different ways,
depending on how you want to
orient the units. See page 4 for
sample configurations and
determine which unit you want
to construct. This step is for
Assembly Option A.
B
A