
Assembly Instruction


ADD CD WALL SHELF
Made in Thailand R05 Page 4 of 4
Customer Service 800.967.6696 | www.crateandbarrel.com
WALL MOUNTING INSTRUCTIONS
There are 2 types of hardware included, 1 group for drywall
installation and 1 group for all other hollow wall installation
types. Be sure to use hardware appropriate for your wall
type. Whenever possible, attach mounting hardware into a
wall stud. (Do not use anchors if attaching to wall studs
directly.)
If you are unsure about your wall type or what mounting
method you should use, consult a qualified professional or
your local hardware store.
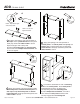
1. Determine the wall location and place the wall bracket
into position. Make sure the pointed side of the bracket
points up. There are 3 holes in the bracket. Level and mark
the 3 hole locations on the wall.
2. If attaching directly into wall studs, skip to Step 5.
3. For drywall installation, drill 3 holes slightly smaller in
diameter than the size of the anchor, but 1/4" deeper than
the length of the anchor. Insert 3 drywall anchors so that
they are flush with the surface of the wall. Gently tap with a
hammer if necessary.
4. For hollow walls, drill 3 holes slightly smaller in diameter
than the size of the anchor. Fold the tabs of the anchor flat,
and insert into the holes until head is flush to the surface of
the wall.
5. Insert 1 medium or large screw through each hole in the
wall bracket and into the corresponding anchors or studs in
the wall. Fully tighten each screw with a Phillips head
screwdriver but do not over tighten.
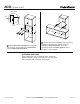
6. With the assistance of another adult, fit the shelf cleat on
the back of the unit onto the wall cleat. Make sure the unit
is firmly seated in the wall bracket. Installation is now
complete.
wall
cleat
screws wall / drywall
anchor
SIDE VIEW
3 - medium
screws
3 - drywall
anchors
3 - large
screws
For drywall installation:
For all other wall
installation types:
3 - wall
anchors
wall
cleat
screws wall
anchor
wall