This is the operation guide for the Crate BV300H. READ IT.
Contents: A Message from the People Behind the BV300H . . . . . . . . . .3 The Front Panel - Input & Channel 1 . . . . . . . . . . . . . .4 The Front Panel - Channel 2 . . . . . . . . . . . . . . . . . .5 The Front Panel - Channel 3 . . . . . . . . . . . . . . . . . .6 The Front Panel - Effects Loop, Eek & Ugh . . . . . . . . . . .7 The Rear Panel - Footswitch, Speaker Outputs, Slave Out The Rear Panel - Effects Loop, Bias, AC Power . . . .8 . . . . . . . . .
A Message from the People Behind the BV300H: You now own the finest lead guitar amplifier in the world. The Crate BV300H was designed to fulfill the needs of the professional musician. It is equally at home in the studio, in the club, or on the big stage. This amplifier has been designed with key features to finely sculpt its sound into YOUR sound. The BV300H uses premium materials and workmanship and is made entirely in the U.S.A.
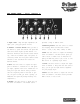
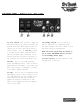
THE FRONT PANEL - Input, Channel 1: 1.Input Jack: 1 Meg Ohm input impedance 1/4” input jack – plug your guitar in here. 2.Channel 1 Select Switch: When you want to use Channel 1, press this switch. The green LED above this switch lights up when Channel 1 is selected. The BV300H uses instant access switching – when the footswitch (#28, rear panel) is connected, either the front panel channel select switches or the footswitch will select the desired channel. 3.
THE FRONT PANEL - Channel 2: 9.Channel 2 Select Switch: When you want to use Channel 2, press this switch. The amber LED above this switch lights up when Channel 2 is selected. The BV300H uses instant access switching – when the footswitch (#28, rear panel) is connected, either the front panel channel select switches or the footswitch will select the desired channel. 10.Gain: Use this control to adjust the input gain for Channel 2. Towards the “–” side gives you the classically British warm crunch.
THE FRONT PANEL - Channel 3: 16.Channel 3 Select Switch: When you want to use Channel 3, press this switch. The red LED above this switch lights up when Channel 3 is selected. The BV300H uses instant access switching – when the footswitch (#28, rear panel) is connected, either the front panel channel select switches or the footswitch will select the desired channel. 17.Gain: Use this control to adjust the input gain for Channel 3.
THE FRONT PANEL - Effects Loop, Eek & Ugh: 23.Loop Switch: When you want to engage the rear panel effects loop, press this switch. The blue LED above this switch lights up when the effects loop is active. This can be used as a “boost” feature – see the “Hot Tip” on page 9. The BV300H uses instant access switching – when the footswitch (#28, rear panel) is connected, either the front panel loop switch or the footswitch will activate the effects loop. 24.
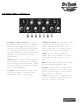
THE REAR PANEL - Footswitch, Speakers, Slave Out: BIG WARNING: IT MAY BE TEMPTING, BUT NEVER PLUG YOUR HEADPHONES INTO THE SPEAKER OUTPUT JACKS OF A 300 WATT AMPLIFIER! 28.Footswitch Jack: Use this jack to connect the BVFS4 four-button footswitch to the amplifier. This allows you to switch channels and turn the effects loop on and off - by remote foot control. Connect one end of the supplied footswitch cable* to this jack, the other end to the footswitch. 29.
THE REAR PANEL - Effects Loop, Bias, AC Power: 33.Effects Loop Send Level: Use this knob to adjust the level of the Effects Loop Send signal (#34). Some effects are picky as to what they like for an input level, so use this knob to get them to smile. 34.Effects Loop Send Jack*: When connecting the amp to an external effects device, use this jack to send the signal to the Input jack of the effect. 35.
Important Information About Tubes And Tube Products: A Brief History Of The Tube: In 1883, Edison discovered that electrons would flow from a suspended filament when enclosed in an evacuated lamp. Years later, in 1905, Fleming expanded on Edison's discovery and created the "Fleming Valve". Then, in 1907, Dr. Lee de Forest added a third component – the grid – to the "Fleming's Valve" and the vacuum tube was a fact of life. The door to electronic amplification was now open.
The Nature Of Tubes: Why (And When) To Replace Them: Tubes are made up of a number of fragile mechanical components that are vacuum-sealed in a glass envelope or bubble. The tube's longevity is based on a number of factors which include how hard and often the amplifier is played, vibration from the speakers, road travel, repeated set up and tear down, etc. Any time you notice a change in your amplifier's performance, check the tubes first.
Survival Tips For Tube Amplifiers: To prolong tube life, observe these tips and recommendations: • Match the impedance of your speaker cabinet(s) to your amplifier. Improper impedance matching will contribute to early tube degradation and may cause premature tube failure. • Make sure the speaker(s) are properly connected prior to turning on the amplifier. • After playing the amplifier, allow sufficient time for it to properly cool down prior to moving it.
Some Suggested Settings: Chug Rhythm (Humbucker): Bluesy Stang: Sparkling Clean: Metal Sound: Rock Sound: Spitty Gain (Humbucker): Evil Thoughts: Chunk (Humbucker): Bluesy Tone (Strat): As Sick As It Gets: 13
The Block Diagram: V1 V1 V2 GAIN LEVEL BASS TREBLE INPUT V1–V8 = 12AX7 V9–V10 = 12AU7 V11–V16 = 6550A SEND RETURN EFFECTS LOOP SPEAKON SPEAKER OUTPUTS 1+ IMPEDANCE SELECTOR EEK! 1- 1/4" SPEAKER OUTPUTS UGH! SLAVE OUT 14
Technical Specifications: OUTPUT POWER RATING 300 Watts RMS @ 5% THD, 4 ohm load, 120 VAC SIGNAL TO NOISE RATIO 75dB Typical GAIN Channel 1 Channel 2 Channel 3 80dB 105dB 105dB Channel 1 Channel 2 Channel 3 LOW 24dB range @ 50Hz 20dB range @ 50Hz 18dB range @ 100Hz MID +10/-22dB @ EQ Switch 10dB range @ 750Hz 20dB range @ 1.2kHz EQ SWITCH 300,700,1k,1.