
User Manual
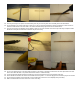


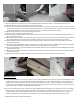


135. The ESC and receiver can be laid flat or stood on their edge.
136. Adjust your soldering iron tip to the proper depth, and melt compartments for the ESC and Rx or you can cut them with a longer
blade hobby knife. Make the size of the compartments tight so that the ESC or Receiver fit snugly.
137. Use your razor blade and a straight edge to cut slits for the leads between the electronics, so that they are buried at least flush with
the top of the fuselage.
138. Your antenna will work best if it is not bunched in a bundle of servo and battery wires.
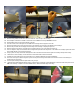
BATTERY PLACEMENT
139. Position your battery 2" back from the nose of the plane on the side of the fuselage with the battery plug to the back. (1300-2400
mA recommended) Use a pen to trace the outline of the battery.
140. Use a razor blade and pliers (and/or your soldering iron) to cut/melt a slot for your battery. If your battery is small, you can cut the
bay slightly smaller, and make the battery fit in snugly enough that it will stay in place during flight.
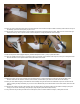
141. Install a velcro strip to hold the battery in place.
142. Use your razor blade to cut a ½” (1 cm) slit from the center of the bottom of your battery bay, through to the other side of the
fuselage.
143. Pull one end of a Velcro strap through the slit, and wrap the other end up and over the fuselage, so that they meet on the battery’s
side of the fuselage, and will wrap completely around the battery.
144. Make sure the Velcro’s ends match up properly, and trim off any excess Velcro.
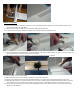
145. Use your hot glue gun to glue down the Velcro where it lays over the opposite side and top of the fuselage. This way, when you put
your wing on, the ends of the Velcro strap will always be on the correct side of the fuselage.
CENTER OF GRAVITY - CG
The CG on the Albatross is 3.75” (9.5 cm) back from the leading edge of the wing, and relative to the wing, not the fuselage.
Install the wing mounting dowels back 9" and 21" from the nose of the plane. Install your battery 2" back from the nose of
the fuselage.
146. Turn the wing over. On the bottom of the wing, on either side of the flat center section, use a ruler to measure back 3.75” (9.5 cm)
from the leading edge, and place a mark with a pen. Some people like to stick pushpins or thumb tacks into each of those marks so
the CG reference point will be easier to find without looking.
147. Make sure all other electronics or hardware are sitting in their proper place on the plane, including the battery, motor, ESC, Rx,
servos, and push rods.
148. Reach under the wing on either side. Find the pushpins you used to mark the COG on the bottom of the wing, and gently try to lift
the plane off of the table.