
User Manual

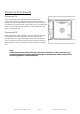

Hardware Setup: Audio Interface
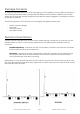
This hardware setup diagram will get Camden EC2 connected to your audio interface and
ready for recording:
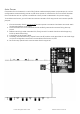
1) Connect mains power into the external PSU supplied in Camden EC2’s packaging and
connect the Power Connector into Camden EC2’s Power Inlet [11].
2) Connect the line outputs [5] [7] of Camden EC2’s Preamps to two available line inputs
on the Audio Interface. Use either Camden EC2’s balanced ¼” jack or XLR outputs
depending on your audio interface’s connections.
Note:
Ensure that the inputs on the Audio Interface can accept balanced, line level
signals and can be switched to a +4dBu or higher reference level for best
performance.
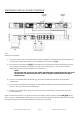
3) Power On Camden EC2, followed by your Audio Interface and other downstream
equipment.
4) Connect two available line outputs on the Audio Interface to the Aux Input line inputs
jacks on the rear panel of Camden EC2’s.
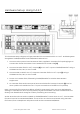
5) Power On Camden EC2 using a brief tap of the Power button. Then Power On your
Audio Interface.
Now connect mic/line/hi-z sources to either of Camden EC2’s preamp inputs [F9] [R3], apply
Gain and your desired Mojo setting, and now the preamp signal will be sent out from Camden
EC2 and directly into the Audio Interface’s inputs for recording.
Camden EC2 Quick Start Guide -Page 8- ©2020 Cranborne Audio Ltd