Instruction Manual
Manuals
Brands
CRAFTSMAN Manuals
Cordless Electric Hedge Trimmers
20-Volt Max 20-in Dual Cordless Electric Hedge Trimmer 1.5 Ah (Battery & Charger Included)
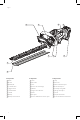
1
2
3
4
5
6
7
8
9
10
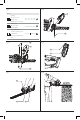
3
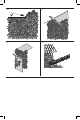
Fig
.H
Fig
.I
Fig
.J
Fig
.K
1
...
2
3
4
5
6
7
...
...
36