Operators Manual Permanently Lubricated 2 Stage Twin Valve Stationary AIR COMPRESSOR Model No. 919.165610 • • • • • • • Safety Guidelines Assembly Operation Maintenance Service and Adjustments Troubleshooting Español CAUTION: Read the Safety Guidelines and All Instructions Carefully Before Operating. Sears, Roebuck and Co., Hoffman Estates, IL 60179 U.S.A. Visit our Craftsman website: www.sears.com/craftsman D21879 Rev.
TABLE OF CONTENTS WARRANTY . . . . . . . . . . . . . . . . . . . . . . . . . . . . . .2 MAINTENANCE . . . . . . . . . . . . . . . . . . . . . . . .12-13 SAFETY GUIDELINES . . . . . . . . . . . . . . . . . . . .3-6 Contents of Carton . . . . . . . . . . . . . . . . . . . . . .7 Tools Required for Assembly . . . . . . . . . . . . . .7 Unpacking . . . . . . . . . . . . . . . . . . . . . . . . . . . . .7 Customer Responsiblilities . . . . . . . . . . . . . . .12 To Check Saety Valve . . . . . . . . . . . .
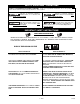
SAFETY GUIDELINES - DEFINITIONS SAFETY and PREVENTING EQUIPMENT PROBLEMS. To help you recognize this information, we use the symbols below. Please read the manual and pay attention to these sections. Indicates an imminently hazardous situation which, if not avoided, will result in death or serious injury. Indicates a potentially hazardous situation which, if not avoided, may result in minor or moderate injury.
HAZARD RISK OF BURSTING AIR TANK: THE FOLLOWING CONDITIONS COULD LEAD TO A WEAKENING OF THE TANK, AND RESULT IN A VIOLENT TANK EXPLOSION AND COULD CAUSE PROPERTY DAMAGE OR SERIOUS INJURY. WHAT CAN HAPPEN HOW TO PREVENT IT 1. FAILURE TO PROPERLY DRAIN CONDENSED WATER FROM THE TANK, CAUSING RUST AND THINNING OF THE STEEL TANK. DRAIN TANK DAILY OR AFTER EACH USE. IF TANK DEVELOPS A LEAK, REPLACE IT IMMEDIATELY WITH A NEW TANK OR REPLACE THE ENTIRE COMPRESSOR. 2.
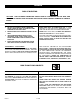
HAZARD RISK OF ELECTRICAL SHOCK WHAT CAN HAPPEN HOW TO PREVENT IT YOUR AIR COMPRESSOR IS POWERED BY ELECTRICITY. LIKE ANY OTHER ELECTRICALLY POWERED DEVICE, IF IT IS NOT USED PROPERLY IT MAY CAUSE ELECTRIC SHOCK. NEVER OPERATE THE COMPRESSOR OUTDOORS WHEN IT IS RAINING OR IN WET CONDITIONS. REPAIRS ATTEMPTED BY UNQUALIFIED PERSONNEL CAN RESULT IN SERIOUS INJURY OR DEATH BY ELECTROCUTION.
HAZARD RISK OF BURNS WHAT CAN HAPPEN HOW TO PREVENT IT TOUCHING EXPOSED METAL SUCH AS THE COMPRESSOR HEAD OR OUTLET TUBES, CAN RESULT IN SERIOUS BURNS. NEVER TOUCH ANY EXPOSED METAL PARTS ON COMPRESSOR DURING OR IMMEDIATELY AFTER OPERATION. COMPRESSOR WILL REMAIN HOT FOR SEVERAL MINUTES AFTER OPERATION. DO NOT REACH AROUND PROTECTIVE SHROUDS OR ATTEMPT MAINTENANCE UNTIL UNIT HAS BEEN ALLOWED TO COOL.
GLOSSARY Become familiar with these terms before operating the unit. CFM: Cubic feet per minute. SCFM: Standard cubic feet per minute; a unit of measure of air delivery. PSIG: Pounds per square inch gauge; a unit of measure of pressure. ASME: American Society of Mechanical Engineers; made, tested, inspected and registered to meet the standards of the ASME.
INSTALLATION 6. Place the (4) 3/8” lag screws through the air compressor feet, washers, shims, and into the anchors. HOW TO SET UP YOUR UNIT Location of the Air Compressor Locate the air compressor in a clean, dry, and well ventilated area. Located the air compressor at least 12" away from the wall or other obstructions that will interfere with the flow of air. Locate the air compressor as close to the main power supply as possible to avoid using long lengths of electrical wiring.
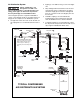
Air Distribution System ● If piping is over 100 feet long, use the next larger size. ● The next figure represents a typical air distribution system. The following are tips to remember when setting up the air compressor’s air distribution system. Bury underground lines below the frost line and avoid pockets where condensation can gather and freeze. Apply pressure before underground lines are covered to make sure all pipe joints are free of leaks.
OPERATION Know Your Air Compressor READ THIS OWNER’S MANUAL AND SAFETY RULES BEFORE OPERATING YOUR UNIT. Compare the illustrations with your unit to familiarize yourself with the location of various controls and adjustments. Save this manual for future reference. Drain Valve: The drain valve is located at the base of the air tank and is used to drain condensation at the end of each use. Description of Operation Become familiar with these controls before operating the unit.
How to Use Your Unit 6. Check all air line fittings and connections/piping for air leaks by applying a soap solution. Correct if necessary. NOTE: Minor leaks can cause the air compressor to overwork, resulting in premature breakdown or inadequate performance. How to Stop: 1. Set the On/Auto/Off lever to “OFF”. Before Starting 7. Check for excessive vibration. Readjust or shim air compressor feet, if necessary. Break-in Procedure 8.
MAINTENANCE Customer Responsibilities Before each use Check Safety Valve Daily or after each use Frequently Yearly ● ● Drain Tank Air Filter (inspect and replace) ● Inspect air lines and fittings for leaks ● ● Air compressor pump intake and exhaust valves Unit cycles automatically when power is on. When performing maintenance, you may be exposed to voltage sources, compressed air, or moving parts. Personal injuries can occur.
Inspect Air Lines and Fittings for Leaks 3. If dirty, rinse air filter with warm water and squeeze dry. 4. Replace air filter and air filter cover. 1. Turn the air compressor on to inspect for air leaks. NOTE: If the air filter is extremely dirty it will need to be replaced. Refer to the “Parts Manual” for the correct part number. 2. Apply a soap solution to all air line fittings and connections/piping.
SERVICE AND ADJUSTMENTS Unit cycles automatically when power is on. When doing Maintenance, you may be exposed to voltage sources, compressed air or moving parts. Personal injuries can occur. Before performing any Maintenance or repair, unplug the compressor and bleed off all air pressure. ALL MAINTENANCE AND REPAIR OPERATIONS NOT LISTED MUST BE PERFORMED BY TRAINED SERVICE TECHNICIAN. 6. Using an adjustable wrench loosen pressure relief tube nut at air tank and pressure switch.
STORAGE Before you store the air compressor, make sure you do the following: 1. Review the "Maintenance" section on the preceding pages and perform scheduled maintenance as necessary. 2. Set the On/Auto/Off lever to “OFF”. 3. Close the globe valve. 4. Remove the air tool or accessory. 5. Open the globe valve and allow the air to slowly bleed from the air tank until tank pressure is approximately 20 psi. Water will condense in the air tank.
TROUBLESHOOTING Performing repairs may expose voltage sources, moving parts or compressed air sources, moving parts or compressed air sources. Personal injury may occur. Prior to attempting any repairs, unplug the air compressor and bleed off all air tank air pressure. CAUSE PROBLEM Excessive tank pressure - safety valve pops off. CORRECTION Pressure switch does not shut off motor when compressor reaches “cut-out” pressure.
PROBLEM Motor will not run. CAUSE CORRECTION Motor overload protection switch has tripped Let motor cool off and overload switch will automatically reset. Tank pressure exceeds pressure switch “cut-in” pressure. Motor will start automatically when tank pressure drops below “cut-in” pressure of pressure switch. Extension cord is wrong length or gauge. Check for proper gauge wire and cord length. Check valve stuck open. Remove and clean, or replace. Loose electrical connections.
CAUSE PROBLEM Compressor is not supplying enough air to operate accessories. D21879 CORRECTION Prolonged excessive use of air. Decrease amount of air usage. Compressor is not large enough for air requirement. Check the accessory air requirement. If it is higher than the SCFM or pressure supplied by your air compressor, you need a larger compressor. Hole in hose. Check and replace if required. Check valve restricted. Remove and clean, or replace. Air leaks. Tighten fittings.
CONTENIDO GARANTÍA . . . . . . . . . . . . . . . . . . . . . . . . . . . . . .19 Antes de poner en marcha . . . . . . . . . . . . . . .28 Procedimiento para el asentamiento . . . . . . .28 Antes de cada puesta en marcha . . . . . . . . . .28 Cómo ponder en marcha . . . . . . . . . . . . . . . .28 NORMAS DE SEGURIDAD . . . . . . . . . . . . . .20-23 GLOSARIO . . . . . . . . . . . . . . . . . . . . . . . . . . . . . .24 ACCESORIOS . . . . . . . . . . . . . . . . . . . . . . . . . . .24 MANTENIMIENTO . . .
DEFINICIONES DE NORMAS DE SEGURIDAD SEGURIDAD Y PREVENCIÓN DE PROBLEMAS DEL EQUIPO: Para ayudar al reconocimiento de esta información, hemos utilizado los símbolos mostrados abajo. Sírvase leer el manual y prestar atención a dichas secciones. Indica una situación de inminente riesgo, la cual, si no es evitada, causará la muerte o lesiones Indica una situación potencialmente peligrosa, la cual, si no es evitada, podría resultar en lesiones menores o moderadas.
PELIGRO RIESGO DE EXPLOSIÓN TANQUE DE AIRE: LAS SIGUIENTES CONDICIONES PUEDEN DETERMINAR EL DEBILITAMIENTO DEL TANQUE, Y ORIGINAR UNA VIOLENTA EXPLOSIÓN DEL MISMO, SIENDO CAUSA DE DAÑOS A LA PROPIEDAD O LESIONES SERIAS. ¿CÓMO PREVENIRLO? ¿QUÉ PUEDE OCURRIR? 1. DRENAJE INADECUADO DEL AGUA CONDENSADA EN EL TANQUE, SIENDO LA CAUSA DEL ÓXIDO QUE REDUCE EL ESPESOR DEL TANQUE DE ACERO. DRENE EL TANQUE DIARIAMENTE O DESPUÉS DE CADA USO.
PELIGRO RIESGO DE DESCARGA ELÉCTRICA ¿QUÉ PUEDE OCURRIR? ¿CÓMO PREVENIRLO? SU COMPRESOR DE AIRE ESTÁ ACCIONADO POR ELECTRICIDAD. COMO CUALQUIER OTRO DISPOSITIVO ELÉCTRICO IMPULSADO ELÉCTRICAMENTE, SI NO SE LO UTILIZA ADECUADAMENTE, PODRÍA CAUSARLE UNA DESCARGA ELÉCTRICA. JAMÁS OPERE EL COMPRESOR A LA INTEMPERIE CUANDO ESTÁ LLOVIENDO O EN CONDICIONES DE HUMEDAD. LAS REPARACIONES INTENTADAS POR PERSONAL NO CALIFICADO PODRÍAN OCASIONAR SERIAS LESIONES O LA MUERTE POR ELECTROCUCIÓN.
PELIGRO RIESGO DE QUEMADURAS ¿QUÉ PUEDE OCURRIR? ¿CÓMO PREVENIRLO? TOCAR EL METAL EXPUESTO TAL COMO EL CABEZAL DEL COMPRESOR O LOS TUBOS DE SALIDA DEL ESCAPE, PUEDE OCASIONARLE SERIAS QUEMADURAS. JAMÁS TOQUE PARTES DE METAL EXPUESTAS EN EL COMPRESOR DURANTE O INMEDIATAMENTE DESPUÉS DE LA OPERACIÓN. EL COMPRESOR PERMANECERÁ CALIENTE POR VARIOS MINUTOS LUEGO DE LA OPERACIÓN. NO LO CUBRA CON FUNDAS PROTECTORAS O INTENTE EL MANTENIMIENTO HASTA QUE LA UNIDAD HAYA ALCANZADO SU ENFRIAMIENTO.
GLOSARIO Familiarícese con los siguientes términos, antes de operar la unidad: Cfm: (Cubic feet per minute) Pies cúbicos por minuto. SCFM: (Stardard cubic feet per minute) Pies cúbicos estándar por minuto; una unidad de medida que permite medir la cantidad de entrega de aire. PSIG: (Pound per square inch) Libras por pulgada cuadrada.
INSTALACIÓN CÓMO PREPARAR LA UNIDAD 7. Ubicación del compresor de aire • • • • Instale el compresor de aire en una zona limpia, seca y bien ventilada. Instale el compresor de aire a una distancia no menor de 30 cm (12") de la pared u otras obstrucciones que pudiesen interferir con el flujo del aire. Instale el compresor de aire lo más cerca posible del sitio de alimentación eléctrica, a fin de evitar el uso de largas extensiones de cableado eléctrico.
Sistema de distribución de aire gitud, utilice la medida inmediata superior. Los tubos de plástico o PVC no han sido diseñados para usarlos con aire comprimido. Independientemente de lo que esté indicado como especificación de presión, las cañerías de plástico pueden explotar debido a la presión del aire. Utilice solamente caños de metal para los ramales de distribución. La siguiente imagen representa un sistema típico de distribución de aire.
OPERACIÓN Conozca su compresor de aire LEA ESTE MANUAL DEL PROPIETARIO Y SUS NORMAS DE SEGURIDAD ANTES DE OPERAR LA UNIDAD. Compare las ilustraciones contra su unidad a fin de familiarizarse con la ubicación de los distintos controles y regulaciones. Conserve este manual para referencias futuras. Descripción de operaciones Familiarícese con estos controles antes de operar la unidad.
Cómo utilizar su unidad 7. Verifique la existencia de vibración excesiva. Reajuste o acuñe el pie del compresor, si ello fuera necesario. Cómo detenerla: 8. 1. Coloque la posición de la llave interruptora On/Auto/Off en la posición "OFF". Luego de 30 minutos, mueva la palanca On/Auto/Off a la posición "OFF" y cierre la válvula de asiento. 9. Mueva la palanca de On/Auto/Off a la posición "ON/AUTO". El aire recibido elevará la presión hasta el punto de "presión de corte", y ello hará detener al motor.
MANTENIMIENTO Responsabilidades del cliente Antes de cada uso Diariamente o luego de Frecuentemente Anualmente cada uso ● Verifique la válvula de seguridad ● Drenaje del tanque Filtro de aire (inspección y reemplazo) ● Inspección de eventuales fugas en las cañerías de aire y las conexiones. ● ● Válvulas de entrada y escape de la bomba del compresor de aire La unidad funciona automáticamente en ciclos cuando está conectada a la energía electrica.
3. Si está sucio enjuague el filtro de aire con agua tibia y exprímalo hasta que seque. Inspección de las cañerías de aire y las conexiones para detectar fugas. 4. Vuelva a colocar el filtro de aire y su cubierta. 1. Ponga en marcha el compresor de aire para permitir inspeccionar la existencia de fugas de aire. NOTA: Si el filtro de aire está sumamente sucio necesitará ser reemplazado. Consulte la sección "Repuestos" para obtener el número correcto de la pieza. 2.
SERVICIO Y AJUSTES La unidad cicla automáticamente en cuanto la energía eléctrica es conectada. Al efectuar el mantenimiento, usted quedará expuesto a tensión viva, aire comprimido o partes en movimiento. Debido a tales circunstancias, podrían ocurrirle lesiones personales. Antes de efectuar mantenimiento o reparación alguna, desenchufe el compresor y purgue cualquier presión de aire.
ALMACENAJE Antes de guardar su compresor de aire, asegúrese de hacer lo siguiente: 1. Revise la sección "Mantenimiento" de las páginas precedentes y ejecute el mantenimiento programado de acuerdo a la necesidad. 2. Coloque la palanca On/Auto/Off en la posición "OFF". 3. Cierre la válvula de asiento 4. Extraiga la herramienta neumática o el accesorio. 5. Abra la válvula de asiento y lentamente deje purgar el aire del tanque de aire, hasta que la presión del mismo llegue aproximadamente a 20 PSI. 6.
GUÍA DE DIAGNÓSTICO DE PROBLEMAS El desarrollo de reparaciones puede exponer a sitios con corriente viva, partes en movimiento o fuentes de aire comprimido que podrían ocasionar lesiones personales. Antes de intentar reparación alguna, desenchufe el compresor de aire y purgue toda la presión de aire del tanque. PROBLEMA Presión excesiva del tanque - la válvula de seguridad se dispara. CAUSA CORRECCIÓN El interruptor de presión no interrumpe al motor cuando el compresor alcanza la presión "de corte".
PROBLEMA El motor no funciona. D21879 CAUSA CORRECCIÓN El interruptor de protección de s obrecarga del motor se ha abierto. Deje enfriar el motor y el interruptor de sobrecarga se reajustará automáticamente. La presión del tanque excede la presión de "corte máximo" del interruptor de presión. El motor arrancará automáticamente cuando la presión del tanque caiga por debajo de la presión de corte máxima del interruptor de presión El cordón de extensión es del largo o calibre equivocados.
PROBLEMA El compresor no esta suministrando suficiente cantidad de aire para operar los accesorios. CAUSA CORRECCIÓN Excesivo y prolongado uso del aire. Disminuya la cantidad de uso de aire. El compresor no tiene suficiente capacidad para el requerimiento de aire al que está sometido. Verifique los requerimientos de aire del accesorio. Si fuera mas elevado que SCFM o la presión suministrada por su compresor, usted necesita un compresor de mayor capacidad.
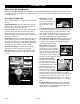
Get it fixed, at your home or ours! Your Home For repair – in your home – of all major brand appliances, lawn and garden equipment, or heating and cooling systems, no matter who made it, no matter who sold it! For the replacement parts, accessories and owner’s manuals that you need to do-it-yourself. For Sears professional installation of home appliances and items like garage door openers and water heaters. 1-800-4-MY-HOME® (1-800-469-4663) www.sears.com Anytime, day or night (U.S.A. and Canada) www.sears.