
Specifications


example use case is when there is a router with both a primary and failover WAN device and the tunnel should only be used when the system has failed over to the backup
connection.
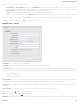
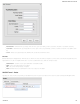
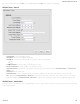
Make a selection for "When," "Condition," and "Value" to create a WAN Binding. The condition will be in the form of these examples:
When Condition Value
Port is USB Port 1
Type is not WiMAX
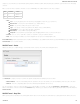
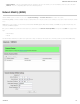
When:
Port – Select by the physical port on the router that you are plugging the modem into (e.g., "USB Port 2").
Manufacturer – Select by the modem manufacturer (e.g., "CradlePoint Inc.").
Model – Set your rule according to the specific model of modem.
Type – Select by type of Internet source (Ethernet, LTE, Modem, Wireless as WAN, WiMAX).
Serial Number – Select a 3G or LTE modem by the serial number.
MAC Address – Select a WiMAX modem by MAC Address.
Unique ID – Select by ID. This is generated by the router and displayed when the device is connected to the router.
Condition: Select “is,” “is not,” “starts with,” “contains,” or “ends with” to create your condition’s statement.
Value: If the correct values are available, select from the dropdown list. You may need to manually input the value.
Invert WAN Binding: Advanced option that inverts the meaning of WAN Binding to only establish this tunnel when the specified WAN Binding device(s) are NOT connected.
Tunnel Enabled: Select to activate the tunnel.
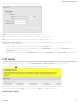
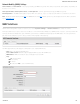
Add/Edit Tunnel – Routes
Adding routes allows you to configure what types of network traffic from the local host or hosts will be allowed through the tunnel.
Click Add Route to configure a new route. You will need to input the following information, defined by the remote network:
Network Address – This is the network address that is the destination of the route. This should be set to the network address at the remote side of the tunnel.
Netmask – This is the corresponding subnet mask of the network being defined (Default: 255.255.255.0).
You can set the tunnel to connect to a range of IP addresses or to a single IP address. For example, you could input 192.168.0.0 and 255.255.255.0 to connect your
tunnel to all the addresses of the remote network in the 192.168.0.x range. Alternatively, you could select a single address by inputting that address along with a Netmask of
255.255.255.255.
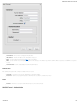
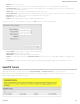
Add/Edit Tunnel – Keep Alive
GRE keep-alive packets can be enabled to be sent through the tunnel in order to monitor the status of the tunnel and more accurately determine if the tunnel is alive or not.
CradlePoint AER 2100 – Manual
07/03/2014
113