
Product Manual


INSTALLATION AND MAINTENANCE MANUAL FORM #PM-004 REV E 09/13
Page 5 of 5
For assembly drawings, parts lists, or specific repair instructions, refer to web site at www.coxreels.com or consult factory.
Coxreels, Inc., 5865 S. Ash Ave., Tempe, Arizona, USA, 85283 Tel: 1-800-269-7335
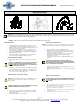
Fig 7.0 1125/1275 Series Fig 8.0 1175-1195 & 1600 Series
NOTE: 1125/1275 series are direct gear driven and 1175, 1185, 1195
& 1600 series are chain and sprocket driven.
• If gear driven reel, adjust motor into location and secure in position
with best gear alignment. Noise level is noticeably higher when gear
is not fully engaged.
NOTE: Improperly engaged gears will reduce gear life.
• If chain driven reel, adjust tension on chain to allow between ¼ to ½”
play in chain.
NOTE: Over-tensioning of chain will reduce motor life.
GEAR REPLACEMENT (1125/1275 Series Only)
• Remove motor as instructed above.
• Remove gear from shaft on motor by loosening set screws.
• Install new gear on to shaft. Install motor as described above.
SLIP RING BRUSH REPLACEMENT (1125WC SERIES)
• Remove cable completely from drum of reel.
• Remove access panel on drum by removing four screws.
• Remove brush retaining nut to access worn brushes.
• Replace with new copper brushes.
Reverse above procedure to re-assemble reel.
TROUBLE SHOOTING GUIDE
TROUBLE CAUSE REMEDY
HOSE/CABLE WILL NOT FULLY FIT
ON TO DRUM OF REEL
a) Hose/cable is longer than specified.
b) Outside diameter of hose is larger than
specification.
c) Hose/cable was not hand guided onto reel
and wound up evenly on drum.
a) Cut down hose/cable to meet reels specified capacity.
b) Replace hose with a hose that meets the specified
maximum outside diameter requirements.
c) Hand guide hose/cable on to drum as it is wound on to the
reel.
IT IS VERY DIFFICULT TO PULL
HOSE OFF REEL ON 115Vac REEL
Wiring for motor is reversed. Refer to wiring diagram and correct motor wiring.
NO ELECTRICAL CURRENT AT
OUTPUT END OF CABLE.
(1125WC SERIES ONLY)
a) Cable is severed.
b) Slip ring brushes are worn.
a) Replace cable.
b) Replace slip ring brushes.
Note: Ensure current does not exceed rated amperage.
DRUM OF REEL IS CRUSHED OR
DAMAGED.
Hose was not charged when initially installed
on to reel.
Replace damaged drum. Contact factory.
Install hose per instructions.
FLUID PATH (PLUMBING AND/OR
SWIVEL) IS LEAKING OR
DAMAGED.
a) Maximum pressure rating for reel has
been exceeded.
b) Application is not compatible with
plumbing and/or swivel seal materials.
a) Replace or repair damaged components. Consult factory.
Check maximum pressure rating of reel.
b) Contact factory to determine chemical compatibility or
environmental issues (i.e. temperature rating).
FLUID LEAKS FROM SWIVEL Swivel seals are damaged or worn.
Replace swivel seals. See "Swivel Seal Replacement".
Caution: Be sure leak is not at Hose Fitting!
SWIVEL ASSEMBLY IN NOT
MOVING FREELY OR LOCKING UP
a) Inlet hose fitting has been over-tightened
b) Inlet hose is not flexible causing side
force on swivel.
Remove and examine swivel assembly for damage. Replace
as necessary.
Properly tighten inlet hose. Hand tighten fitting, plus ½ turn
with wrench.