
Tus neeg siv phau ntawv


- 6 -
User Manual
REPLACING THE KNIFE ASSEMBLY
The blender knife assembly should be checked daily for worn, loose, or damaged
blades. If the cutter unit assembly is worn or damaged, it should be replaced
immediately to prevent injury or contamination of food product.
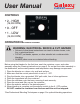
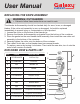
EXPLODED VIEW & PARTS LIST
1. Loosen the collar on the bottom of the blender jar.
2. Remove the blender knife assembly and gasket from the bottom of the container.
3. Place the gasket on the new blender knife assembly, then install the new cutter unit
assembly in the bottom of the container.
4. Securely tighten the collar onto the bottom of the container.
5. The rubber clutch disc on the blender base has reverse threads.
To replace, remove by turning it clockwise. Then install the new disc, turn it onto the
motor shaft counter-clockwise.
1
2
3
4
5
6
7
8
9
WARNING: CUT HAZARD
• Failure to follow these instructions can result in cuts.
A
C
B
PART ITEM # DESCRIPTION
1 177PGB440LPC Lid Pour Cap
2 177PGB440LC Lid Cover
3 N/A Blender Jar
4 177PGB440GSK Gasket
5 N/A Knife Assembly
6 177PGB440BC Actuator Clutch
7 177PGB440JCB Jar Container Base
8 N/A Blender Base
9 N/A Control Panel Switch
A 177PGB440LID Complete Lid Assembly
B 177GBB440JAR Complete Jar Assembly
C 177PGB440KNF Complete Knife Assembly