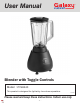
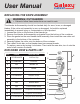
User Manual Blender with Toggle Controls Model: 177GB440 This product is designed for light-duty, low-volume operations. 12/2022 Please read and keep these instructions. Indoor use only.
User Manual IMPORTANT SAFETY INSTRUCTIONS When using electrical equipment, basic safety precautions should be followed to reduce the risk of burns, electrical shock, fire, or injury to persons. READ ALL OF THE INSTRUCTIONS BEFORE USING THIS EQUIPMENT. 1. CAUTION: Blades are sharp. Handle carefully. 9. 2. Never remove parts or clean the blender unless it is unplugged from the electrical outlet. 3. Do not immerse the blender in water or other liquid. Doing so can result in electrical shock. 4.
User Manual OPENING & INSTALLATION INSTRUCTIONS • Inspect blender for any damage such as cracks or dents in base and container. • Remove all plastic wrap and packaging material before use. • Do not install blender next to or above source of heat, such as an oven or radiator. This could cause the blender to operate improperly and could shorten life of electrical parts. • Install blender on a level countertop surface. • Plug into a grounded 120V outlet, free of other appliances and equipment.
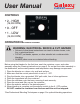
User Manual CONTROLS • 2 - HIGH (19,000 RPM) • 0 - OFF • 1 - LOW (16,000 RPM) OPERATION INSTRUCTIONS WARNING: ELECTRICAL SHOCK & CUT HAZARD • Failure to follow these instructions can result in broken bones, cuts, fire, or electrical shock. • DO NOT put hands, spoons, or other utensils into container while blending. • ALWAYS place cover on container before blending. Before using the blender for the first time, wash the container, cover, and cutter assembly using the Cleaning Instructions on page 3.
User Manual PROFESSIONAL BLENDING TECHNIQUES ALL PRODUCT TEMPERATURES • Use a sufficient amount of liquid to ensure that the mixture is fluid and free-running at all times. • Pour the liquid into the container FIRST. • Cut solid ingredients into pieces no larger than 1" cubes. • DO NOT blend maximum volume all at once. If making a large recipe, add the ingredients to container in batches. • DO NOT overfill the container with product. This may prevent the blender from processing the product properly.
User Manual REPLACING THE KNIFE ASSEMBLY WARNING: CUT HAZARD • Failure to follow these instructions can result in cuts. The blender knife assembly should be checked daily for worn, loose, or damaged blades. If the cutter unit assembly is worn or damaged, it should be replaced immediately to prevent injury or contamination of food product. 1. Loosen the collar on the bottom of the blender jar. 2. Remove the blender knife assembly and gasket from the bottom of the container. 3.