
User Guide Instruction Manual

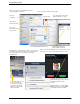
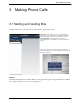

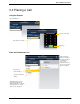
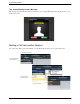
Table Of Contents
- 1 About Bria iPad Edition
- 2 Configuring
- 3 Making Phone Calls
- 3.1 Starting and Quitting Bria
- 3.2 Using the Bria Interface
- 3.3 Placing a Call
- 3.4 Handling Incoming Calls
- 3.5 Handling One Established Call
- 3.6 Recording Calls
- 3.7 Placing a Second Bria Call
- 3.8 Handling Two Established Calls
- 3.9 Unattended (Blind) Transfer
- 3.10 Attended Transfer
- 3.11 Conference Call
- 3.12 Handling Video Calls
- 3.13 Call History
- 3.14 Accessing Voicemail
- 4 Presence and Instant Messaging
- 5 Settings
- A Troubleshooting
- B Dial Plans
- C Glossary

Bria iPad Edition User Guide
11
3 Making Phone Calls
3.1 Starting and Quitting Bria
Start Bria. After a few seconds, the message “Phone Ready” appears. Bria is ready.
Quitting
Double-tap the Home button on the
iPad
. The list of active applications appears. Long-tap the Bria icon until the
red icon appears. Tap the red icon to close the application.
This message appears if you did not enable 3G and you do not
have a Wi-Fi connection. Use of 3G is optional; to turn it on go to
Settings > Preferences.
“No Service“ means that the device does not have Wi-Fi or
mobile data network, or that Bria is not allowed to use data for
SIP. Go to Settings > Preferences to allow Bria to use data.
“No Registration“ means that the SIP account is not
registered/enabled. Go to Settings > Accounts and enable the
account.