
User`s manual


Web Admin User’s Manual
9 Costar Video Systems, LLC
2. Quick Configuration
In Quick Configuration, you will be able to set up many of the essential
parts of the configuration in a simple manner without going into details.
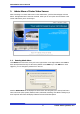
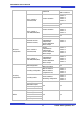
Selecting Quick Configuration gives you the menu as below. You can
perform each setup by clicking the one you would like to configure.
2.1. Step 1: Changing Server Name
Click Server Name on System Configuration menu, then Server Name Setup windows will be displayed.
See the section 3.1 Server Name Setup in page 11 to see how to change the server name.
2.2. Step 2: Time Setup
Click Date & Time on System Configuration menu, then Local Date & Time Configuration window will
be displayed. See the section 3.2 Date & Time in page 11 to see how to set up.
2.3. Step 3: Network Setup
To make a connection to the Internet, it is required to figure out the type of the Internet service
you’re using. See the section 4.1 Network Configuration in page 18 to see how to set up.
2.4. Step 4: IP-CCTV DNS
When Costar Video Server is used in a Dynamic IP environment, it is required to utilize IP-CCTV DNS
feature. See the section 4.7 IP-CCTV DNS Setup in page 24 to see how to set up.
2.5. Step 5: IP Devices Registration for FW-NVR series
You can add any of NVS (Network Video Server) and NCS (Network Camera Server) to NVR (Network
Video Recorder) devices as a remote server device. See the section 3.6 IP Devices Registration in
page 15 to see how to set up.
2.6. Step 6: Recording Configuration for FW-NVR series
Each camera can be configured for recording option in this section.
See the section 7.3 Recording Configuration for FW-5050/5071/5450/5850/5870 NVR
series in page 79 for detail.
2.7. Finish
You need to save all the changes to the Flash Memory after finishing the configuration. The changes
made to Costar Video Server will be permanent by this step. Click Finish on Quick Configuration
menu.
Click Save Configuration button. This will write the new settings to the system’s flash memory. If
you don’t want to save them, click Back button.