
User's Manual

10
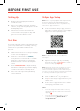
BEFORE FIRST USE
Setting Up
Test Run
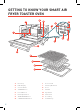
VeSync App Setup
1. Remove all packaging around and
inside the oven.
2. Place on a stable, level, heat-resistant
surface, away from anything that can be
damaged by heat.
3. Wash all accessories and clean the
oven’s interior (see page 27). Dry and
place accessories back in oven.
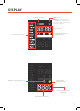
1. Make sure there is no food or packaging
in the oven and plug it in.
2. Turn the control knob to
“TOAST”
,
then press the control knob to confirm.
Turn the control knob to change the
Darkness Level to Level 7 (the highest
level).
3. Press START/PAUSE to begin heating.
The button will light up, and the display
will show the timer counting down.
4. The oven will stop heating and beep
when finished.
1. To download the VeSync app, scan the
QR code or search “VeSync” in the Apple
App Store
®
or Google Play Store.
Note: For Android
™
users, choose “Allow” to
use VeSync.
Note: You must create your own VeSync account
to use third-party services and products. These
will not work with a guest account. With a VeSync
account, you can also allow your family and friends
to control your smart air fryer toaster oven.
A test run will help you become familiar with
your oven, make sure it’s working correctly,
and clean it of possible residues in the
process.
Note: Due to ongoing updates and improvements,
the VeSync app may be slightly dierent than
shown in the manual. In case of any dierences,
follow the in-app instructions.
3. Turn on Bluetooth
®
on your phone.
4. Tap + in the VeSync app and select your
smart oven.
5. Follow the in-app instructions to finish
setting up your smart oven.
2. Open the VeSync app. If you already
have an account, tap Log In. To create a
new account, tap Sign Up.
Note:
• You can change the name and icon at any
time by going to the smart oven screen and
tapping .
• You can use the VeSync app to connect
your smart oven to Amazon Alexa or
Google Assistant
™
.