
Installation Guide
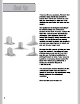
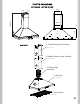
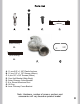

A. Find the Core Unit Bracket (D) that will hold
the back of the range hood. Mark the
locations on the wall with a pencil or marker.
B. Drill a 5/16" (8mm) hole at each marked
location.
C. Insert wall anchors into each hole, gently
tapping in place.
D.
Take the Core Unit Bracket ( Part D) that
will hold the range hood and firmly tighten with
3 wood screws (Part B) into the anchors.
Secure range hood by hanging on bracket.
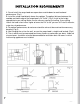
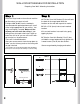
Place the range hood on the wall and mark the
position where you want to install.
A height of 24" to 36" from the cooktop is
recommended for optimal
performance. Install
at the height appropriate for your ceiling.
You
may install higher if needed. Make sure the
chimney can still reach the ceiling. If your
ceiling leaves the hood a few inches higher or
lower than 24" to 36" you can still install it with-
out a major loss of performance.
There are 3 included brackets.
Start your measurements from the top down to
make sure the chimney reaches the ceiling with
no gap if desired.
* If you intend to run your ducting through the back wall behind
the hood, it is not necessary for the chimney to touch the ceiling.
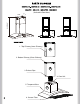
WALL MOUNT RANGE HOOD INSTALLATION
Preparing Your Wall / Mounting Instructions
Wood Screw
Mounting Bracket
WALL
(Outer Chimney)
7"
13.6"
(Inner Chimney)
Core Body
9
D
H
E