
Installation Guide


z ,IWKHVXSSO\FRUGLVGDPDJHGLWPXVWEHUHSODFHG
E\ WKH PDQXIDFWXUHU LWV VHUYLFH DJHQW RU VLPLODUO\
TXDOLILHGSHUVRQVLQRUGHUWRDYRLGDKD]DUG
z 'RQRWXVHKDUVKDEUDVLYHFOHDQHUVRUVKDUSPHWDO
VFUDSHUV WR FOHDQ WKH RYHQ GRRU JODVV VLQFH WKH\
FDQ VFUDWFK WKH VXUIDFH ZKLFK PD\ UHVXOW LQ
VKDWWHULQJRIWKHJODVV
z $VWHDPFOHDQHULVQRWWREHXVHG
z 7KHDSSOLDQFHVDUHQRWLQWHQGHGWREHRSHUDWHGE\
PHDQV RI DQ H[WHUQDO WLPHU RU VHSDUDWH UHPRWH
FRQWUROV\VWHP
z 7KH LQVWUXFWLRQV IRU RYHQV WKDW KDYH VKHOYHV VKDOO
LQFOXGHGHWDLOVLQGLFDWLQJWKHFRUUHFWLQVWDOODWLRQVRI
WKHVKHOYHV
4
VXSHUYLVLRQ RU LQVWUXFWLRQ FRQFHUQLQJ XVH RI WKH
DSSOLDQFH LQ D VDIH ZD\ DQG XQGHUVWDQG WKH
KD]DUGV LQYROYHG &KLOGUHQ VKDOO QRW SOD\ ZLWK WKH
DSSOLDQFH&OHDQLQJDQGXVHUPDLQWHQDQFHVKDOOQRW
EHPDGHE\FKLOGUHQZLWKRXWVXSHUYLVLRQ
z 'XULQJXVHWKH DSSOLDQFHEHFRPHV YHU\ KRW&DUH
VKRXOGEHWDNHQWRDYRLGWRXFKLQJKHDWLQJHOHPHQWV
LQVLGHWKHRYHQ
z 'RQRWDOORZFKLOGUHQWRJRQHDUWKHRYHQZKHQLWLV
RSHUDWLQJHVSHFLDOO\ZKHQWKHJULOOLVRQ
z (QVXUH WKDW WKH DSSOLDQFH LV VZLWFKHG RII EHIRUH
UHSODFLQJ WKH RYHQ ODPS WR DYRLG WKH SRVVLELOLW\ RI
HOHFWULFVKRFN
z 7KHPHDQVIRUGLVFRQQHFWLRQPXVWEHLQFRUSRUDWHG
LQ WKH IL[HG ZLULQJ LQ DFFRUGDQFH ZLWK WKH ZLULQJ
VSHFLILFDWLRQV
z &KLOGUHQ VKRXOG EH VXSHUYLVHG WR HQVXUH WKDW WKH\
GRQRWSOD\ZLWKWKHDSSOLDQFH
z 7KLV DSSOLDQFH LV QRW LQWHQGHG IRU XVH E\ SHUVRQV
LQFOXGLQJ FKLOGUHQ ZLWK UHGXFHG SK\VLFDO VHQVRU\
RU PHQWDO FDSDELOLWLHV RU ODFN RI H[SHULHQFH DQG
NQRZOHGJH XQOHVV WKH\ KDYH EHHQ JLYHQ
VXSHUYLVLRQ RU LQVWUXFWLRQ FRQFHUQLQJ XVH RI WKH
DSSOLDQFHE\SHUVRQUHVSRQVLEOHIRUWKHLUVDIHW\
z $FFHVVLEOH SDUWV PD\ EHFRPH KRW GXULQJ XVH
<RXQJFKLOGUHQVKRXOGEHNHSWDZD\
z $Q DOOSROH GLVFRQQHFWLRQ PHDQV PXVW EH
LQFRUSRUDWHG LQ WKH IL[HG ZLULQJ LQ DFFRUGDQFH ZLWK
WKHZLULQJUXOHV
3
INSTALLATION
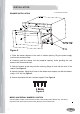
DRAWER INSTALLATION
1. Place the drawer adjacent to the wall or cabinet opening. Plug the power supply
cord into the electrical outlet.
2. Carefully guide the drawer into the prepared opening. Avoid pinching the cord
between the oven and the wall.
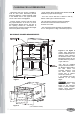
3. Slide the drawer all the way until the mounting flange is flush with the face of the
cabinet. See Figure 5.
4. Open the drawer. Using the 4 holes on the drawer as a templat, pre-drill the cabinet
using a 1/16" bit. See Figure 5.
5. Secure the drawer with the 4 screws supplied. See Figure 6.
The name plate includes model and serial number. Open the Microwave Drawer fully. The label is
beyond the back wall of the microwave cavity facing up from the flat surface.
44 SSc
c
rreewwss
Figure 6
Screws
Mounting flange
Figure 5
7
MODEL AND SERIAL NUMBER LOCATION
(COS-12MWDSS SHOWN)