SIMPLE SMART FUN Rear Facing: 5-40 lb and 19-40 in. (2.3-18 kg and 48-101.6 cm) Forward Facing: 22-40 lb and 29-43 in. and at least 1 year old (10.1-18 kg and 73.6-110 cm) KEEP INSTRUCTIONS FOR FUTURE USE. Read all instructions before using this child restraint. To see installation videos, scan the QR Code or visit www.coscokids.com. i ©2016 Dorel Juvenile. All Rights Reserved.
Choosing Rear or Forward Facing Your child’s height, weight, and age determine how your child restraint should be placed in the vehicle. Children up to 1 year of age must ride rear facing. The American Academy of Pediatrics recommends that children should remain rear facing until they are at least 2 years old. Please talk to your doctor about which is the best option for your child. In this child restraint, your child can remain rear facing up to 40 lb (18 kg) and up to 40 in. (101.6 cm).
Table of Contents Getting Started ................ 1 Safety Information ........... 25 Parts of the Child Restraint .............. 1 Prepare Child Restraint to Fit Your Child .............................................. 3 How Does Your Child Fit? ................ 4 Changing Position of Buckle ............ 6 Changing Position of Shoulder Harness Strap .............................................. 8 Harness System Adjustments for Smaller Infants ............................................
Parts of the Child Restraint Front View Side View E B C D F G H A. B. C. D. E. 1 Shoulder Harness Slots Harness Strap Chest Clip Buckle Cup Holder Attachment (under pad) Back View P I A Q R M E J F. Hip Harness Slots G. Harness Release Lever (under flap) H. Harness Adjustment Strap I. Cup Holder (see page 24) J. Lower Anchor Belt (see page 28) K L K. Lower Anchor Belt Attachment for Storage (under side of shell) L. Rear-Facing Belt Path M. Forward-Facing Belt Path N.
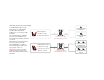
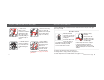
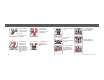
Prepare Child Restraint to Fit Your Child 1. Fully Loosen Harness Strap Push down on harness release lever (under flap on front of seat pad) while pulling out on harness strap as shown. 2. Unbuckle Harness Press in towards the top of the red button. Pull buckle tongues out. 3 How Does Your Child Fit? 3. Release Chest Clip Press on chest clip release button and pull apart. Place harness strap out of the way.
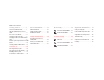
Changing Position of Buckle FORWARD FACING Buckle Position Start in the 1st slot and adjust outward as your child grows. Buckle should be used in the slot closest to your child. The buckle should not be underneath or behind your child. 1 2 3 Any slot can be used. Harness Strap Position Always choose the shoulder harness slot closest to your child’s shoulder height. Harness strap MUST be at or slightly above shoulders.
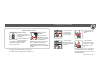
Changing Position of Shoulder Harness Strap 5. Pull Metal Retainer Completely Through Pad and Shell 6. Check Buckle Pull up on buckle to make sure it is secured. The buckle MUST not pull out. 7 WARNING: Failure to place buckle’s metal retainer completely through pad and shell can result in serious injury or death. 1. Fully Loosen Harness Strap Push down on harness release lever (under flap on front of seat pad) while pulling out on harness strap as shown. 3.
Harness System Adjustments for Smaller Infants 4. Rethread Harness Strap into Correct Shoulder Harness Slots For Your Child See pages 4-5 for fit guidelines. WARNINGS: Make sure the harness height is correct for your child’s size. Do not use this child restraint rear facing unless the top of your child’s head is at least 1 in. (2.5 cm) below 5. Attach Harness the top of the child Strap Loops to restraint.
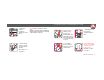
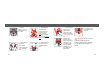
Choosing Rear or Forward Facing 5. Check Buckle Pull up on buckle to make sure it is secured. The buckle MUST not pull out. 6. Fully Loosen Harness Strap Push down on harness release lever (under flap on front of seat pad) while pulling out on harness strap as shown. 11 7. From Back, Remove Harness Strap Loops From Splitter Plate 8. Pull Harness Straps Out of Shoulder Harness Slots 12. Weave Harness Strap In and Out of Shell as Shown 9. Unthread Chest Clip 10.
Choosing Rear or Forward Facing 13. Thread Harness Strap Up Through Slot in Seat Pad 14. Make Harness Strap Even Sewn ends of harness strap loops MUST face each other. 13 15. Thread Buckle and Chest Clip Harness strap end goes through the back of buckle tongues and through the chest clip front to back as shown. 16. Thread Harness Strap Into Lowest Shoulder Harness Slots sewn end 17. Attach Harness Strap Loops to Splitter Plate Sewn ends of the harness strap loops MUST face towards you.
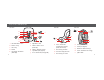
Securing Child in Child Restraint 1. Place Child in Child Restraint The child’s bottom and back should be flat against the child restraint. Position harness strap over child’s shoulders and upper thighs. 15 2. Buckle Harness Push buckle tongues into buckle until you hear a “click.” Pull up on harness strap to make sure buckle is locked. 3. Close Chest Clip Insert right half of chest clip into left half and snap together. 4. Tighten Harness Pull on harness adjustment strap to tighten harness snugly. 5.
Removing Harness System WARNINGS: Failure to fasten and tighten the harness system correctly may allow the child to be ejected from the child restraint in a crash or sudden stop causing serious injury or death. Do not mistake comfort for safety. Harness system must be snugly adjusted. To Remove Child From Child Restraint 1. Loosen Harness Strap 2. Unbuckle Harness 17 DO NOT put snowsuits or bulky garments on your child when placing them in the child restraint.
Removing Seat Pad for Cleaning 5. Unthread Buckle Do not unbuckle the buckle. 6. Pull Harness Strap Out of Seat 7. Turn Seat Over Locate buckle’s metal retainer on bottom of shell. 19 8. Rotate Metal Retainer and Push It Up Through Shell and Pad 9. From Top of Seat, Pull Buckle Out of Shell You must remove the harness system to remove the pad from the shell. See pages 18-19. Cleaning Pad Remove Pad Machine wash separately with cold water on a gentle cycle. Do not use bleach.
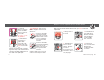
Installing Harness System If you will be using the lowest shoulder harness slots, see pages 10-14. Otherwise, continue on to step 1. 1. Insert Buckle’s Metal Retainer into Slot Closest to Child 1 2 Buckle MUST face out. 3 You MUST use the 1st or 2nd buckle slots when child restraint is used rear facing. Any slot can be used when forward facing. 21 2. Pull Metal Retainer Completely Through Pad and Shell 3. Check Buckle Pull up on buckle to make sure it is secured. The buckle MUST not pull out. 4.
Accessories on Select Models 8. Thread Harness Strap Into Correct Shoulder Harness Slots For Your Child See pages 4-5 for fit guidelines. 9. Attach Harness Strap Loops to Splitter Plate Sewn ends of the harness strap loops MUST face towards you. 23 sewn end DO NOT twist harness strap or harness adjustment strap. Make sure the harness strap loops are fitted COMPLETELY ON both sides of the splitter plate.
Vehicle Seating Position Child Restraint Use Never take your child out of the child restraint while the vehicle is moving. Never leave child unattended. Placing your child in a hot child restraint may result in burns. Do not use a child restraint with damaged or missing parts. Do not use cut, frayed or damaged harnesses. Do not substitute parts or try to modify the child restraint in any way. Do not lubricate buckles and fasteners.
Choosing Lower Anchor or Vehicle Belts If you are not sure where to place the child restraint in your vehicle, consult your vehicle owner’s manual, contact Dorel Juvenile Group Care Department (see page 57), or visit your local Child Passenger Inspection Station. Go to http://www.safercar.gov/cpsApp/cps/ index.htm to find your closest station. Children are safer when properly restrained in rear seating positions than in the front seating positions.
Adjuster Lower Anchor Hooks When installing this child restraint with vehicle belts, the lower anchor hooks and belt MUST be properly stored. Storing Lower Anchor Belt: When used rear facing, thread lower anchor belt through forward-facing belt path as shown. Then attach hooks to attachments near rear-facing belt path as shown. Gently pull free end of belt to remove slack. When used forward facing, thread lower anchor belt through rear-facing belt path.
Knowing Your Vehicle Belts Not all vehicle belts and seating positions will work with child restraints. Please follow the following steps to understand how to lock a child restraint with a vehicle belt. 31 1. You MUST Review 2. Determine How Your Vehicle Owner’s the Child Restraint Manual Will Be Locked Into Place Your vehicle owner’s manual will let you The vehicle belt MUST know what vehicle NOT loosen after belts and seating positions child restraints tightening. can be installed in.
Automatic Locking Retractor This retractor always locks. It will automatically lock after slowly pulling the seat belt out at least halfway and letting the belt go back into the retractor an inch or two. Emergency Locking See Step 4 “Check the Retractor Latch Plates” If the retractor does not lock, it is most likely an Emergency Locking Retractor. These retractors only lock during a sudden stop or collision. 33 You will need to determine if your seat belt’s latch plate can lock the belt.
Aircraft Important Information Symbols This restraint is certified for aircraft use. Install the child restraint in a window seat to avoid blocking the aisle. If the aircraft lap belt is too short, ask the flight attendant for a belt extender. Use only on forward facing aircraft seats. Contact the airline for their specific policies. Rear Facing Aircraft Installation For rear facing installation follow pages 42-45.
Lower Anchor Belt Installation WARNINGS: Do not use the lower anchor belt along with the vehicle lap or lap/shoulder belt. Check lower anchor belt before each use. Use only if the belt can be tightened properly and securely. Do not fasten multiple lower anchor hooks on the same lower anchor bar in the vehicle. Secure the tether hook when used rear facing. Attach the tether hook to storage attachment as shown and gently tighten to remove slack.
7. Attach Lower Anchor Hooks to Vehicle’s Lower Anchors Review your vehicle owner’s manual for lower anchor locations and lower anchor belt use. 39 8. Tighten Belt Place hand in child restraint. Firmly push child restraint down and back towards the vehicle seat back while pulling free end of belt to tighten. It may be easier to pull pad away from shell and tighten the belt through the belt path opening as shown. 9. Check Belt Tightness Hold child restraint at the belt path with your weakest hand. 10.
Choosing Vehicle Belt Rear Installation or Forward Facing 11. Recheck Level Line Repeat steps 6-11 if level line is not parallel with the ground. NOTE: You may need to place a large rolled towel(s) or foam pool noodle(s) under front of child restraint to help make level line parallel with the ground. Check often to be sure padding is still in place and the belt is tight. 41 To Release Lower Anchor Belt Remove child from child restraint.
1. Place Child Restraint Rear Facing in Back Seat 43 2. Check Level Line For children who cannot sit up unassisted, the level line on shell MUST be parallel with the ground. For children who can sit up unassisted, you may rotate the child restraint to be more upright. 3. Check if Your Vehicle Belts Will Work With This Child Restraint This is very important because not all vehicle belts will work with child restraints.
ForwardImportant Facing Installation Symbols If it moves more than 1 in. (2.5 cm), you can try: A. Pulling the belt tighter. B. Reinstalling the child restraint. C. Changing to a different seating location. D. Switching to the lower anchor belt installation if lower anchors are available in your vehicle. 9. Secure Child in Child Restraint See pages 15-17. 45 10. Recheck Level Line Repeat steps 2-5 if level line is not parallel with the ground.
Tether Use 47 Adjusting Tether Strap You MUST always attach, Pull free end to adjust, and secure the top To tighten: After the child tighten anchorage (tether) strap when installing restraint is locked into the child restraint forward facing with place with lower anchor internal harness. Tethers improve belt or vehicle belt, push the installation and stability of child Lift up to down on child restraint restraints and reduce the risk of injury.
Important Symbols 49 3. Finished Lower Anchor Belt Routing 5. Loosely Attach Tether Hook Check vehicle owner’s manual for specific location. 7. Tighten Belt Place hand in child restraint. Firmly push down while pulling free end of belt to tighten. 4. Place Child Restraint Forward Facing Flush Against Vehicle Seat Back 6. Attach Lower Anchor Hooks to Vehicle’s Lower Anchors Review your vehicle owner’s manual for lower anchor locations and lower anchor belt use.
Vehicle Belt Installation 9. Check Belt Tightness Hold child restraint at the belt path with your weakest hand. Push and pull from side to side. It should not move more than 1 in. (2.5 cm). If it moves more than 1 in. (2.5 cm), you can try: A. Reinstalling the child restraint. B. Putting your knee in the seat and pulling the belt tighter. C. Changing to a different seating location. D. Switching to vehicle belt installation. 51 To Release Lower Anchor Belt Remove child from child restraint.
3. Check if Your Vehicle Belts Will Work With This Child Restraint This is very important because not all vehicle belts will work with child restraints. Review pages 31-34 and your vehicle owner’s manual to determine what kind of vehicle belt you have and how to lock a child restraint in place. 4. Route Vehicle Lap or Lap/Shoulder Belt Through Forward-Facing Belt Path 5. Buckle Vehicle Belt Do not twist belt. 53 6.
Using a Locking Clip You will rarely need to use a locking clip except in some older vehicles. Built-in child restraint locking systems have been required in vehicles since 1996 and many vehicles had these features even earlier. Review pages 3134 and your vehicle owner’s manual to determine if your vehicle belts require a locking clip. If you need a locking clip immediately, they are likely available at an auto dealership, an auto store, or where you purchased this child restraint.
Dorel Juvenile Group Information Registration and Safety Notices Thank you for choosing this child restraint. The DJG family is committed to creating child restraints with the most comfort and convenience available today. Remember, parents are a child’s first teachers and examples. If you always buckle your seat belt, your child will think it is the natural thing to do. Make it a firm rule that the vehicle does not go until everyone is buckled up. Make no exceptions.
Troubleshooting Replacement Parts Order Form 1. Locate a Child Safety Seat Inspection Station for hands on training on how to use your child restraint: Visit your local Child Passenger Inspection Station or go to http://www.safercar.gov/ cpsApp/cps/index.htm to find your closest station. 2. If the child restraint buckle or harness release lever sticks or you cannot get the straps tight enough around child: DO NOT LUBRICATE.
Up to $25.00 .............$5.95 $25.01 to $50.00 ......$6.95 $50.01 to $75.00 ......$8.95 $75.01 to $100.00 ....$9.95 61 $100.01 to $150.00 ..$10.95 $150.01 to $200.00 ..$11.95 $200.01 and up ........$13.95 Outside Continental USA $10.00 Sales Tax ...........$_______ (Arizona, California, Georgia, Indiana, Missouri, South Carolina, and Texas residents add applicable sales tax.) Grand Total ........$_______ No shipping and handling on instructions for quantities under 6. Add $.