
Manual


page 10
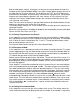
1999 then it is displayed in 2 parts, first part is the thousands signified by the x10
3
legend
in the upper right corner of the display and the second part is the units. For example
serial number 12345 will be shown as:
3
x10
Pressing the ‘Mode’ button changes the unit to the Viewing Dewpoint Mode.
5.3 Set-up State
To enter the Setup State power-up the unit while depressing the Mode key.
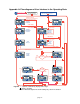
Refer to Appendix B for a flow diagram of the Set-up State.
The set-up state provides the following nine capabilities:
1. Testing the optional analog output: By pushing the up, down or pressure correct
buttons, the user forces the analog output to its low, high and mid values, respec-
tively. This facilitates the hook-up and testing of the remote terminal.
2. Display of alternate units: In this mode, a second unit can be chosen to be dis-
played alternating with the unit selected in the operating state, for example, a dew-
point can be displayed alternating with the sample temperature, or dewpoint can
be alternated in two different units.
3. Selecting the sensor type: In this mode the user can select the software matching
the type of sensor installed in the instrument; XTR-100 (-100°C to +20°C); XTR-
65 (-65°C to +20°C).
4. Adjusting low end sensor attenuation and/or dewpoint: These modes are used to
enter a data pair representing a low dewpoint and the sensor attenuation mea-
sured at this low dewpoint.
3) and 4) are set at the factory and need only be modified when a sensor is changed.
5. Manual calibration: (Not yet available) In this mode, the user can enter multi-point
calibration data to improve the instruments accuracy.
6. Output range setting: These modes are used to set dewpoints corresponding to
the low and/or high end of the current loop output.
7. Lock/Unlock the instrument: This mode is used to block access to parameter set-
tings, protecting the instrument from unauthorized or inadvertent changes of
parameters. Attempting to change settings while instrument is locked will display
and beep
To unlock instrument press the arrow up key, to lock the instrument press the
arrow down key.
Note: It is imperative that one returns the instrument to the lock mode to
avoid unauthorized changes.