
Programming instructions


ROBOTC
VEXnet Upgrade Installation • 11
©
Carnegie Mellon Robotics Academy / For use with VEX
®
Robotics Systems
Setup
VEXnet Upgrade Installation Instructions (cont.)
Part IV. Linking the Microcontroller and Transmitter VEXnet Upgrades
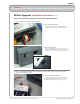
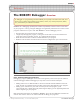
1. Begin turning on both of the VEXnet Upgrades.
1a. TurnontheMicrocontroller
Slide the POWER switch on the Microcontroller to the
ON position to power it and the VEXnet Upgrade.
1b. TurnontheTransmitter
Slide both POWER switches on the Transmitter (front
and back) to the ON position. (If your Transmitter was
already on from Part III, turn it OFF and then back ON.)
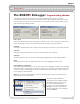
2. Wait for the ROBOT and VEXnet status lights to turn green. When they turn green, the VEXnet
Upgrades are nished linking.
2.AllowtheVEXnetUpgradestoLink
The VEXnet status light will blink yellow while the link is
being established. When the linking is complete, both
the ROBOT and VEXnet status lights will be green.